Saturday, October 08, 2016

ANTIPASTO PASTA OR KALE SALAD


Long story short: Here is a bunch of stuff I didn’t think I liked (Raw chickpeas! Pepperoncini! Artichokes!) in a big bowl with a lot of tasty salty briny things, all swimming in an amazing garlicky oregano dressing. I love it.

Long story slightly longer: My friend S brought a delicious pasta salad to one of our picnics earlier this summer, explaining that she’d adapted it from the Smitten Kitchen version of Nancy Silverton’s chopped salad from Mozza. Despite the presence of the aforementioned stuff I didn’t think I liked, I adored it and immediately wanted to re-create it for myself (and A, who was out of town and had thus missed out). I did, and we both loved it.

I have a surfeit of pasta recipes, though, plus I’m trying not to eat pasta every single week, so I also wanted to try this in straight-up salad form, but the traditional iceberg lettuce format of the original didn’t appeal to me. Considering this concoction is chock-full of items cured, pickled, and preserved, I thought it could use a little more veggie oomph, and kale seemed a natural fit. It plays well with Italian ingredients, its sturdiness stands up to the heavy dressing, and it has enough flavor of its own to avoid getting lost in the shuffle. I was right; this made an excellent salad—a truth that was tested when A had to fly to Indiana unexpectedly on the day I’d planned to make it, leaving me with all six servings to eat on my own. Sure, I was a bit weary of antipasto salad by the end of the week, but none went uneaten. It was really that good.

A few notes: The Smitten Kitchen recipe called for way, way too much salt considering all the processed ingredients bringing serious sodium of their own. I halved it and it was plenty. I also halved the salami and cheese quantities and still thought there was plenty of each. I’m not a huge provolone fan and had trouble finding any (except presliced sandwich cheese) at Trader Joe’s, so I used Pecorino Romano. For the pasta salad I cut it into matchsticks, but that made it too assertive, so I simply shredded it for the kale version and it was perfect. S had added a few pickled cherry peppers to her salad for a bit of heat, and I followed her lead. She also used artichokes, so I bought some for the very first time and dutifully added them in. I guess they bring another vegetable to the mix, but honestly, artichokes do absolutely nothing for me. They hardly taste like anything. I’ve tried them multiple times in many formats and still don’t understand why people seem to be so gaga for them. I’ll finish the jar, but I’m not sure I’ll bother buying any more in the future. Adding arugula to the pasta version of the salad was also S’s idea, and it brings a nice, fresh, green element to what—let’s face it—is not exactly the healthiest salad on the spectrum. It is, however, a substantial, satisfying, protein-rich, all-seasons crowd-pleasing main dish I’ll be making again and again, in both forms.

4 cloves garlic
1 generous tablespoon dried oregano
1 teaspoon kosher salt
Freshly ground black pepper to taste
2 tablespoons lemon juice
¼ cup red wine vinegar
¼ cup extra-virgin olive oil
1 (15-ounce) can chickpeas, drained and rinsed
1 small red onion, peeled and sliced into paper-thin rings
4 ounces Pecorino Romano cheese, coarsely shredded
4-6 ounces sliced salami, cut into ¼-inch ribbons
4 medium or 8 small pickled pepperoncini, sliced into rings
2-4 pickled cherry peppers, diced (optional)
4-6 jarred artichoke hearts, diced (optional)
1 pint cherry tomatoes, halved or quartered
For the pasta salad:
12 ounces rotini, cooked, drained and rinsed in cold water
6 generous handfuls arugula
For the kale salad:
1 very large or 2 small bunches Tuscan kale, ribs removed, leaves thinly sliced
  1. To make the dressing, roughly chop the garlic and then add the oregano, salt and up to ½ teaspoon ground pepper. Chop the mixture together and use the side of a knife or a mortar and pestle to make a grainy herb paste. Transfer the paste to a small bowl, then add the lemon juice and vinegar. Mix with a fork, allowing the salt to dissolve, then add the oil and whisk until well combined. The dressing should be thick with garlic and oregano.
  2. For the pasta salad: Combine the cooled pasta, chickpeas, red onion, cheese, salami, pepperoncini, cherry peppers and artichokes (if using), and cherry tomatoes in a large bowl. Add about half the dressing, toss well, and then add remaining dressing to taste (I used all of it). Adjust seasonings to taste. Fold in the arugula immediately before serving.
  3. For the kale salad: Combine the shredded kale with about half the dressing in a large bowl. Toss with your hands, massaging the kale until it becomes tender. Let sit for at least 15 minutes while you prepare the other ingredients. Add the chickpeas, red onion, cheese, salami, pepperoncini, cherry peppers and artichokes (if using), and cherry tomatoes to the bowl. Toss well and add remaining dressing to taste (I didn’t quite use all of it). Adjust seasonings to taste.
Serves: 6-8
Time: 30-40 minutes
Leftover potential: Great. For the pasta salad, store the arugula separately and add one generous handful to each serving directly before you eat it.

Wednesday, September 07, 2016

PESTO CHICKEN SALAD SANDWICHES


This is going to be one of those posts where I marvel at suddenly liking something I used to abhor. Beans, corn tortillas, fish, mayonnaise, cauliflower, runny eggs, cabbage, potato salad—the list goes on. I would wonder who I even am anymore, except that I still consistently detest beets and olives. In fact, with every new food obstacle conquered, I feel even safer in declaring my hatred of beet and olives a fundamental and unshakeable aspect of my being. As a reformed picky eater, I have diminishing patience for picky eating in others, yet I believe it’s legit to allow everyone two or three really vehement food dislikes, especially if they’ve given those items a good fair shake and still can’t get on board.

All this is to say that I was always repulsed by chicken salad (which was of course a side effect of my feelings about mayonnaise), and then I saw a photo of these sandwiches from Damn Delicious on some random food site roundup and craved them desperately. This is one of those things that’s so simple and sensible it’s barely a recipe you need to write down—essentially just a caprese sandwich, bulked out with chicken that’s perked up with pesto and made creamy with a bit of yogurt. But it never occurred to me before, so maybe it’ll be news to you too. Although it’s nothing fancy, it’s easy, fresh, and satisfying summer fare. What’s more, I suddenly find myself bookmarking all sorts of chicken salad recipes right and left. Maybe it’s the maturing effects of time teaching me to broaden my horizons, or perhaps it’s just the endless SoCal summers making cold, creamy, and crunchy seem like the best way to eat everything.

1 cup packed fresh basil leaves
3 cloves garlic, peeled
3 tablespoons pine nuts, toasted if desired (I used sliced almonds)
1/3 cup grated Parmesan
Kosher salt and freshly ground black pepper, to taste
1/3 cup olive oil
2 cups cooked shredded or diced chicken breast (I recommend poached chicken)
¼ cup Greek yogurt
1 baguette, halved lengthwise and cut into 4 equal pieces (I used 4 split Italian-style sandwich rolls and thought the slightly softer texture worked well), toasted (I brushed the flat surface with a bit of olive oil and ran them under the broiler until golden brown)
2 cups arugula
2 medium tomatoes, thinly sliced
8 ounces fresh mozzarella, sliced
  1. To make the pesto, combine basil, garlic, pine nuts, and Parmesan in the bowl of a food processor; season with salt and pepper to taste. With the motor running, add olive oil in a slow stream until emulsified.
  2. In a large bowl, combine chicken, ½ cup pesto, Greek yogurt, and salt and pepper to taste.
  3. Serve chicken pesto mixture on baguette/rolls with arugula, tomatoes, and mozzarella.
Serves: 4
Time: 25 minutes
Leftover potential: Good; chicken salad mixture will keep for several days in the fridge. Store all the other sandwich components separately and assemble them just before serving.

Wednesday, August 24, 2016

GREEK CHICKEN FARRO SALAD


I’ve talked about this before, but one thing I’m still wrestling with—even after 12 years in the food blog game—is the feeling that I need to have a perfectly curated recipe collection with just one ideal example of each type of recipe. (Being an editor, essentially a professional content curator, doesn’t help. It’s a difficult reflex to turn off at the end of the day.) When I see a recipe that looks enticing but has notable similarities to a recipe I already have, I have to resist the urge to click on by. I remind myself that there are only so many ingredients in the world, so there’s bound to be overlap from time to time, trying new recipes is fun and low-stakes, and who cares if my recipe collection is sprawling and inconsistent? Plus, every now and then you find a better roasted chicken or a kickass cauliflower soup that supplants the old one.

Thus, when I saw this pasta salad recipe at Budget Bytes, my first impulse was to pass it over, even though it looked delicious. After all, I already have a favorite pasta salad recipe, and this one was basically Mediterranean pepper salad meets chicken gyros meets tabbouleh anyway. I’m covered! But I still wanted it, so I threw caution to the wind and made it—using farro instead, because I’m trying not to eat pasta every week. And you know what? Despite having very similar ingredients and flavor profile to dishes I’ve already tried, this one is its own thing—and that thing is a fresh, colorful, crunchy, savory, lemon-bright, utterly satisfying main-dish salad, aka everything I want in a summer meal. Even A, not a farro fan, pronounced it “not bad,” which translates into high praise. So lesson learned, I guess? Life is messy and repetitive, but sometimes it brings us good salad.

Marinade/dressing:
1 lemon
¼ cup olive oil
3 cloves garlic, divided
1½ teaspoons dried oregano
½ teaspoon salt
Freshly ground black pepper to taste
Salad:
1 pound boneless, skinless chicken thighs
1 cup farro
1 large red or yellow bell pepper, diced
1 pint cherry tomatoes, halved
2 medium Persian cucumbers, diced
½ cup chopped fresh parsley
2-4 ounces feta
  1. Remove the zest from the lemon and set it aside. Squeeze the juice from the lemon into a separate bowl. You’ll need at least ¼ cup juice.
  2. Prepare the dressing/marinade by mincing two of the three cloves of garlic and combining them in a small bowl with ¼ cup lemon juice, olive oil, oregano, salt, pepper, and a pinch of the lemon zest. Whisk these ingredients until well combined.
  3. Place the chicken thighs in a ziplock bag and add half of the dressing, saving the rest to add to the salad later. Mince one more clove of garlic and add it to the chicken and marinade. Squeeze the air out and massage the bag to make sure the thighs are well coated in the marinade. Refrigerate the chicken for at least 30 minutes, up to 24 hours.
  4. While the chicken is marinating, cook the farro according to the package directions, drain in a colander, and let cool to room temperature.
  5. Heat a skillet over medium heat. Remove the chicken thighs from the marinade, add them to the pan, and cook on each side until they are well browned and cooked through (about 5 minutes per side). Remove the cooked chicken from the skillet and let it rest for about 5 minutes. Once it’s slightly cooled, chop the chicken into bite-sized pieces.
  6. Finally, build the salad. Add the cooked and cooled farro to a large bowl. Top with the bell pepper, tomatoes, cucumber, parsley, and chopped chicken. Crumble the feta over the top and add a pinch or two of the lemon zest. Pour the remaining dressing over the salad and toss to coat. Serve immediately or refrigerate until ready to eat.
Serves: 4-6
Time: 1 hour, plus 30 minutes to 24 hours marinating time
Leftover potential: Great.

Thursday, August 04, 2016

RYE CRUMBLE BARS WITH JAM


I’m currently having a torrid love affair with rye. This is not a sponsored post, but an awesome artisan flour mill opened in my neighborhood a few years ago, and my friend S gifted me some of their products last Christmas, including a bag of whole rye flour. I immediately started Googling recipes, and it turns out I adore the nutty, malty flavor that rye adds to baked goods. So far I’ve made bread, brownies, and chocolate chip cookies (those last two really deserve posts of their own, but were fortunately/unfortunately devoured before I could snap photos, so gosh darn it, I’ll have to make them again), but the real winner has been these bars from Kim Boyce’s much buzzed-about cookbook Good to the Grain, found via Orangette. I always have jars of old jam under my bed that need using up, so the fact that it uses a whole cup and a half of the stuff is a definite bonus.

Let’s face it: This recipe looks incredibly fussy, especially compared to the much simpler jam bars already in my repertoire. The bottom crust and the top crust are made separately with slightly different ingredients, you have to melt and cool butter twice, the bottom crust needs to be frozen for 30 minutes, and the baking time is astonishingly long—nearly two hours. It’s not something you throw together on the spur of the moment. But I made it on a Friday night, and I was surprised by how non-annoying it actually was. The bottom and top crusts share similar ingredients and are a cinch to mix up; you can make the top one while the bottom one freezes. (Or, as Orangette notes, you can even make this in stages over the course of a few days.) After that it’s mostly hands-off, and you can wander away and watch TV or do yoga or something while it bakes. Most importantly, the result is terrific. They definitely put the “crumble” in crumble bars, and I felt that they benefited from some time in the fridge or freezer to keep them from being a sticky disintegrating mess, but the flavor is so, so good, with the toasty, buttery, salty shortbread balancing out the sweet tartness of the jam. I used berry jams the first time, and am planning a second go-round to use up last year’s cranberry preserves. At the rate I’m going, I’ll need to restock on rye flour before I even get to the rest of the recipes I want to try (shortbread, crackers, more bread)!

Shortbread crust:
65 grams (½ cup) dark rye flour
120 grams (1 cup) all-purpose flour
50 grams (1/3 cup) dark brown sugar
½ teaspoon kosher salt
113 grams (1 stick) unsalted butter, melted and cooled slightly
1 teaspoon vanilla extract
Crumble:
100 grams (1 cup) rolled oats
32 grams (3 tablespoons) dark brown sugar
52 grams (¼ cup plus 2 tablespoons) dark rye flour
30 grams (¼ cup) all-purpose flour
38 grams (3 tablespoons) sugar
1 teaspoon kosher salt
85 grams (6 tablespoons) unsalted butter, melted and cooled slightly
Filling:
350 ml (1½ cups) jam, preserves, or fruit butter (I had closer to 1¼ cups, and it turned out just fine)
  1. Set a rack in the middle of the oven, and preheat to 275 degrees. Grease a 9-inch springform pan (I just used a regular cake pan, lining the bottom with parchment, and it was fine) with butter or cooking spray.
  2. To make the shortbread crust, combine the flours, sugar, and salt in a large bowl, and whisk to mix well. Add the melted butter and vanilla extract, and stir until thoroughly combined. (If the mixture looks dry, use your hands to squeeze and massaged the dough until it comes together.) Using your hands, press the dough evenly into the bottom of the prepared pan. Put the pan in the freezer for 30 minutes, while you make the crumble. (If you want to do this step ahead of time, wrap the pan in plastic wrap and put it in the fridge or freezer. If it’s in the fridge, just remember to transfer it to the freezer for 30 minutes before baking.)
  3. While the shortbread is chilling, put all of the crumble ingredients except the melted butter into the bowl of a food processor, and pulse until the oats are partially ground, about 5 or 10 seconds. Pour the mixture into a bowl. Add the melted butter and stir with your hands, squeezing the mixture to create small crumbly bits. Set aside. (If you want to do this step ahead of time, wrap the bowl in plastic wrap and put it in the fridge. Take it out about 30 minutes before using, and if needed, use a fork to break up any giant clumps that have hardened.)
  4. Bake the frozen shortbread until pale brown and firm when touched, about 50 to 55 minutes. Remove from the oven, and raise the oven temperature to 350 degrees.
  5. To assemble the bars, spread the jam over the shortbread crust, and then top with the crumble, evenly sprinkling it over the surface and squeezing bits of it together to create irregular nubs. Bake for 50 to 55 minutes, or until golden brown on top, rotating the pan halfway through for even baking.
  6. When the pan is cool enough to handle but still warm, run a sharp knife around the edge of the pan to loosen any jam that may have stuck. Remove the ring if using a springform. Completely (or mostly, anyway) cool the bars in the pan before cutting into wedges.
Serves: About 12 to 16
Time: 3 hours
Leftover potential: Good; I kept mine in the freezer and they lasted for a few weeks.

Tuesday, July 12, 2016

SPRING PANZANELLA


Yup, still behind. Considering we’re a week past the Fourth of July, I guess I should finish posting last season’s recipes…or at least the ones with “spring” right there in the title. That means breaking my cardinal rule of not posting two Smitten Kitchen recipes in a row and making it obvious that I’m only a few steps away from being a blatant SK fan blog. (I can’t help it! Her recipes are just so good!) This is one I’ve been eyeing on and off for several years, especially since winter panzanella became one of my favorite salads. The white beans in this one always gave me pause—whole, cold beans are still not my favorite, and I knew A would be even less thrilled when confronted with them. But my desire to eat all the spring things, along with the constant need for more main-dish salads in my life, won out.

I made a few adjustments, most notably adding chopped hard-boiled eggs, which I thought might fit in well with the spring theme while also ensuring a fully satisfying, protein-packed one-bowl meal. After we ate, A proclaimed that the egg was an integral part of his enjoyment of the salad, mitigating the presence of the dreaded beans, so a point for me, I guess. I also threw in some green beans because my asparagus bundle looked a bit on the skimpy side (and also because…spring). Finally, after reading many complaints in the comments about the original recipe’s slightly odd leek-cooking method (which involves boiling them whole and then trying to slice them while slimy-soft into chunks that looked off-puttingly large to me), I decided to try slicing them before cooking, which worked just fine. The layers do separate a bit, but the smaller pieces integrated better into the salad—another plus, since A isn’t a huge fan of leeks to begin with. It still feels a bit strange to boil leeks, and I was tempted to roast or sauté them, as some commenters mentioned doing, but I think the simmer does give them a nice, juicy tenderness that’s needed in this salad. (I cut back on the quantity slightly, though, in favor of more green beans.)

The result was an excellent salad, delicate yet flavorful, durable, portable, and pretty. Although I’ll admit the real star of the show might be the incredible garlicky-cheesy croutons.

Croutons:
¼ cup olive oil
2 cloves garlic, finely chopped
6 cups day-old baguette or other bread, cubed
6 tablespoons finely grated Parmesan, plus more for garnish
Salt and freshly ground black pepper to taste
Vinaigrette:
Half a red onion, finely diced
2 to 2½ tablespoons champagne or white wine vinegar
Juice of half a lemon
¼ cup olive oil
½ teaspoon Dijon mustard
Salt and freshly ground black pepper to taste
Salad:
2-4 large leeks
2 teaspoons salt
1 pound asparagus (I used about ¾ pound asparagus and ½ pound green beans, which was delicious)
1 15-ounce can white beans, rinsed and drained, or 1½ cups cooked white beans
2-4 hard-boiled eggs, chopped (optional)
  1. Preheat oven to 400 degrees.
  2. For the croutons, mix the bread cubes with the garlic, olive oil, Parmesan, salt and pepper in a large bowl. Toss to coat well. Transfer bread to a baking sheet and sprinkle with salt and pepper. Bake, stirring once or twice, until the croutons are crisp and lightly colored on the outside, about 10 to 15 minutes. Set aside and let cool.
  3. For the dressing, mix the red onion with the vinegar and lemon juice in a small bowl and set aside for a few minutes before whisking in the olive oil, Dijon, and salt and pepper to taste. Set aside.
  4. Bring a few inches of salted water to a boil in a large pot. Break off and discard tough ends of asparagus, then cut the spears into 1-inch segments. Add to the boiling water and cook until crisp-tender, about 3 to 5 minutes. Use a slotted spoon to transfer it to a bowl of ice water, then drain and pat it dry.
  5. Cut off and discard dark green tops and root ends of leeks. Halve each leek lengthwise and rinse well under cold running water to wash away sand. Slice leeks into ½-inch-thick pieces and add to the boiling water in the pot. Simmer, uncovered, until tender, 5 to 10 minutes. Drain, transfer to a bowl of ice water to stop the cooking, drain again, and then pat dry with a towel.
  6. Place asparagus, leeks, white beans, and eggs (if using) in a large bowl and mix in the cooled Parmesan croutons. (If you’re not planning on eating all the salad right away, only put croutons into the servings you plan to eat; store remaining salad and croutons separately.) Pour vinaigrette over and toss well. Season with salt and pepper.
Serves: 4 as a main dish, 6 as a side
Time: 1 hour
Leftover potential: Good; store salad and croutons separately until about 15 minutes before you want to eat them.

Friday, July 01, 2016

SHAVED ASPARAGUS PIZZA


I’ll admit that sometimes I have a kneejerk reaction of avoiding things that are trendy, even when those things are right up my alley. Case in point: shaved asparagus pizza, which seemed to me like something that’s popular mainly because it’s so Pinterest*-ready pretty with its tangle of green, not because it tastes much different from pizzas topped with asparagus in normal-sized pieces. This is one instance where I’m perfectly happy to be proven wrong.

*Second case in point: Pinterest itself, which I finally gave in and joined this past month. Turns out that despite the annoying qualities I’d foreseen (lots of insipid content to wade through, and the general championing of style over substance...or am I just feeling defensive because my rickety old Blogspot blog with the impatiently staged and poorly lit food photos looks so sad in comparison to most of what’s out there?), it’s precisely what I needed to organize my recipes-to-try after the sad, ugly decline of my longtime favorite Delicious. (I tried Pepperplate for a while, but it and other apps designed especially for recipes were too feature-rich for my taste. I don’t need to generate shopping lists, I just want to be able to bookmark web pages, tag them by category and see a photo—that’s it!) I just keep all my boards private, and I have to admit it’s pretty nifty…much like this pizza, to get back to my main point.

I had a hankering for something springy and fresh in the pizza department, so (inspired by a more recent iteration at A Cozy Kitchen) I dredged up this old recipe from Smitten Kitchen. It turns out that shaved asparagus, tossed with oil and red pepper flakes and a generous quantity of salt, creates a totally distinctive pizza experience. The fact that shaving the asparagus is somewhat awkward is actually a plus, because the mix of textures from the unevenly sized strips is really what sets this apart. All the ingredients melt dreamily together, with the occasional pop of a larger asparagus tip making its presence known. My only adaptations were to add red pepper flakes and a squeeze of lemon juice, neither of which were strictly needed, but they are so perfect with asparagus it’s hard to resist.

So better late than never, all aboard the bandwagon! Next spring I’m finally trying shaved asparagus salad.

1 pound pizza dough
½ to ¾ pound asparagus
¼ cup grated Parmesan
½ pound shredded mozzarella
2 teaspoons olive oil
½ teaspoon coarse salt
¼ teaspoon red pepper flakes
Several grinds black pepper
1 scallion, thinly sliced
Freshly squeezed lemon juice to taste
  1. Preheat your oven to 450 degrees.
  2. Prepare asparagus: No need to snap off ends; they can be your handles as you peel the asparagus. Holding a single asparagus spear by its tough end, lay it flat on a cutting board and use a vegetable peeler (a Y-shaped one works best here) to create long shavings of asparagus by drawing the peeler from the base to the top of the stalk. Repeat with remaining stalks and don’t fret some pieces are unevenly thick (such as the tip, which might be too thin to peel); the mixed textures give a great character to the pizza. Discard tough ends. Toss peelings in a medium bowl with olive oil, salt, red pepper flakes, and pepper to taste.
  3. Roll or stretch out your pizza dough and transfer to a floured or cornmeal-dusted baking sheet. Sprinkle dough with Parmesan, then mozzarella. Pile asparagus on top. Bake pizza for 10 to 15 minutes, or until edges are browned, the cheese is bubbly and the asparagus might be lightly charred. Remove from the oven and immediately sprinkle with scallions, squeeze lemon juice over the top if desired, then slice and eat.
Serves: 4
Time: 35 minutes
Leftover potential: Good.

Saturday, June 25, 2016

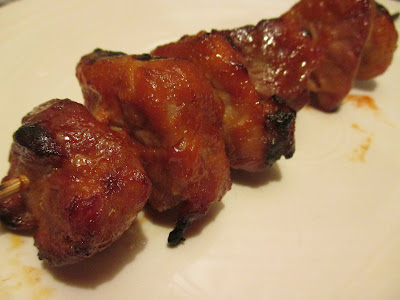
SWEET SRIRACHA-GLAZED PORK SKEWERS


While I mainly plan my menus around which vegetables I’m hungry for, A still thinks a meal isn’t really complete without some sort of meaty component, so I’m always on the lookout for easy carnivore-friendly preparations that I can make as a side dish to a big pile of vegetables. And having accumulated an overabundance of chicken recipes, I’m working to expand my horizons into other types of meat. Since my pork repertoire centers mostly on bacon, prosciutto, sausage and ground pork, tenderloin is a good area for new exploration, especially since it’s fairly healthy, inexpensive, versatile, and not hard to prepare.

All these criteria neatly converged in this super-simple recipe—seriously, we’re talking just five ingredients—from Cook’s Illustrated, which I stumbled upon via Pink Parsley. Bite-sized chunks of grilled pork in a sweet-spicy-salty glaze, with prep so quick and low-maintenance that I can focus my efforts on making a hearty salad or other veg-centric dish to serve alongside? Definitely a recipe for mealtime harmony.

The first time I made these, I used my George Foreman grill, and consequently spent the next week trying to scrape burnt sugary residue off the cooking surface. Then I remembered seeing a recipe for oven-broiled pork kebabs over at Budget Bytes, so I swiped the technique and it worked like a charm. You get a decent amount of char in a relatively short period of time, which means it might even be worth turning on the oven in the height of a summer heat wave. But if you prefer to fire up the grill, just follow the original method instead. Either way, you’ll get a big payoff for very little effort.

1½ pounds pork tenderloin, trimmed and cut into 1-inch chunks
1 teaspoon kosher salt
3 tablespoons packed brown sugar
2 tablespoons Sriracha sauce
1 teaspoon cornstarch
  1. If using wooden or bamboo skewers, soak 4 of them in water for at least 30 minutes to help prevent burning under the broiler.
  2. Toss the pork and salt together in a large mixing bowl and let sit at room temperature for 20 minutes.
  3. Meanwhile, whisk together the brown sugar, Sriracha sauce, and cornstarch. Set aside 2 tablespoons of the mixture and add the rest to the pork, mixing well with a silicone spatula.
  4. Thread the meat onto the skewers. Arrange the skewers on a broiler pan, or on a wire rack atop a foil-lined sheet pan.
  5. Adjust the oven rack so that the top of the skewers will be 5-6 inches from the broiler. Preheat the broiler for at least 5 minutes.
  6. Place the skewers under the broiler and cook for 5 minutes, or just until the edges begin to brown. Remove from oven, rotate the skewers, and brush with half the reserved glaze. Return to the oven for an additional 5 minutes. Remove from oven, rotate again, brush with the remaining glaze, and broil 5 more minutes maximum, until evenly browned on all sides. (Be careful not to overcook!)
  7. Transfer the skewers to a serving platter, tent loosely with aluminum foil, and let rest for 5 minutes before serving.
Serves: 4
Time: 50 minutes
Leftover potential: OK.