Friday, December 16, 2011

ROASTED SQUASH PIZZA WITH CARAMELIZED ONIONS AND BACON


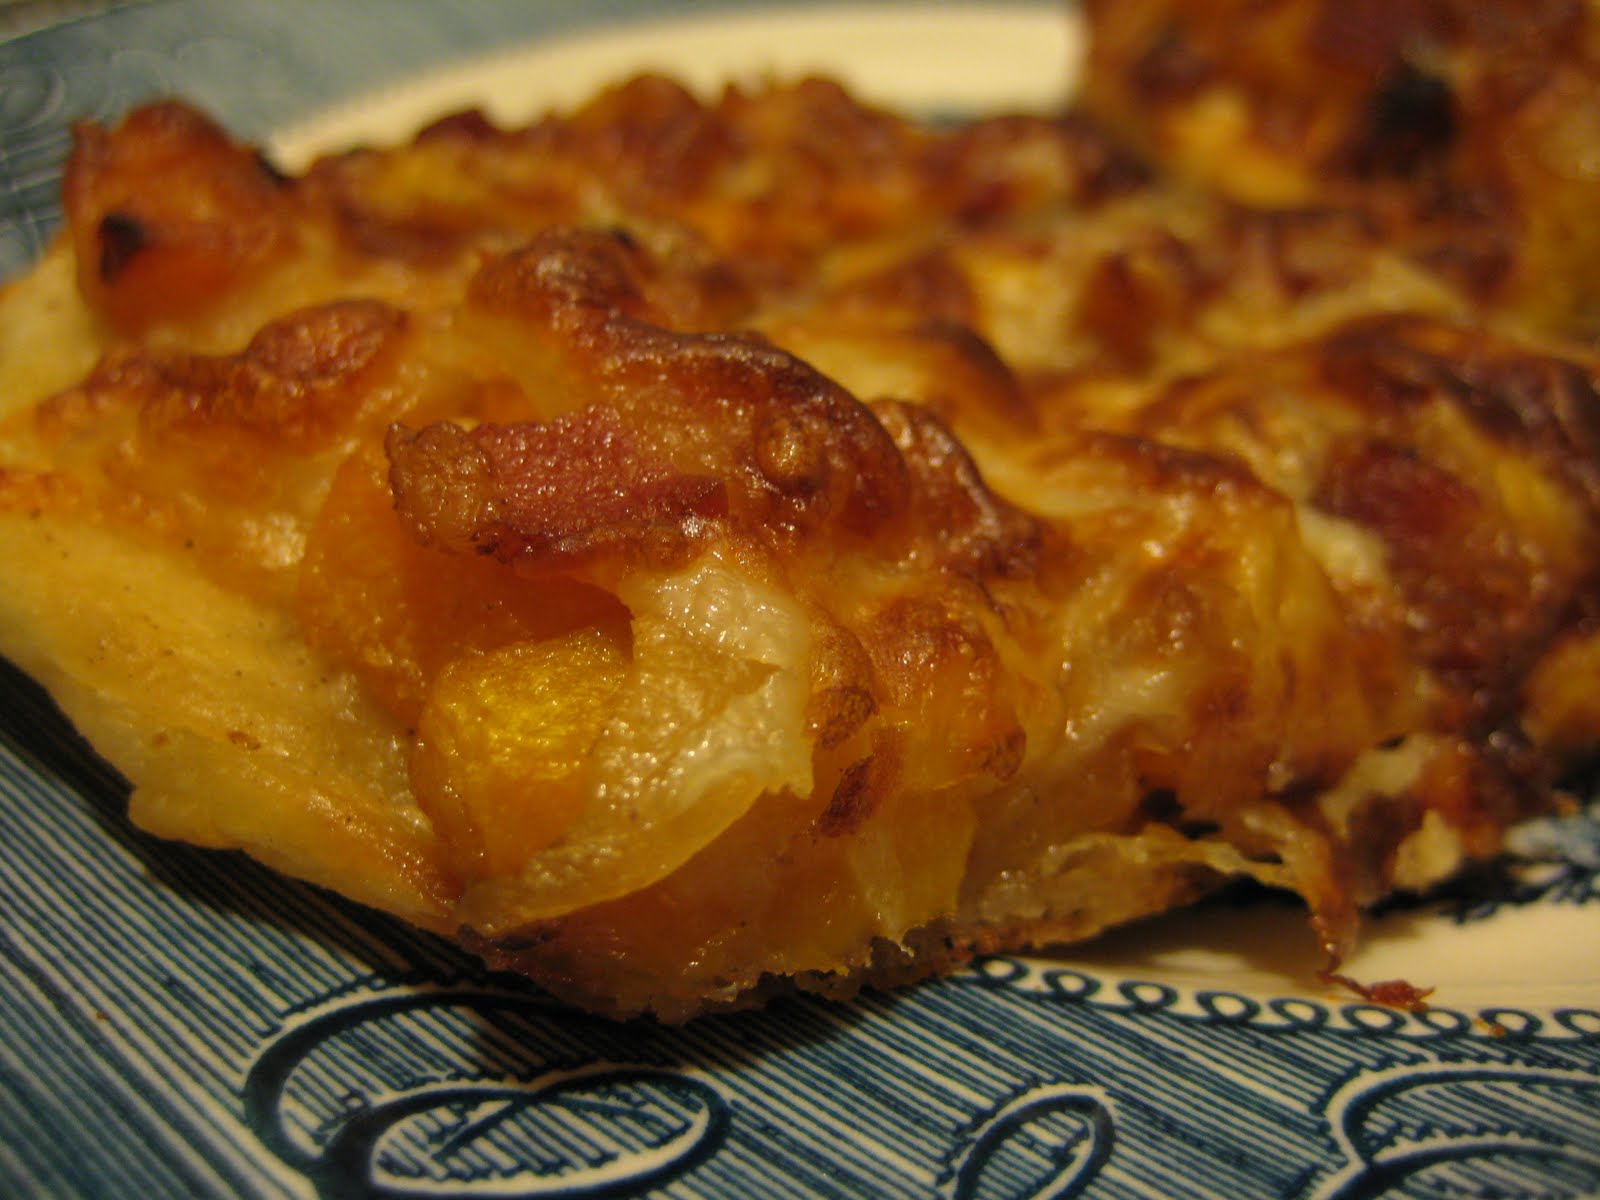
Just when I think I’m running out of pizza-topping combinations to try, another one presents itself. As soon as I saw this recipe at Dinner With Julie, I knew it would be perfect, and perfect it was—an addictive, comforting blend of smoky, salty, sweet, and creamy.

My one misstep was in using a package of pre-cubed butternut squash from Trader Joe’s; normally I frown upon such things, but we’d missed that week’s farmers’ market due to our Thanksgiving trip to Minnesota. I could’ve picked up a whole squash at the grocery store, but I wanted to make things easier on myself post-vacation, and I figured TJ’s usually has pretty good produce, so… Live and learn, right? The squash was so slimy and soggy that it took forever to roast properly; it just kept steaming away in the oven without browning, and I had to bake it nearly twice as long just to get any color and crispness on it. Then, when I popped a piece into my mouth, I discovered it was nearly flavorless, so I desperately sprinkled a little brown sugar over the rest and threw it back into the oven until the sugar caramelized. That seemed to help the sweetness along and the pizza tasted great, but: never again.

On the plus side, I had been planning to just use mozzarella on this, but then I remembered I had some cheese odds and ends left over from making kale pizza a few weeks before, so I added those into the mix. I think the Asiago in particular really made this spectacular, balancing out the sweetness of the squash and onions with its pungent sharpness. And, of course, the bacon didn’t hurt either. I’ve had a run of just-OK pizza experiments lately, but this one was an unequivocal success, probably the best I’ve tried since July’s corn-feta-cilantro-lime awesomeness.

About 1 pound butternut or other winter squash, peeled, seeded, and cubed
1 tablespoon olive oil
Salt and pepper to taste
4 slices bacon, diced
1 large onion, halved and thinly sliced
1 pound pizza dough
Shredded cheese to taste (I used a mixture of mozzarella, Asiago, and Fontina, which I highly recommend)

1. Preheat oven to 400 degrees.

2. Place the cubed squash on a rimmed baking sheet, toss with olive oil and salt and pepper to taste, and roast for 20 to 30 minutes, stirring once, until soft and browned. Remove from oven and set aside, then increase the oven temperature to 450 degrees.

3. Meanwhile, cook the bacon in a skillet over medium heat until crisp. Remove with a slotted spoon and set aside on a paper-towel-lined plate to drain. Add the onion to the drippings in the skillet and sauté until tender and caramelized.

4. Roll out the pizza dough, place it on a baking sheet coated with cornmeal or olive oil, and scatter half the cheese over it. Add the squash, onions, and bacon, then top with the remaining cheese. Bake for 10 to 15 minutes, until bubbly and golden.

Serves: 4
Time: 75 minutes
Leftover potential: Good.

Monday, December 12, 2011

JALAPENO-CHEDDAR SKILLET CORNBREAD


It’s odd, but I don’t think I’d ever made cornbread before this. I’ve eaten some that I’ve liked over the years (mostly at barbecue/soul food restaurants), but generally I can take or leave it, and I mostly leave it. At its worst, it can be dry, crumbly, and bland. Everyone talks about how much better it is when cooked in a cast-iron skillet, though, so ever since I got a skillet of my own I’ve been thinking I might give it a try. A couple of months ago, I stumbled across the perfect-looking recipe at A Cozy Kitchen. Pouring the hot oil from the skillet into the batter seemed a little weird (and perilous—wear sturdy oven mitts!), but since the recipe was adapted from no less an authority than the Homesick Texan herself, I couldn’t argue. Aside from that little adventure, the bread was easy to make and turned out perfectly: crisp-crusted without and tender within, with the buttermilk and cheese warding off dryness and the jalapeno providing a nice kick. Maybe it was the skillet or maybe it was the recipe, but the bread had a bit more structural integrity than some I’ve seen; it held its shape well when sliced and wasn’t overly crumbly. I served it with chili, but it would have been just as satisfying on its own, with a little butter.

So consider me a cornbread convert! This will definitely be replacing tortilla chips as my chili accompaniment of choice, and I’m contemplating pairing it it with black bean soup soon. I didn’t have any bacon grease on hand, but I’d love to try that next time instead of canola oil; a little bit of porky smokiness would really put this over the top.


2 tablespoons vegetable oil or bacon drippings
2 cups cornmeal (yellow or white)
½ cup sifted all-purpose flour
1 teaspoon baking powder
1½ teaspoons salt
1 large egg, lightly beaten
2 cups buttermilk, shaken
2 jalapeños, diced
1¼ cup shredded cheddar cheese, divided

1. Preheat oven to 450 degrees. Put the oil or drippings in a 12-inch cast-iron skillet and place it in the oven for a few minutes until it’s sizzling.

2. Meanwhile, mix together dry ingredients in a large bowl and set aside. Whisk egg and buttermilk in a medium bowl. Mix the wet ingredients into the dry ingredients, then fold in jalapeños and 1 cup of shredded cheddar.

3. Take the cast-iron skillet out of the oven, pour hot oil/drippings into batter, and mix. Pour batter into skillet and top with remaining ¼ cup cheddar. Bake for 20 minutes, until brown on top and pulling away from the sides of the skillet.

4. Turn bread out of the skillet, slice into wedges or squares, and serve.

Serves: About 8
Time: 30 minutes
Leftover potential: Good; can be frozen.

Wednesday, December 07, 2011

CRISPY CHICKEN AND APPLE SALAD


In my ongoing quest for satisfying cold-weather salads, I have bookmarked approximately one million that involve apples and/or dried cranberries, all very subtly different. This one, originally from Everyday Food, which I spotted at Serious Eats, combines those two uber-autumnal/wintry ingredients with lettuce, slices of breaded pan-fried chicken breast, and a creamy dressing. The original dressing looked unappetizing to me—it was basically just a mixture of mayonnaise and buttermilk, with a little vinegar and parsley thrown in—and it is a sign of my newfound passion for mustard that I immediately thought, “But this salad would be perfect with a little Grey Poupon!” So instead I used a lighter, spunkier yogurt-Dijon vinaigrette lifted from one of my very favorite salads, a dressing that has become my go-to default whenever I need to improvise. As I suspected, it was a delectable counterpoint to the chicken and the crisp, sweet-tart fruit. When I ate the leftovers for lunch the next day, I threw in a handful of walnuts, and that made everything even better, so I’m suggesting it as an option below. This isn’t a revolutionary combination of flavors—it’s so intuitive, I’m pretty sure I’ve seen similar salads on fast-food menus, although of course the homemade version is infinitely better—but it makes an easy, wholesome, pleasing meal. We both really liked it, so I’m guessing it’s going to become a regular menu staple around here.

¼ cup all-purpose flour
1¼ teaspoons salt, divided
Freshly ground black pepper to taste
1 large egg
1 cup panko breadcrumbs
1 pound boneless, skinless chicken breasts, gently pounded to an even thickness
5 tablespoons olive oil, divided
3 tablespoons white wine vinegar
3 tablespoons plain yogurt
1½ teaspoons Dijon mustard
8 cups red-leaf lettuce leaves
2 large apples, cut into thin wedges
½ cup dried cranberries
½ cup toasted walnuts (optional)

1. On three small plates, set up the dredging stations: the flour on one, the egg whisked with 1 tablespoon of water on another, and the breacrumbs on the third. Season the flour with ¼ teaspoon salt and some freshly ground black pepper, and the panko with ½ teaspoon salt. Dry the chicken breasts thoroughly with paper towels until tacky.

2. In a medium skillet, heat 2 tablespoons olive oil over medium until shimmering.

3. Dredge the chicken in the flour and shake off the excess, then in the egg mixture, allowing the excess to drip off, and finally in the breadcrumbs, pressing gently to adhere. Add the chicken to the skillet and cook until golden, then flip and finish cooking, 8 to 10 minutes total. Drain on paper towels, allow to cool for a few moments, and then slice into strips.

4. While the chicken cooks, whisk together vinegar, yogurt, mustard, and ½ teaspoon salt in a small bowl; season with pepper to taste. Add 3 tablespoons olive oil in a slow, steady stream, whisking until emulsified.

5. Lay the lettuce in a serving bowl or on a platter and scatter with the apples and cranberries (and walnuts, if desired). Lay the chicken over the top, drizzle with dressing, and serve.

Serves: 4
Time: 30 minutes
Leftover potential: OK, although chicken will be less crispy the next day; store all components (chicken, dressing, walnuts, unsliced apples, and cranberries) separately and assemble right before eating.

Tuesday, December 06, 2011

CHICKEN A LA DIABLE


Devil chicken! Except, of course, this zesty, spicy, crispy baked chicken is actually quite divine. I spotted it at Serious Eats and pegged it as an easy weeknight dinner, which it certainly was. I love that I’ve now gone from mustard hating to grudging acceptance to actually perking up whenever I see it in an ingredient list. It’s such a great shortcut to add a lot of zip and savor to food, especially meat; I can’t believe I ever turned up my nose at it. Using it as a coating for chicken is as brilliant as you would expect. Throw on some red pepper flakes, thyme, breadcrumbs, an egg wash to hold it all together, and naturally some butter, and you’ve got tasty Frenchy comfort food. I served it with spinach-apple salad, which was a perfect accompaniment.

2 tablespoons smooth Dijon mustard
1 tablespoon coarse-grain Dijon mustard
½ teaspoon hot red pepper flakes
2 eggs
4 whole chicken legs (bone-in, skin-on)
Salt to taste
2 tablespoons minced fresh thyme
½ cup panko breadcrumbs
3 tablespoons unsalted butter, cut into small cubes

1. Preheat oven to 375 degrees.

2. In a small bowl, combine mustards and red pepper and mix well to blend. Season chicken legs with salt, then use a pastry brush to paint the mustard mixture evenly on all the legs.

3. On a plate or in a shallow bowl, combine eggs and whisk lightly with a fork to blend. In another, combine the breadcrumbs with the thyme. Dredge the chicken in the eggs, then in the breadcrumbs, coating them as evenly as possible, and then transfer to a baking dish.

4. Dot the chicken pieces evenly with butter, then bake until the juices run clear, 30 to 40 minutes.

Serves: 4
Time: 1 hour
Leftover potential: OK (although the leftovers won’t be as crispy)

Friday, December 02, 2011

PUMPKIN PUDDING


After the cookies and the pancakes, I still had some pumpkin puree left, so of course I had to make pumpkin pudding, as part of my ongoing quest to make every kind of pudding in the world, ever. I found the recipe at Sugarcrafter, probably via Food Blog Search. It was as easy as any other pudding (in other words, surprisingly easy) and tasted about as you’d expect, like a lighter, creamier pumpkin pie filling. It didn’t rock my world, but I will certainly make it again, especially when I have extra pumpkin puree to use up.

It amuses me how many ways there are to make pudding; some recipes have you add the egg right away and stir continually (and then strain the pudding to make sure there are no cooked egg bits floating around), others have you add it midway through (which means tempering the egg mixture with some hot milk), and a few have you add it at the end (which means there’s always a small risk of raw-ish egg, since you’re just relying on the heat of the milk to cook it). Whichever way you do it doesn’t seem to have a great impact on the end result, so perhaps it’s just a matter of personal preference. I’m not too afraid of raw egg, and in this case I didn’t balk at straining the pudding since I knew I’d want to get rid of any stray stringy pumpkin pieces, but in general I’m of the add-it-midway-and-temper school, so I might do that next time I make this. Otherwise, I saw no need to tinker with the recipe, except that of course I once again shoved nutmeg to the background in favor of cardamom, because I don’t understand why the rest of the world refuses to use it.

And here ends my experimentation with pumpkin for this year…unless I buy another can, in which case this whole merry-go-round will start up again.

1¾ cups milk
1 egg
½ cup canned pumpkin
½ teaspoon ground cinnamon
¼ teaspoon ground cardamom
⅛ teaspoon ground nutmeg
⅛ teaspoon ground cloves
2 tablespoons cornstarch
¼ cup + 2 tablespoons brown sugar

1. In a medium bowl, whisk together the milk and egg.

2. In another bowl, combine the pumpkin and spices.

3. In a saucepan over medium heat, combine the cornstarch and sugar. Gradually whisk in the milk mixture, scraping the bottom and sides with a rubber spatula to break up lumps. Bring to a boil and cook until the mixture thickens and coats the spatula, stirring constantly. Remove from the heat.

4. Add the pumpkin mixture to the pudding, stirring to combine. Place the pan back over low heat and warm until heated through. Strain through a fine mesh strainer into a bowl to remove any lumps. Transfer the mixture to a clean bowl or bowls (if you don’t like pudding skin, place plastic wrap directly on the surface of the pudding so that a skin will not form). Refrigerate at least an hour before serving.

Serves: 4
Time: 30 minutes
Leftover potential: Good; lasts a few days in an airtight container in the refrigerator.