Tuesday, May 29, 2012

STRAWBERRY AND ASPARAGUS SALAD


Asparagus + strawberries + mint + lemon = spring in a bowl. Add feta and spinach and you can’t hold me back. I might never have thought to combine these exact ingredients before stumbling across this salad from Bev Cooks on the magical Interwebs, but of course they go together brilliantly. (I’ve already combined strawberries and avocado, so why not strawberries and asparagus?) I doubled the recipe to serve four (as a side), swapped the feta in for goat cheese (not my fave), and upped the lemon juice ratio in the dressing (I like mine acidic). I used salted pepitas because I happened to have some on hand, and I did like them against the sweetness of the strawberries, but I think a lot of other options would work well here, too—pecans, sunflowers seeds, almonds, or even walnuts. The lemon-mint dressing was particularly nice; I had contemplated trying some sort of balsamic dressing instead, worried about the mint being too overpowering and weird, but it was subtle, just enough to add a crisp and refreshing aftertaste, and kept this salad on the delicate side, which is perfect for spring. I ate some leftover dressing on plain spinach later in the week and it was so good on its own that I started envisioning using it on other fruit-with-greens salads throughout the summer (I bet it would be nice with blueberries or peaches).

1 bunch (about ½ pound or less) asparagus, ends trimmed, stalks sliced into 2-inch pieces
10 mint leaves
5 tablespoons extra-virgin olive oil
3 tablespoons freshly squeezed lemon juice
Salt and freshly ground black pepper to taste
About 3 cups baby spinach
About 1 cup strawberries, rinsed and thinly sliced
¼ cup pepitas, toasted
¼ cup crumbled feta or goat cheese

1. Bring a medium pot of salted water to a boil. Add the asparagus and cook until bright green and crisp-tender, about 2 minutes. Drain and cool in an ice bath or under cold running water. Pat dry.

2. Using a mini food processor or an immersion blender, combine the mint leaves with the oil, lemon juice, and salt and pepper to taste.

3. Arrange the spinach in a bowl or on a plate. Top with sliced strawberries, blanched asparagus, toasted pepitas, crumbled cheese, and a good drizzle of the lemon-mint dressing.

Serves: 4
Time: 30 minutes
Leftover potential: OK, but you should store the components separately and assemble them only when ready to eat.

Tuesday, May 22, 2012

AGUADITO


If you’re one of those poor afflicted people who think cilantro tastes like soap (I’m so glad I didn’t inherit that gene from my dad), I’m telling you right now that you can go ahead and skip this recipe. This version of the traditional Peruvian chicken soup has a pungent puree of cilantro, Serrano pepper, and garlic stirred right into the broth, lending it a bright green color and wonderfully fresh flavor, especially when finished with plenty of lime juice. It’s basically cilantro soup, and I love it.

I only made a few changes to the original recipe from A Cozy Kitchen. I don’t really like rice, so I swapped in quinoa instead, figuring it has a similar cooking time, and hey, it’s Peruvian too. I like the subtle texture quinoa adds to soups, and this one was no exception. I also pulled the chicken off the bone before serving, because it seemed incredibly awkward to have to deal with a whole piece of chicken while I was trying to slurp down my soup. Next time I might just skip using bone-in pieces entirely; it does certainly maximize the chicken taste, but it also adds a lot of grease—my finished soup was a bit oilier than I like, although granted, I didn’t help things by using entirely dark meat—and I didn’t enjoy the splattery step of browning the chicken in hot oil. My homemade chicken stock is already really flavorful (and no matter how much I try to skim it after it’s cooled, it still probably has more fat than the storebought stuff), and when I’ve used whole pieces of chicken to make it (rather than just a leftover carcass), I pull the meat off the bones afterwards and stash it in my freezer, so I could easily dump that reserved shredded chicken into the soup instead of dealing with whole pieces (another option would be to use meat from a roasted or rotisserie chicken). I think that would simplify the process and keep the fat in check without sacrificing much depth of flavor.

Regardless of how you make it, this soup would be a great way to brighten up the cold winter months (especially when you’re sick—it has the same comforting, restorative quality that homemade chicken noodle soup does, but with a welcome extra zestiness), but with its cilantro, corn, and lime, it also bridges the gap from spring to summer admirably.

¾ cup cilantro leaves, plus extra for garnish
1 Serrano pepper, halved and de-seeded
4 garlic cloves, divided
4¼ cups chicken broth, divided
2 tablespoons olive oil
1 to 1½ pounds skin-on, bone-in chicken (I used drumsticks)
1 small yellow onion, diced
1 small red bell pepper, diced
½ teaspoon ground cumin
¼ cup quinoa or white rice
1 ear of corn
Salt to taste
1 large lime

1. Add cilantro leaves, serrano pepper, 2 garlic cloves (peeled but whole), and ¼ cup chicken broth to a blender (or an immersion blender cup). Blend until mixture is thoroughly combined. Set aside.

2. In a large, heavy pot, heat olive oil over medium-high heat. When it’s hot, carefully add chicken, skin side down. Cook for 4 to 5 minutes, until skin is crisp and slightly browned. Flip over and cook for an additional 5 minutes. Remove chicken from pot and set aside.

3. To the pot with the chicken drippings, add onion and cook until translucent, about 5 minutes. Add bell peppers and cumin and cook for 1 to 2 more minutes. Mince the other two garlic cloves, place them atop the mixture in the pot, and cook until fragrant.

4. Add the quinoa/rice and the cilantro mixture to the pot and stir, being sure to completely coat the quinoa/rice. Gently add the chicken back to the pot and cover with the remaining 4 cups of chicken broth. (The broth should just cover the chicken; if it doesn’t, add a little more broth, or a bit of water). Cook for 20 to 30 minutes, until quinoa/rice is fully cooked.

5. If desired, remove the chicken from the soup, tear the meat from the bones, shred the meat, and return it to the soup, discarding the bones and skin. (I find it much easier to eat this way.)

6. Cut kernels from corn cob and mix them into the soup a few minutes before you take it off the stove. When you’re ready to serve, add salt to taste. (This will depend on how salty your chicken broth was; mine was homemade and salt-free, so I started with 1 teaspoon of kosher salt.)

7. Squeeze the lime into the soup and garnish with cilantro to taste.

Serves: 4–5
Time: 1 hour
Leftover potential: Good.

Thursday, May 17, 2012

ORANGE CURRY ALMONDS


As threatened—er, promised—I reworked the magical roasted nut recipe yet again, just to cover all my citrus bases. (I’m ignoring grapefruit here, as I do in all areas of my life.) I think it’s a really good flavor combo. I used Trader Joe’s curry powder, my favorite storebought variety, which has a nice, bright citrusy/floral taste that I correctly suspected would marry well with the orange. (I think I was inspired by these cookies...which now makes me wonder if I could get coconut in here too, somehow.) There’s a little heat to these, but mostly just a deep, savory spice that makes them seem richer and substantial than the other two varieties I’ve made—or maybe it’s just that almonds fill me up more quickly than other nuts. Whereas I could demolish handfuls of the chili lime peanuts or lemon pepper cashews if I wasn’t careful, I’m full and satisfied after a dozen or so of these almonds. Whether for that reason or just because I prefer lemon and lime to orange, these have lingered longer in my kitchen than the other two kinds I’ve made, and I do think I’d name them my least favorite of the three. (They also, for some reason, seem to be on the verge of oversaltiness, even though I used the same amount of salt as in the other two recipes, which struck me as being just the right amount. I might cut back on the salt next time—or perhaps I just measured poorly this time?) But that’s mainly because the first two were so very kickass. I’m still pleased to have “invented” these and I do consider them a successful snack: addictively crisp, excitingly tasty, fairly wholesome, and not like anything I’ve ever seen in a store. For someone who rarely improvises, I feel like I’m on a roll lately!

Freshly grated zest of 1 large orange
¼ cup freshly squeezed orange juice
1 tablespoon kosher salt
2 teaspoons sugar
4–5 teaspoons curry powder
1 pound unsalted almonds

1. Preheat oven to 250 degrees.

2. Whisk orange zest, orange juice, salt, sugar, and curry powder together in a large bowl. Add almonds and stir until evenly coated.

3. Scrape nuts onto a large, rimmed baking sheet (line with parchment if desired, for ease in cleanup). Bake until nuts are fragrant, dry, and beginning to darken, about 30 minutes.

Serves: About 16
Time: 40 minutes
Leftover potential: Good; will keep in an airtight container at room temperature for at least two weeks

Friday, May 04, 2012

POTATO-LEEK PIZZA WITH RICOTTA AND LEMON


Yeah, I already have a potato-leek pizza recipe—but this one has ricotta and lemon zest and tastes like springtime. The Kitchn calls it a “flatbread,” but I know a pizza when I see one. And this one is fab.

I was a bit worried about getting the potato sliced thinly enough to cook through, since I don’t have a mandoline. (Microsoft Word really wants to change this to “mandolin.” Well, I don’t have one of those, either.) Soaking the potato slices in cold water seemed odd to me; I’ve seen this mentioned in some French fry recipes (I think it draws off the excess starch) but have never tried it before, and was kind of worried by how stiff and curled they were when I pulled them out of their bath—I feared I’d soaked them too long and ruined them, but now after some Internet research I see that you can soak potatoes for hours without damage. And whether it was the water or my careful slicing skills, it worked, and the potatoes got nice and tender. I really love the flavors here—just don’t leave off the lemon zest (as I almost accidentally did when I was eating the leftovers), because it’s what makes this pizza special!

2 large leeks
1 large red-skinned waxy potato
Olive oil to taste
Salt and pepper to taste
1 to 2 cups ricotta cheese
Leaves from 4 sprigs thyme
1 pound pizza dough

1 cup shredded Parmesan or Pecorino Romano cheese (I believe I threw in some Asiago and that was good, too)
Zest from two large lemons

1. Preheat the oven to 450 degrees.

2. Trim the roots off the leeks and then slice each leek (white and light green parts only) into very thin rounds. Place the slices in a large bowl and fill with water. Toss the leeks with your fingers, separating the individual rings. Set aside for a few minutes to allow the dirt to settle to the bottom.

3. Slice the potato into thin rounds about ⅛ inch thick. Place slices in a bowl of cool water and set aside.

4. Set a saucepan over medium heat and add about a teaspoon of oil. Transfer the leeks to the saucepan using a slotted spoon and cook until they are bright green and wilted. Season with salt and pepper to taste and set aside.

5. Roll out the dough on a baking sheet and spread with ricotta cheese. Scatter the thyme over the cheese. Arrange the potato slices in overlapping layers and top with leeks. Sprinkle the cheese evenly over the top.

6. Bake for about 15 to 18 minutes, rotating once, until the edges are golden, the leeks have started to crisp, and the potatoes are tender. Remove from the oven and toss the lemon zest over the surface of the hot pizza.

Serves: 4
Time: 45 minutes
Leftover potential: Good.

Wednesday, May 02, 2012

GARLIC NAAN


Of course I needed some naan to go with my chicken tikka masala. I hear Trader Joe’s makes a pretty decent frozen one, but I do enjoy baking bread from time to time, and it’s pretty convenient to do on my telecommuting days—knead the dough during my lunch break, let it rise while I work, punch it down right after work and let the second rise happen while I do miscellaneous pre-dinner tasks, then bake while I’m cooking. Posie Gets Cozy, the same site that turned me on to the tikka masala, mentioned an Allrecipes naan recipe as well, but it called for ¼ cup sugar, which seemed way too sweet, so I turned to trusty Food Blog Search instead. It turns out there are a dizzyingly diverse bunch of ways to make naan. It can be leavened with yeast, or just with baking soda; it can be cooked on a grill, on a stovetop, or in the oven; and so on. I quickly grew exhausted from combing through all the variations, so I settled semi-blindly upon this one from Use Real Butter, mainly because it had garlic, it used yeast (baking-soda breads, while simpler, never taste quite as good to me), it included yogurt (yum), it didn’t have weird-looking amounts of sugar or anything else, and it offered instructions for a several different cooking methods, plus lots of helpful photos for guidance.

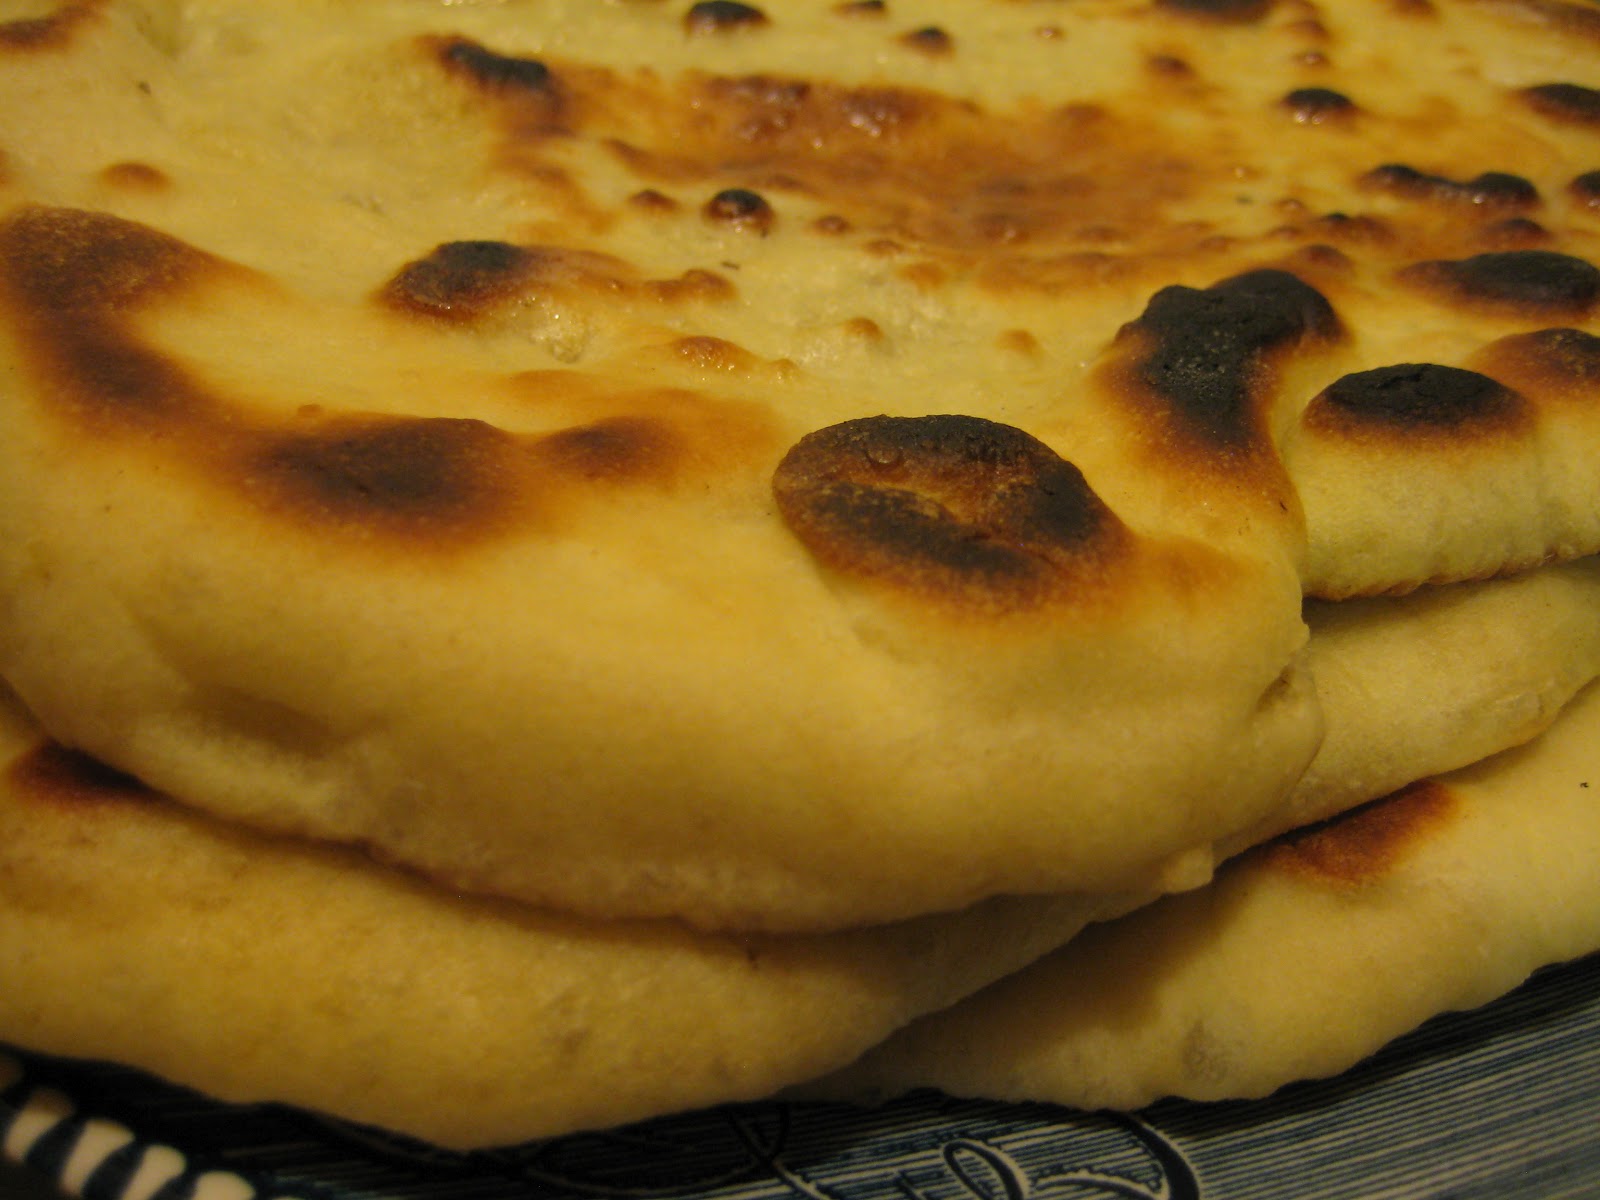
This turned out to be a wise choice. The dough came together well (I used my KitchenAid mixer, and I think it’s the first time I’ve really gotten good results using the dough hook), was easy to work with, and baked up just as promised, with big bubbles, nice char marks, and a tender, springy-chewy texture. I used my cast-iron skillet on the stovetop and it did the trick just fine. I’d heard the cooking surface should be really hot, so I started at medium-high heat, but the first naan I cooked crossed the line too rapidly from alluringly blistered to fairly blackened, so I turned the stove down to medium to get nonburnt bread. However, I crammed that singed naan into my mouth while cooking the other seven breads, and it was insanely delicious. Maybe it was just that I was so hungry, but mostly likely the bread is best eaten right off the skillet; by the time we sat down to eat the other ones with dinner, they’d cooled to room temperature and even though they still tasted great, they just didn’t seem quite as incredible as that first one. So I’m going to recommend that you serve these as freshly cooked as you can, although the leftover ones are certainly beyond passable. (Or is this just a demonstration of Ramona Quimby’s principle that the first bite of the apple always tastes the best?)

The bread had a mild, not overpowering garlic flavor; I didn’t bother with adding chopped garlic to the top of the cooked naan, figuring that it would just fall off annoyingly into my tikka masala as I dipped it. I didn’t think I’d brush the breads with melted butter either, but I tried it with a few and it did give them a much more photogenic glossy finish and appealing moistness—as well as, of course, a nice buttery taste—so I think it’s worth it but not crucial (unless you want to sprinkle garlic, herbs, or anything else on top, in which case it will provide the necessary adhesion).

Even though I’m not quite sure I’d declare these as good as the restaurant naans I’ve eaten, it was a close enough approximation that I was beamingly pleased with myself. It was fun to make, too, especially watching each one bubble and puff on the skillet. I’ll definitely be making this again, not only with chicken tikka masala and any further Indian dishes I might now be emboldened to try, but with soups like curried lentil and curried coconut carrot.

2½ teaspoons dry yeast
2 tablespoons sugar
4½ to 5 cups all-purpose flour, plus more for dusting and rolling
2 teaspoons salt
1 teaspoon baking powder
2 cloves garlic, crushed and minced
3 tablespoons milk
2 tablespoons plain Greek yogurt
1 large egg, lightly beaten
2 tablespoons vegetable oil, plus a little more for oiling the bowl
Unsalted butter to taste
2 cloves garlic, minced, for sprinkling on top if desired

1. Place the sugar, yeast, and ¼ cup warm water (110 to 115 degrees Fahrenheit) in a small bowl, stir, and let sit 5 to 10 minutes until it becomes foamy.

2. Put the flour, salt, and baking powder in a food processor fitted with a dough blade or a mixer bowl fitted with the dough hook and blend. Pour the yeast mixture, garlic, milk, yogurt, egg, 2 tablespoons vegetable oil, and ¾ cup warm water into the bowl and knead until the dough forms a ball that is smooth and elastic (about 2–3 minutes in a processor, 5–8 minutes in a stand mixer, or 8–10 minutes by hand). The dough should be soft without being sticky; if it’s sticky, add more flour.

3. Put the dough in a large, lightly oiled bowl. Turn the dough around to coat it with oil on all sides, and then cover the bowl with plastic wrap or a kitchen towel and let it sit in a warm, draft-free place for 60 to 90 minutes.

4. Punch down the dough and cut it into 8 pieces. Roll them into balls and set on a floured baking sheet. Cover with a damp kitchen towel and let rise until doubled in size (about 40 to 60 minutes).

5. Roll the dough balls out on a floured work surface to make disks about 6 inches in diameter, then stretch it slightly to make the classic oblong/teardrop shape.

6. Heat a large skillet over medium or medium-high heat. Melt a little butter in the hot skillet. Brush the first naan with water and place it in the skillet water side down. Large bubbles should begin to puff up within a minute. When the bottom of the naan is browned, brush the top of the naan with water, flip it over, and let it cook for another minute or so, until that side is browned. Remove to a basket or plate and, if desired, brush with melted butter and sprinkle with more minced garlic. Repeat seven more times.

Yields: 8 naan
Time: About 2½ to 3 hours
Leftover potential: The naan seemed best when freshly made, but it was OK the next day (when stored in a tightly sealed plastic bag and warmed briefly in the microwave). I have two pieces in the freezer but haven’t tried defrosting them yet.

Tuesday, May 01, 2012

CHICKEN TIKKA MASALA

I have no idea what possessed me. My usual cooking policy is to avoid making anything at home that a nearby restaurant can make better—better, that is, according to my own idiosyncratic tastes rather than any objective standard of quality, so even though I acknowledge that the fancy artisan pizza place in my neighborhood can do magical things with its wood-fired oven that my putzy little home appliance could never achieve, I’m not that picky about pizza crust, and prefer convenience and the ability to customize over the hassle and expense of going out, except on special occasions. (Plus. I require pizza on a weekly basis, which would bankrupt me at the fancy place.) Mainly this means that I don’t bother trying to cook a lot of complicated (or rather, seemingly complicated, to my Western self) global cuisines, at least not in any remotely authentic way. If I suddenly moved to the backwoods, hundreds of miles from the nearest Indian buffet, you can bet that I’d be training myself to make curries with a quickness, but because I have a favorite Indian restaurant within walking distance of my apartment (along with tasty Thai, Japanese, Afghani, Himalayan, and Ukrainian eateries, plus a great taco truck), I just don’t feel inclined to bother when I can have the pros do it for me. We rarely eat out, but when we do, it’s nearly always either international food or pub fare like burgers and fries. (My rule also applies to good old American burger making, a skill I just don’t feel any urgency to master, and as I’ve mentioned before, deep-frying terrifies me.)

Yet there I was, reading Posie Gets Cozy, when I stumbled across a reference to making chicken tikka masala. I clicked the links that led to further descriptions, until I found myself staring at the actual recipe on Allrecipes. The ingredient list was relatively simple, the method straightforward, the reviews mostly glowing (the main complaints centered around the bizarre fact that the recipe called for a whopping 7 [!!] teaspoons of salt, but that’s easy enough to correct). I could do this…so I did. It was fun, and it was delicious.

As usual, I marinated the chicken for 24 hours instead of 1 hour, and I used the George Foreman (sue me; it’s easy) instead of the grill. All fine, but then I nearly failed RTFR 101 (that’s Read the Freaking Recipe) by using a 15-ounce can of tomato sauce, the standard size at Trader Joe’s, instead of the 8-ounce can called for. I didn’t realize this until after the 20 minutes of simmering, when I sampled a spoonful and thought it pretty much tasted like a spicier tomato-cream sauce. Duh! In a panic, I hastily threw in random amounts of more spices, plus some 1% milk to thin it, and whatever I did must have worked, because the end result was quite tasty and really did seem comparable to the restaurant versions I’ve had. My one complaint was that the servings seemed a bit paltry, although admittedly my mind is probably contrasting them to the enormous standard restaurant portions; in reality this dish is pretty rich and we didn’t feel deprived. Still, there certainly wouldn’t have been much spare sauce if I hadn’t accidentally doubled part of it. Dude, the sauce is the best part! Even though I wasn’t serving it over rice (I don’t really like rice that much), I had made homemade naan (recipe to follow) and wanted plenty of leftover sauce for dipping. So, long story short, I’m going to straight-up double the sauce portions next time, although I’ll be using half-and-half instead of the original heavy cream, because 2 cups of cream is just too much for a weeknight dinner. I’ll also be increasing the chicken quantity slightly; the original recipe called for three breasts, no weights given, so I just picked up a package from the store at random—two breasts, large ones, but probably only about a pound. Next time I’ll make sure I’m reaching for one of the larger packages, aiming for 1½ pounds. I’d also like to try thighs instead, since I generally prefer dark meat.

With 2 whole teaspoons of cayenne plus a jalapeno, I was worried this would be way too spicy for me, but in fact it was just perfect. That cayenne is in the marinade, so most of it doesn’t actually get eaten, plus it gets mellowed by the yogurt and the cream. If you want more spice, you can leave the seeds in your jalapeno.

Even though this wasn’t rocket science, we thoroughly enjoyed it and I was really proud of myself for trying it, which just goes to show that it pays to break the rules (or at least your own arbitrarily self-imposed ones) every now and then.

P.S. Looking for a vegetable side dish to add some more color to this meal? I made green beans with ginger butter and it was the perfect accompaniment.

1 cup nonfat plain yogurt (I think thinner is better for marinades, so I used European-style instead of Greek)
1 tablespoon lemon juice
6 teaspoons ground cumin, divided
1 teaspoon ground cinnamon
2 teaspoons cayenne pepper
2 teaspoons freshly ground black pepper
1 tablespoon minced fresh ginger
2 teaspoons salt, divided
1 to 1½ pounds boneless skinless chicken pieces (breasts, thighs, or a combination), cut into bite-sized chunks
2 tablespoons butter
2 cloves garlic, minced
1 large jalapeno pepper, seeded and finely chopped
4 teaspoons paprika
1 15- or 16-ounce can tomato sauce
1½ to 2 cups half-and-half
¼ cup chopped fresh cilantro

1. In a large bowl, combine yogurt, lemon juice, 2 teaspoons cumin, cinnamon, cayenne, black pepper, ginger, and 1 teaspoon salt. Stir in chicken, cover, and refrigerate for 1 to 24 hours.

2. Preheat a grill or broiler. Thread chicken onto four skewers and discard marinade. Cook until juices run clear, about 5 minutes on each side. Set aside.

3. Melt butter in a large, heavy skillet over medium heat. Saute garlic and jalapeno for 1 minute. Season with 4 teaspoons cumin, paprika, and 1 teaspoon salt. Stir in tomato sauce and half-and-half. Simmer on low heat until sauce thickens, about 20 minutes. Remove grilled chicken from skewers, add to the skillet with the sauce, and simmer for 10 minutes. Serve garnished with fresh cilantro.

Serves: 4
Time: 1 hour 15 minutes, plus 1–24 hours marinating time
Leftover potential: Good.