Monday, October 31, 2011

SWEET POTATO, RICOTTA, AND ARUGULA PIZZA


Sweet potato. Ricotta. Arugula. Pizza. That’s all you need to know, OK?

What? No? More? Fine. I spotted this recipe (presented as an appetizer “flatbread,” but you say flatbread, I say pizza) at The Kitchn during The Great Ovenless Exile. I knew my stovetop pizza-making method (which I still need to detail for you sometime, considering that it has become my default pizza-making method, even though I still write all my recipes as though I’m baking them in the traditional manner) wouldn’t be enough to cook the sweet potatoes properly, so carefully squirreled it away, glancing at it longingly now and then, until My!New!Oven! finally arrived. It seemed like such a slam dunk: I love ricotta on pizzas, the contrasting colors were so bright and autumnal, and the peppery crunch of the arugula seemed like a perfect foil for the sweet starchiness of the potato.

And it was, indeed, very good. Not transcendent—it tasted exactly like the sum of its parts, although the thyme was a surprisingly nice, elevating touch—but I enjoyed it. One of the original recipe commenters had noted that she had difficulty getting the sweet potato slices to cook through by the time the crust was done, and I don’t have a mandoline or the requisite knife skills to slice a sweet potato that thinly, and besides, I still wanted to use my stovetop method, so I decided to precook the sweet potatoes in the oven, taking a page from this pesto-butternut squash pizza recipe. It worked fairly well, but I think I could have roasted them a bit less long, because they dried out more than I expected. Other than that, everything went smoothly and as written. As always with recipes where raw arugula is added at the end, it was a bit awkward to eat, with leaves falling every which way as soon as you take a bite, but if you add the arugula to the pizza immediately when it comes out of the oven, it does wilt a little bit, which helps. (I always just load up my pizzas with as much arugula as they can hold, which makes overflow a given.)

A was unenthused about this pizza, claiming that he doesn’t like sweet potatoes, which was news to me because he happily devours sweet potato fries and sweet potato spinach salad, but I suppose ketchup and bacon (respectively, not together) go a long way toward making anything palatable. His disapproval means this isn’t destined to become a favorite standby, but I’ll definitely make it again on occasion. It’s a fallish but light meal, which is perfect for this I’m-craving-squash-but-it’s-90-degrees-outside funk I inevitably fall into every October since I moved to Southern California.

1 sweet potato (about 12 ounces)
1 teaspoon olive oil
1 cup ricotta
2 teaspoons fresh thyme
1 pound pizza dough
1 cup grated Parmesan cheese, loosely packed
2 ounces arugula (two big handfuls)
Salt to taste

1. Preheat the oven to 400 degrees.

2. Peel the sweet potato and slice it into ¼-inch-thick rounds. Combine the slices with the olive oil in a large bowl and toss well to coat. Spread slices in a single layer on a baking sheet (coat with foil or parchment for extra ease) and bake for about 20 minutes or until tender.

3. Remove the sweet potatoes from the oven and increase the heat to 450 degrees.

4. In a small bowl, mix the thyme into the ricotta.

5. Roll out the pizza dough and place it on a baking sheet sprinkled with cornmeal or a little olive oil. Spread the ricotta mixture evenly across the top of the dough. Arrange the sweet potato coins in slightly overlapping layers on top. Sprinkle the entire surface with a little salt.

6. Bake pizza for 7 minutes, rotate it, and then bake for another 7 minutes, or until the edges of the crust are turning golden. Sprinkle the Parmesan on top and bake for one more minute or until melted.

7. Scatter the arugula on top of the pizza as soon as it comes out of the oven. Let it stand for a few minutes to allow the arugula to wilt. Slice and serve either warm or at room temperature.

Serves: 4
Time: 1 hour
Leftover potential: Good. I only added the arugula to the slices I was eating immediately, preferring to add fresh arugula to the leftovers after reheating them, but I think it would be OK reheated with the arugula already on top, too.

Thursday, October 27, 2011

MAYONNAISE


Behold! I have worked wonders! Actually, it turns out that making your own mayonnaise is a cinch, at least if you have an immersion blender. I’m not sure why I suddenly got crazy and decided to try this after watching a video at Serious Eats, but I did it and it worked beautifully—like a delicious magic trick! I’d love to whip this out at a party. Even though I technically understand how emulsification works, it still seems bizarre to me that an egg and a bunch of oil can combine in a matter of seconds to form a thick, creamy spread. (You’ll notice mine is a bit freckled, since I only had coarse-grain mustard on hand, but it tasted good all the same.)

The only problem with making my own mayonnaise is that…I don’t really like mayonnaise. I tolerate it a bit more than I used to, and the homemade stuff is certainly far superior to storebought, although I think some claims I’ve seen in recipe comments that homemade mayo will “change your life” or “convert mayonnaise haters” are overblown. I made this on a night I was serving fish cakes, so I used it in the cakes themselves and also in the tartar sauce I dolloped on top, which was noticeably improved by it. But most of the rest of the batch of mayo languished unused in the refrigerator, because I simply don’t have that many recipes that call for great quantities of it and I don’t eat a lot of sandwiches, dips, or creamy dressings. I don’t regret trying it because it was so easy and such a fun discovery, but in the future I’ll be saving it for special occasions. It would be fun to try adding garlic and/or herbs. I can definitely see myself making it periodically throughout the summer, when we tend to have BLTs on a near-weekly basis. I thought I’d perfected my BLT skillz, but this will take it to a whole new level!

1 large egg yolk, at room temperature
1 tablespoon room-temperature water
1 tablespoon lemon juice (from half a lemon)
1 teaspoon Dijon mustard
1 cup vegetable or canola oil (not olive oil; the flavor is too strong)
Kosher salt to taste

1. Place egg yolk, water, lemon juice, and mustard in the bottom of a narrow immersion blender cup. Pour oil on top and allow to settle for 15 seconds.

2. Place head of immersion blender at bottom of cup (directly over egg yolk) and switch it on. As mayonnaise forms, slowly tilt and lift the head of the immersion blender until all oil is emulsified.

Time: 5 minutes
Yields: About 1 cup
Leftover potential: Good; will keep in a sealed container in the refrigerator for 1 to 2 weeks.

OATMEAL BUTTERSCOTCH COOKIES


During my long ovenless purgatory, I kept wistfully bookmarking cookie recipes, and now that My!New!Oven! and I have gotten to know each other and are getting along like gangbusters, it’s time to start putting them to use. Cookies containing oatmeal are always my favorites (except for The Dreaded Oatmeal Raisin), and I’ve been hopelessly attracted to butterscotch chips in all their artificially flavored glory ever since I first encountered them them (in monster cookies) a few years ago, so the ubiquitous oatmeal butterscotch cookies (aka “oatmeal scotchies”) seemed like a no-brainer. I’d figured I’d just try the recipe on the Nestle Tollhouse butterscotch-chip bag (since I find their chocolate-chip cookie formula so hard to beat), until I stumbled across this one at Annie’s Eats. Annie attests that she has tried many oatmeal butterscotch cookie recipes and this one is the best, and how could I resist that?

This recipe varies from the traditional version by adding coconut and toffee bits, two other things I love. Combined with the always-on-the-verge-of-cloying butterscotch chips and the usual cookie ingredients, they conspire to make a very sweet cookie, although the oatmeal and cinnamon help to temper that somewhat. If you can get over the sugar high, however, the flavors are wonderful and the texture is perfect; the coconut adds tenderness and the toffee a bit of chew. I’d still like to try the standard recipe sometime just for the sake of comparison, but I’d definitely make these again.

This was my first time using toffee baking bits (I bought the Heath brand—the “Bits o’Brickle,” not the ones with chocolate), and I have to admit, they were pretty tasty. I’ve got some left over and am looking forward to trying them in another recipe.

1½ cups all-purpose flour
1 teaspoon baking soda
1 teaspoon ground cinnamon
½ teaspoon salt
1 cup (2 sticks) unsalted butter, at room temperature
1 cup brown sugar
½ cup granulated sugar
2 large eggs
1 teaspoon vanilla extract
3 cups old-fashioned rolled oats
1½ cups shredded coconut
1 cup butterscotch chips
½ cup toffee bits

1. Preheat the oven to 350 degrees. Line baking sheets with silicone baking mats or parchment paper.

2. In a bowl, combine the flour, baking soda, cinnamon and salt. Stir to blend, and set aside.

3. In the bowl of an electric mixer, combine the butter and sugars and beat on medium-high speed until light and smooth, about 2 to 3 minutes. Beat in the eggs until incorporated. Blend in the vanilla. With the mixer on low speed, mix in the dry ingredients just until incorporated. With a spatula, fold in the oats, coconut, butterscotch chips, and toffee bits until evenly combined.

4. Drop scoops of dough (about 2 tablespoons each) onto the prepared baking sheets, a few inches apart. Bake for 12 to 15 minutes, until just set and light golden, rotating the pans halfway through baking. Let cool on the pans about 5 minutes, then transfer to a wire rack to cool completely.

Yields: About 4 dozen cookies
Time: 1 hour
Leftover potential: Good; freezes well.

Thursday, October 20, 2011

MUSTARD-ROASTED POTATOES


My!New!Oven! was installed unexpectedly midweek, so I hadn’t had the chance to plan and shop for any recipes that would put it to use immediately. I did break it in by making chocolate chip cookies and baked oatmeal, two things I could throw together using ingredients already in my pantry, but it wasn’t until the following Sunday that I really got to bake my official inaugural meal. I didn’t have to think very long about what I wanted: roasted chicken with actual bones in it (not daring to attempt anything as ambitious as a whole chicken until the oven and I became better acquainted, I went with lemon-garlic drumsticks), and these potatoes, which I’d bookmarked at Smitten Kitchen last spring, after the “I love Dijon mustard” realization of early 2011, but before The Great Ovenlessness.

And it was AWESOME. Keep in mind that this is coming from someone who hadn’t eaten a roasted vegetable in five months, but these were easily the best potatoes I’ve ever made, crispy on the outside, tender on the inside, and so incredibly tasty. Old Me would have been scared off by the quantity of mustard I slathered on those things, but truthfully, after roasting, the overall taste wasn’t very identifiably mustardy (I don’t think if I’d tasted one blindfolded, I would have exclaimed, “Ah, mustard!”), just super-complex and dynamic and wonderful. It was a little more complicated to put together than many other roasted potato recipes I’ve tried, but every single one of those ingredients—oil, butter, lemon juice and zest, garlic, oregano, salt, and pepper—played a crucial role in the zippy flavor. In particular, the whole mustard seeds became addictively nutty and crunchy when roasted; I found myself picking up the crusty scraps that fell off the potatoes and devouring them straight off the baking sheet with glee. I’d better start buying larger jars of mustard, because this is going to be my go-to potato recipe from now on.

¼ cup whole-grain Dijon mustard (I used Grey Poupon Harvest Coarse Ground, which still has enough liquidity that it sticks to the potatoes easily; if your mustard is on the drier side, you may want to consider using 3 tablespoons of it and 1 tablespoon of regular, smooth Dijon to help things along)
1 tablespoon extra-virgin olive oil
1 tablespoon butter, melted
1 tablespoon freshly squeezed lemon juice
2 garlic cloves, minced
1½ teaspoons dried oregano
½ teaspoon finely grated lemon peel
½ teaspoon coarse kosher salt
1½ pounds small unpeeled red and/or yellow potatoes, cut into ¾-inch-wide wedges
Freshly ground black pepper to taste

1. Preheat oven to 425 degrees. Spray a large rimmed baking sheet with nonstick spray or coat with parchment paper.

2. Whisk mustard, olive oil, butter, lemon juice, garlic, oregano, lemon peel, and salt in large bowl to blend. Add potatoes; sprinkle generously with freshly ground black pepper and toss to coat. Place potatoes on prepared baking sheet, spreading them out in a single layer.

3. Roast potatoes 20 minutes. Stir, and then roast about 25 minutes longer, until crusty and browned.

(Potatoes can be made up to 2 hours ahead; let stand on baking sheet at room temperature, then rewarm in a 425-degree oven for about 10 minutes.)

Serves: 4–5
Time: 1 hour
Leftover potential: OK; leftover potatoes will be softer if reheated in the microwave, but they’ll still have great flavor. I haven’t tried reheating them in the oven, but I imagine that would restore them to something closer to their former glory.

Tuesday, October 18, 2011

APPLE, FETA, AND PECAN PIZZA


As soon as I saw this recipe in the October issue of Cooking Light, I dogeared the page. I had almost skipped over it because the title contained the dreaded (to me) phrase “goat cheese,” but I quickly noticed that feta was suggested as a substitute, and I think we’re all aware how much I currently adore feta. I do think pizzas topped with salad are difficult to eat gracefully (I refuse to resort to a knife and fork), but I can never resist fresh arugula with lemon-Dijon vinaigrette, and when you add apples, pecans, and cheese, you’ve got a perfect early-autumn meal.

Everything came together exactly as you’d expect. My!New!Oven! hadn’t been installed yet, so I didn’t follow the recipe exactly, using my now-habitual cast-iron-skillet-on-the-stovetop method and finishing it under the broiler (the only part of Sad Old Oven that still functioned). I realized while typing this just now that the recipe calls for a “six-grain pizza crust,” implying some sort of prepared, pre-cooked product, whereas I started with actual dough. I’m specifying dough in the recipe below, but I don’t think it should make too much of a difference which one you use; you just may need to cook it a bit longer when starting with raw dough. Just use your common sense—pizza recipes are always just loose suggestions anyway.

I did make a few changes that aren’t shown below. I doubled the dressing and arugula quantities, heaping some of the salad atop the pizza and whatever didn’t fit off to the side of the plate. This makes for a heartier meal and also gives you something to do with all the bits of nuts, cheese, apple, and arugula that will inevitably tumble off the pizza as soon as you take your first bite; just let them fall onto the plate, and then when you’re done with your pizza, stir all the detritus into the remaining greens and you’ve got a nice side salad to enjoy! I also amped up the lemon juice a bit in the dressing, because the honey was more noticeable than I’d expected and I prefer a more acidic taste with my salad; next time I might try leaving out the honey completely because I don’t think the added sugar is really needed when you’ve already got baked fruit. But all in all, the flavors went together wonderfully—the sweet apple, salty cheese, earthy nuts, and lemony dressing combine for a simple yet sophisticated lunch or light supper.

1 pound pizza dough
3 cups thinly sliced Fuji apple (about 8 ounces)
1 cup (4 ounces) crumbled feta or goat cheese
2 teaspoons chopped fresh thyme
1 tablespoon extra-virgin olive oil
2 teaspoons Dijon mustard
1 teaspoon fresh lemon juice
1½ teaspoons honey
2 cups baby arugula
3 tablespoons chopped pecans, toasted

1. Preheat oven to 450 degrees.

2. Roll out pizza dough and place on a baking sheet coated with cooking spray. Arrange apple slices evenly over crust; top with cheese. Sprinkle thyme evenly over cheese. Bake for 8 minutes or until crust is crisp and browned and cheese is melted.

3. Combine oil, mustard, lemon juice, and honey in a medium bowl, stirring with a whisk. Season with salt and pepper to taste. Add arugula and toss gently to coat. Sprinkle pecans evenly over pizza; top with arugula mixture.

Serves: 4
Time: 40 minutes
Leftover potential: Good; just store the cooked pizza, dressing, arugula, and pecans separately and assemble them after reheating the pizza.

Friday, October 14, 2011

LEMON PUDDING


And so we come to the end of my effort to make homemade versions of all my favorite Jell-O instant pudding varieties. (Well, I might try coconut someday…and maybe pumpkin…but I will not be attempting “cheesecake,” “Oreo,” “chocolate fudge,” “Devil’s food” [don’t ask me how Kraft’s three kinds of chocolate pudding differ from one another], “white chocolate,” “egg custard,” or “flan.” [Kraft’s online description: “But don’t be fooled by its elitist attitude this flavor is beloved by everyone.” Aside from the heinous lack of punctuation, how is flan even a flavor? Is it shorthand for caramel? And while we’re at it, the concept of custard-flavored pudding kind of blows my mind, too. Isn’t that like saying “yam-flavored sweet potato”?])

I used Food Blog Search to find my way to this recipe, from a book called Luscious Lemon Desserts by Lori Longbotham. There’s not much to say about it except that it’s lemon, it’s pudding, and it’s delicious. The recipe is structured a bit differently from other ones I’ve tried, in that you cook the egg at the same time as all the other ingredients instead of adding it later, but the result was pretty much the same. I like a really thick pudding, so for my taste, I should have cooked the pudding a tiny bit longer; I forgot that I’d be stirring in an entire ½ cup of liquid at the very end, which thinned it out somewhat. I also freaked out and threw in some vanilla at the last minute, on the principle that vanilla is delicious with everything and would give it a richer, smoother taste. I liked the resulting flavor, but I’m not sure I can out-and-out recommend it because the bright taste of the unadulterated lemon is great, too—I’d go with straight lemon for a spring/summer version, whereas mine was maybe more appropriate for fall/winter.

As I was making this, I pondered why other fruit-flavored puddings aren’t common. Why not strawberry, for instance? Couldn’t you make a lime or orange pudding using the same method as this lemon one, or would that just be gross? As you know, I had a hard time even finding a banana pudding recipe that had real banana in it. Most of my searches for fruit puddings turn up bread puddings, British-style puddings, or pudding cakes, not plain old pudding pudding. Although I’m not necessarily sure this is something I want to pursue—my ideas for future pudding experiments tend more toward peanut butter or maple. Which off-the-beaten-track pudding flavors sound good to you?

¾ cup sugar
¼ cup cornstarch
2½ cups milk
3 large egg yolks, lightly beaten
2 tablespoons finely grated lemon zest
A pinch of salt
½ cup freshly squeezed lemon juice
2 tablespoons unsalted butter, at room temperature
½ teaspoon vanilla extract (optional)

1. Whisk together the sugar and the cornstarch in a medium saucepan. Add the milk and whisk until smooth. Add the egg yolks, zest, and salt and cook over medium heat, stirring frequently at first and constantly towards the end, until thickened.

2. Remove the pan from the heat and stir in the lemon juice and butter. Press through a fine-mesh strainer into a large serving bowl or four individual serving dishes. Let cool to room temperature. Refrigerate, loosely covered, for at least 2 hours or up to 3 days, until set and thoroughly chilled.

Serves: 4
Time: 30 minutes
Leftover potential: Good, for a few days (I've found that homemade pudding eventually gets runny or sort of separates if you keep it too long, although it comes together with a vigorous stirring and still retains its essential yumminess).

Tuesday, October 11, 2011

ODDS AND ENDS

Lest you think I’m some sort of perfect kitchen goddess (aw, I know you were thinking it), I must confess to a recent string of cooking disappointments, or at least non-triumphs. Usually if a recipe turns out poorly I don’t bother to post it (don’t worry, though—if I had any really spectacularly inedible disasters I’d definitely write about them for your amusement), but in these cases it’s not the recipe that’s at fault, just my recipe-selection skills, and the results haven’t been unpleasant, just sort of…meh.

I blame the transition to autumn, which has me all confused about what’s in season, what I feel like eating, and what’s appropriate for weather that swings wildly between cool, rainy, and fallish and hot, sunny, and summery. My five-month ovenless state was also a factor, keeping at least half of my recipe collection off-limits and severely limiting which new things I could tackle. At first I approached the challenge with can-do pioneer spirit, trying to focus on what I could cook, but eventually the initial thrill of experimentation—Skillet pizza! Muesli! Puddingfest!—died down, leaving me feeling restless and deprived. I should have just hunkered down and relied on old favorites, but I still felt compelled to seek out and try new recipes to generate blog material, with decidedly mixed results. My to-be-posted queue got clogged with entries I felt ambivalent about, yet couldn’t completely discard. Maybe someone else would want to know about these recipes, or perhaps I’d try them again sometime and love them more, or hey, that photo turned out rather prettily…And so here we are. Now that I have a Brand-New Oven (I should just assign a macro for this phrase, because I’m totally going to try to work it into every blog post from now on), I’m ready to move forward, and I’ve decided a roundup is the best way to tackle all these lingering fragments.

Spinach, Mushroom, and Feta Pizza


I improvised this one after being inspired by, of all things, a pizza I glimpsed on an episode of Man vs. Food Nation. I love spinach, mushrooms, and feta on pizza, but it hadn’t occurred to me to put the three together. I made it so long ago that I can’t really remember the details to share them with you, but my approach was pretty much as you might expect. It turned out tastily, except that somehow, even knowing perfectly well how much spinach shrinks up when you cook it, I didn’t use quite enough and it faded into the background. I’m mainly mentioning this pizza here to remind myself of the concept, because I intend to make it again someday (with double the spinach) and do a full post when I’ve perfected it.


Chicken With Tomato-Herb Pan Sauce/Fresh Corn and Basil Polenta


We eat chicken about once a week, but at least half of my recipes use the oven, so I was getting desperate for new sautéed and grilled versions by the time I spotted this one, originally from Bon Appetit, at Annie’s Eats. It seemed to be getting rave reviews and looked like a super-flavorful treatment for boneless, skinless chicken breasts (oh, how I was missing chicken with actual bones in it at this point!), so I decided to give it a shot, but I wasn’t sure what to serve with it. It seemed like you’d want something to soak up all that savory-looking sauce, but I couldn’t make bread, I don’t like rice, and potatoes with tomatoes just seems weird to me. Annie’s Eats had linked to several other posts about the recipe at other blogs, and one of them, Pink Parsley, showed it being served with this beautiful fresh corn and basil polenta. As soon as I saw it, I wanted it, despite never having made polenta before. Tomatoes, corn, and basil are a perfect combo, after all, and I’ve been obsessed with corn all summer long.

Technically, the recipes turned out just fine…except it turns out that A hates polenta. I should have guessed this, knowing he dislikes other similarly-textured foods like oatmeal, not to mention the fact that he can take or leave corn. It also turns out that that recipe, which neglects to mention this so I assumed it would match the quantities of the chicken recipe, makes a TON of polenta—like eight servings. I figured I’d save the leftovers, let them firm up in a baking dish, and then cut them into squares and fry them up all nice and crispy, but alas, I never got around to it, and to my shame, I ended up throwing it all away. Personally, I liked the recipe, and normally I don’t let it bother me too much when A doesn’t care for something that I’ve made, because he always gives it a fair try and is polite and appreciative and hey, more tasty leftovers for me! This was just one of those cases where I wore myself out making two new recipes at the same time, and then by the time I sat down to eat I was so exhausted and Over It that the whole effort just felt like a horrible miscalculation and a complete waste of time. That’s the problem with having too many cooking victories in a row sometimes—the first thing that’s not a total win feels like a failure. I would definitely recommend the polenta recipe to polenta lovers (make a half-batch, though), and as for the chicken, I wouldn’t mind trying it again someday. Mine turned out a little dry, but the sauce was nice.

Asparagus and Bacon Hash

I actually just wanted to make the sweet corn hash again, but I was trying to restrain myself because it had only been a week since the first time I’d made it, plus corn season is so close to its end that I never know if it will still be there when I show up to the farmer’s market. I know asparagus isn’t in season either, but there’s always one stand selling decent hothouse stuff, and the Smitten Kitchen has never steered me wrong. Indeed, this was a great recipe, and if I’d tried it a month ago you’d definitely have been seeing a whole post about it here, but it doesn’t hold a candle to the corn hash, and I don’t know if I really love hash enough to accommodate two recipes in my repertoire. Maybe when spring rolls around I’ll feel inspired to give this another shot, and if it looks good to you I totally recommend it, but I didn’t care quite enough about it to give it the full blog treatment.

BLT Pizza With Corn


This was another improvisation on my part (I know! Who am I all of a sudden?), an homage on my favorite summer meal of BLTs and corn on the cob. It should have been a slam dunk, considering it involved diced bacon, wilted arugula, heirloom tomato slices, fresh corn kernels, and shredded mozzarella, but somehow it didn’t quite gel. It was quite moist—the tomatoes gave off a lot of liquid, the arugula cooked more than I expected, and maybe I used too much cheese?—and the bacon flavor didn’t come through as much as I expected (I’m thinking I cut the pieces too small). Perhaps I should have scattered fresh arugula on top rather than baking it on there? It tasted just fine and we certainly had no trouble polishing it off, but I was vaguely disappointed. I’m not sure whether I’ll give it another shot or whether I should just let BLTs be BLTs and pizza be pizza.

Maple Frozen Yogurt

Once I’d burned through all the homemade pudding flavors I could think of, it was luckily cool enough to start making ice cream again. I wanted something fallish, but wasn’t quite ready for pumpkin yet, and maple seemed to fit the bill. I wouldn’t describe myself as a maple fan because I hardly ever put syrup on my pancakes or waffles, but when I think harder about it, I have periodically enjoyed maple-flavored things—like Nut Goodies, Minnesota’s distinctive local candy, with which I have a fond history. (At my last job, I wrote a children’s book about candy making that was based on the Pearson’s factory, which involved many tours and all the free Nut Goodies and Salted Nut Rolls I could ever want.) That is apparently the point at which my brain stopped working. This recipe at Sassy Radish was described in such glowing terms that I never really stopped to ponder the fact that it was frozen yogurt and thus tart. Or that it involved sour cream, which is even tarter. All the frozen yogurts and sour cream ice creams I’ve made thus far have been fruity, which to some extent has masked/complemented the tartness, so all I was thinking of was how wonderfully thick sour cream ice cream can be. The maple frozen yogurt was easy to put together, and it sure felt like I was putting in a ridiculous amount of maple syrup (it feels quite bizarre to pour syrup into a bowl of dairy products, by the way), but I was surprised by how not-sweet the result was. I added a bit more syrup (and, in a moment of panic, some vanilla), but the dominant flavor was still, surprise, surprise, yogurt.

What had I been thinking? I do like yogurt, but since I’m on the fence about maple anyway, I’d geared myself up for something candy-sweet, like the interior of a maple cream See’s chocolate, and I had a hard time not being crushed that it didn’t meet my expectations. Still, it wasn’t bad enough to throw away, so it had to be eaten. I knew A wouldn’t like it—he hates that tangy yogurt flavor—but he wasn’t home anyway, so I resignedly scooped myself a bowl. I don’t know whether it was Stockholm Syndrome or what, but after a few bites I really liked it! The syrup flavor was just a subtle sweet smokiness, well balanced by the creamy tartness of the dairy. I wouldn’t make it again, just because I know A won’t eat it (he did try some later and declared his dislike) and I shouldn’t be polishing off entire batches of frozen treats on my own, but I enjoyed it and would recommend it to others. (Just remember: Is tangy!) It also inspired me to look for more maple dessert recipes. I’d like to try a maple pecan ice cream, sure, but I also had a brainwave: Why not maple pudding? It turns out there are several recipes I can try, so yay.

Crustless Broccoli-Feta Quiche

Now that I have my Brand-New Oven, I can try all the baked recipes that have been sitting in my queue for months. This simple, easy egg dish from Poppytalk seemed like a perfect Saturday-night supper, and indeed it was (it would also make a good breakfast or lunch). Not quite exciting enough to devote a whole post to, but the kind of thing I’m glad I know about because it’s so easy to throw together. Obviously, you could use put anything you want into it, but I like broccoli and feta together, and feta and dill together for that matter (baked feta is my love right now—it gets so tantalizingly crisp and browned), so this worked well for me.

So now that I’ve cleared away all my ambivalence, stay tuned for some recipes that got me genuinely excited! I’m kicking it into high gear and putting my Brand-New Oven through its paces this week—I hope it's up to the task.

Thursday, October 06, 2011

PISTACHIO PUDDING


Yes! More pudding! If you’re some kind of weird pudding hater, be forewarned that there is actually still one more pudding recipe in the to-be-posted queue. After that, however, you’re in luck, because glory hallelujah, after suffering with just a stovetop and a broiler lo these many months, I finally have a brand-new oven, which means I will be reveling in cookies and cakes for the foreseeable future. Not that I will ever lose my newfound love of homemade pudding. In fact, Weird Pudding Hater, you can send all your unwanted pudding my way and I’ll gladly finish it off for you.

As far as I can remember, I never tasted a real pistachio until I was well into high school (I just don’t recall seeing them around when I was a kid—maybe they were harder to obtain in Minnesota back then or something?), but Jell-O instant pistachio pudding was always my very favorite flavor, even if I had no idea what it was supposed to taste like or why it was green. I loved it with an intensity matched only by my adoration of the croissants from Napoleon’s Bakery that were stuffed with a fat layer of almond paste. Later, I discovered that the green layer of spumoni ice cream was usually pistachio-flavored, and I would carefully excavate only that portion from my college cafeteria’s self-serve ice cream freezer, leaving the boring chocolate and weird chunky cherry parts behind. What can I say? I’ve always loved those somewhat old-fashioned dessert flavors (see also: butterscotch, butter pecan, butter brickle, maple nut). So as soon as I realized, thanks to this recipe at Joy the Baker, that I could make homemade pistachio pudding using real pistachios, which remain perhaps my favorite kind of nut (although it’s a close tie with cashews), I was all over it.

I made this recipe once before, early in my pudding-making adventures, but didn’t manage to photograph it before we devoured it all. That time, craving a perfectly silky-smooth pudding, I carefully strained it after cooking to remove all the pistachio bits. It was good, but on the thin side, because I wasn’t perfectly experienced with cooking puddings yet. This time around, tired and pressed for time, I just said “Screw it” and skipped the straining, and I gotta say, I don’t know if it was that or my improved pudding-making skills, but it was even better than before. Leaving the pistachio pieces in obviously heightens the flavor, and the texture is nubblier but not off-putting—and actually more reminiscent of the good old Jell-O version, which did have little nut chunks sprinkled throughout. You will, however, notice that unlike the Jell-O version, my pudding is more golden-brown than green. That’s because I lazily used the shelled pistachios from Trader Joe’s, which I’m guessing are roasted after being shelled, thus losing most of their color. If you have the patience to shell the pistachios yourself, you should be rewarded with a gentle green hue.

Ever since I first made this, I’ve been dying to know if I could achieve a decent almond pudding (as tasty as those almond-paste-filled croissants, perhaps?) by substituting almonds for the pistachios and almond extract for some of the vanilla. It seems like it should work, right? I’ll give it a try sometime and let you know—once I’m done playing with my new oven, that is.

½ cup salted pistachio nuts, plus extra for garnishing if desired
⅔ cup granulated sugar, divided
2 tablespoons water
2 cups milk (original recipe calls for whole, but 1% worked for me)
2 large egg yolks
2 tablespoons cornstarch
1 pinch of salt
1 teaspoon pure vanilla extract
2 tablespoons unsalted butter, softened

1. Place ½ cup pistachios in the bowl of a food processor. Pulse until the nuts are in small bits. Add ⅓ cup sugar and the water, and blend until relatively smooth.

2. Spoon pistachio paste into a medium saucepan. Add the milk and whisk over medium heat until steamy and hot.

3. While milk is heating, whisk together ⅓ cup sugar, egg yolks, cornstarch, and pinch of salt. (Mixture will be thick; keep whisking until it’s smooth.) Pour ½ cup of the steaming pistachio milk into the sugar and egg mixture; whisk together. Add another ½ cup of hot milk and whisk to incorporate. Return the milky egg mixture to the saucepan over medium heat.

4. Heat pudding mixture over medium heat until thick and bubbly, whisking constantly. (You might also want to use a heat-proof spatula to stir the mixture, ensuring that the sides and corners of the pan aren’t burning.) Boil for about 1 minute, or until fully thickened. Remove from heat and stir in butter and vanilla extract, until butter is melted. If you want a smoother pudding, press cooked pudding through a fine-mesh strainer set over a medium bowl to remove the pistachio pieces.

5. Spoon into small ramekins, cover the surface of the individual puddings with plastic wrap if you don’t like pudding skin (I happen to love it), and refrigerate for at least a couple of hours. If desired, garnish with chopped pistachios before serving.

Serves: 6
Time: 30 minutes
Leftover potential: Good; pudding will last, covered, in the refrigerator for about 4 days.

Monday, September 12, 2011

CHOCOLATE PUDDING


Once I began my pudding mania, chocolate pudding was bound to happen, and I am happy to report that it was just as delicious as expected. I’d bookmarked this recipe from Smitten Kitchen, but at the last minute I balked at the thought of having to futz with a double boiler, even though I’m sure pudding made with pure melted chocolate is divine. I figured there must be puddings made with cocoa powder instead, and as usual, Simply Recipes delivered a strong, straightforward one.

As usual, I used 1% milk instead of whole and detected no ill effects. I also tossed in a little vanilla extract, because it always seems to make chocolatey things taste even better. My one error was managing to cook my pudding until it was actually a tiny bit too thick; I didn’t really think that was possible, but I’d forgotten that this pudding would be enriched with chocolate chips at the end, which of course makes it set to a firmer consistency. Mine was almost like a soft ganache instead of a pudding—not unpleasant by any means, but I think I’ll go easier on it next time. This is definitely a must-have basic recipe, so easy to throw together whenever a chocolate craving strikes. If you’ve never made pudding that didn’t come out of a box (which I certainly hadn’t before this summer), I urge you to give this one a try.

¼ cup sugar
¼ cup unsweetened cocoa powder
2 tablespoons cornstarch
1 pinch of salt
2 cups milk (original recipe calls for whole, but 1% worked fine for me)
1 large egg
½ teaspoon vanilla extract
4 ounces semisweet chocolate chips

1. Whisk together the sugar, cocoa powder, cornstarch, and salt in a heavy 2-quart saucepan. Gradually whisk in the milk. Bring to a boil over medium heat, whisking constantly, and boil, continuing to whisk, until pudding is thick, about 3 to 5 minutes. Remove from heat.

2. Immediately beat the egg lightly in a medium heat-proof bowl. Very gradually, add the hot chocolate mixture to the egg, whisking constantly. Whisk in the vanilla, then add the chocolate chips and stir until they are melted and the mixture is smooth.

3. Pour the pudding into the ramekins or cups. If you want, cover the surface of each of pudding with plastic wrap or wax paper to prevent a skin from forming. Refrigerate, covered, until cold, at least 2 hours.

Serves: 4
Time: 30 minutes
Leftover potential: OK; pudding will keep for a few days in the fridge.

SWEET CORN HASH


Shortly after making chilled avocado soup with a corn-bacon-jalapeno-onion-cilantro topping so delicious I could have just as happily eaten it sans soup, I stumbled across a recipe that’s pretty much exactly that. This iteration—from The Way the Cookie Crumbles, based on a version by Joy the Baker, who is the source of the avocado soup recipe, so we have truly come full circle here—is rounded out into a hearty breakfast (or, in my case, a cozy Saturday night supper) with the addition of potatoes and eggs. I punched up the color and vitamins by serving the whole thing over a bed of greens (spinach because I had an orphaned half-bag in the fridge, although I would have used arugula otherwise), which added a nice freshness and texture—the greens achieve a pleasant state of semi-wiltiness, with the egg yolk coating them like a dressing. The original recipe didn’t call for jalapeno, but Bridget mentioned adding roasted green chile, and since jalapeno had been so tasty in the soup topping, I figured it would be good here, too (spoiler: it was). And, in a further effort to replicate the magic of the soup topping, I subbed cilantro for parsley again and was well pleased.

My one misstep was to distrust the idea of cooking potatoes in the microwave (I know it’s perfectly possible, but I’ve never done it and our microwave is rather temperamental, so I wimped out). The original Joy the Baker recipe calls for them to be roasted, but my oven’s still defunct (GRRR), so I boiled them instead. This of course (a) took more time than microwaving and (b) made them quite soft and damp, which in turn made them take forever to get browned and crispy in the skillet, and they broke down quite a bit in the process. I don’t know why I didn’t just start frying the potatoes from a raw state, which is what hash recipes usually direct you to do, except that sometimes it’s hard to get the potatoes tender that way before they’re too well browned on the outside, and if there’s one thing I hate, it’s a crunchy potato. (This is, in my view, the downfall of 70 percent of restaurant breakfast potato preparations.) In retrospect, I should have just tried the microwave method. Next time! For there will certainly be a next time; this is my favorite version of hash I’ve ever made. I loved the way the sweetness of the corn balanced out the smoky fried flavors, with a hint of spice from the pepper and brightness from the cilantro. Also, I’m late to the party with this—it took me a long time to learn to tolerate runny yolks—but I’m becoming obsessed with topping things with eggs. Note to self: Eat more eggs; you like them. Also: learn to poach.

4 slices bacon, chopped
4 medium red potatoes, cubed
1 onion, chopped
1 medium jalapeno, seeded and chopped
4 ears corn, kernels removed
¼ cup cilantro, minced
Salt and freshly ground black pepper to taste
4 eggs
4 large handfuls spinach or arugula (optional)

1. In a large nonstick skillet (preferably cast iron) over medium heat, cook the bacon until almost crisp.

2. While the bacon cooks, put the potatoes in a medium microwave-safe bowl; spoon a couple teaspoons of rendered bacon fat from the skillet into the bowl; stir. Cover the potatoes loosely and microwave on high for 3 minutes, stirring twice.

3. Add the onions, jalapeno, and potatoes to the skillet with the bacon; cook, stirring occasionally, until browned, about 8 minutes. Stir in the corn and most of the cilantro.

4. Lower the heat to medium-low. Using the back of a spoon, create 4 wells in the hash. Break one egg into each well; season with salt and pepper. Cover the pan and cook, without stirring, until the white is set, about 8 minutes. Garnish with the remaining cilantro; serve immediately, over spinach or arugula if desired.

Serves: 4
Time: 1 hour
Leftover potential: OK, except the eggs will not keep or reheat well. If you’re planning to save some as leftovers, fry the eggs separately for the servings you’re going to eat right away (as shown in the photo above), then fry additional eggs as needed when it’s time to eat the leftovers. Alternately, you can break the eggs into the cooking pan but break the yolks of the ones you want to save for leftovers, so that they cook thoroughly and harden (they will be slightly tough in the leftovers, but edible—more of a scrambled consistency).

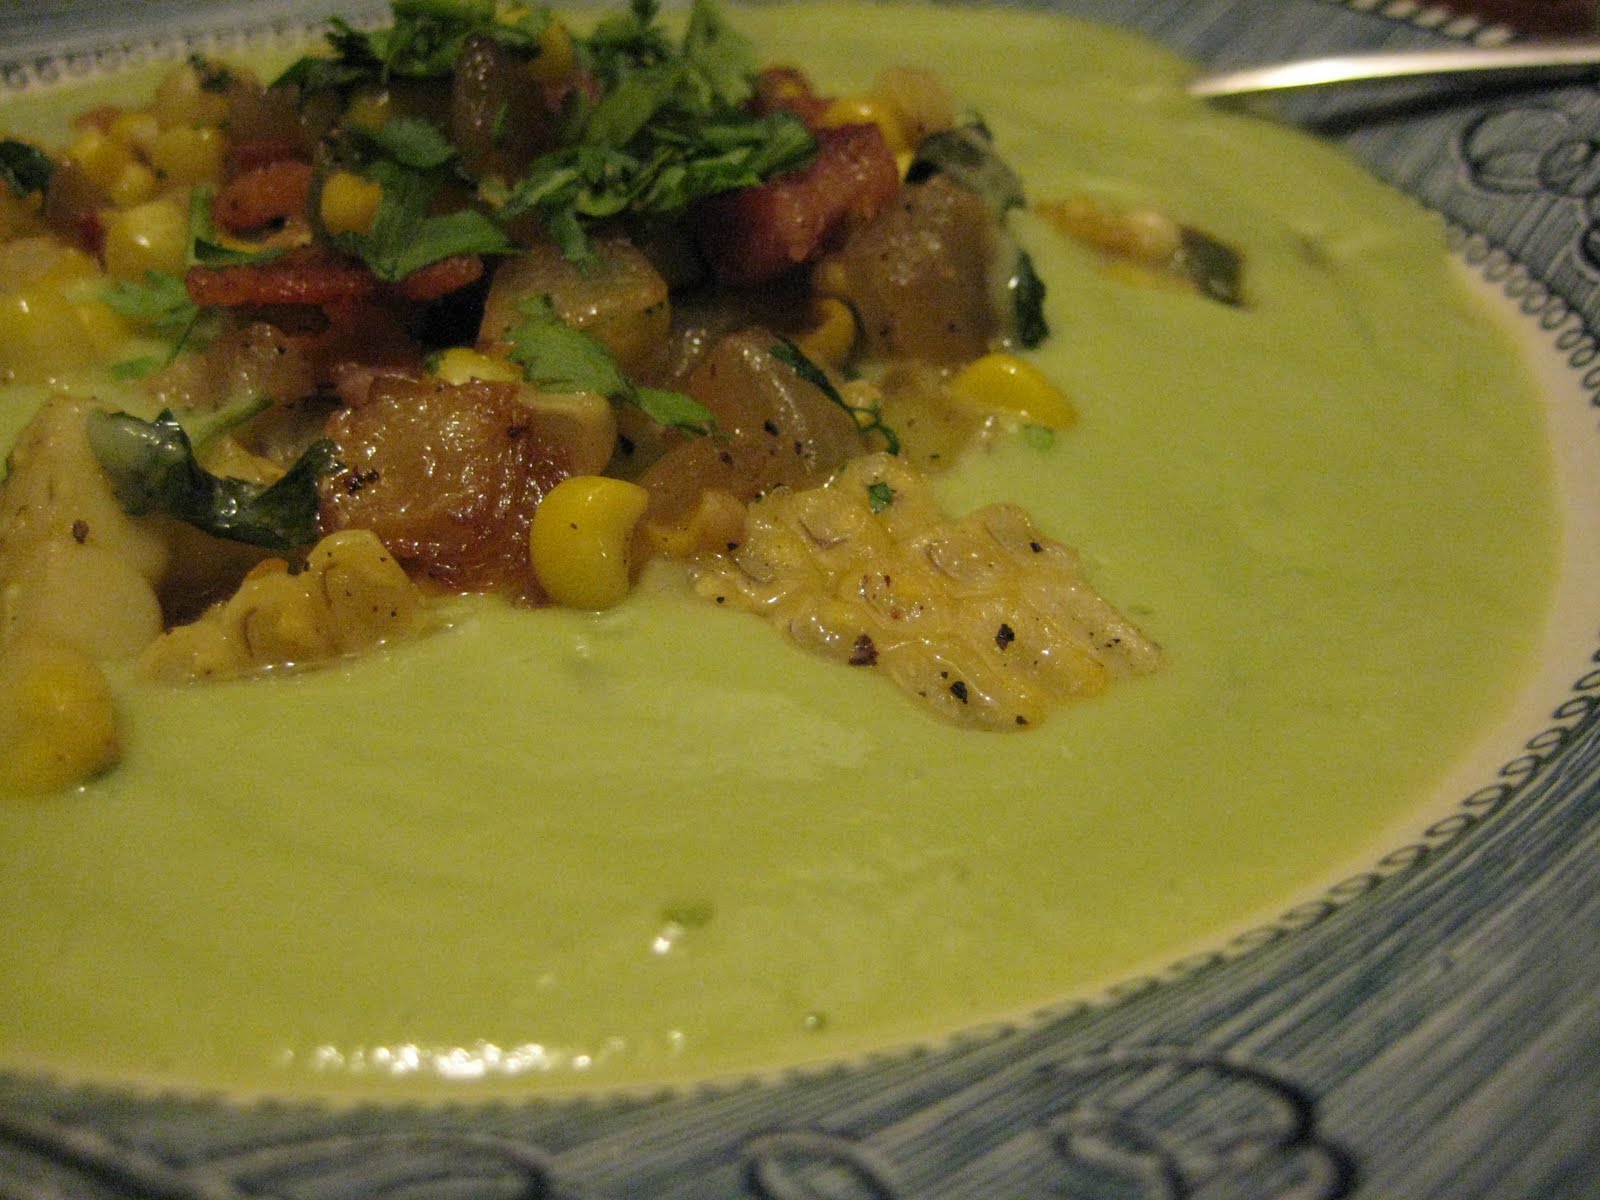
CHILLED AVOCADO SOUP WITH CORN AND BACON


In general, ice cream and popsicles aside, I don’t like cold food. Even in the hottest weather, I prefer my salads at room temperature. And the less said about cold pizza, the better. (Ugh, I can’t get over the congealed melted cheese.) Obviously, then, I have never really warmed (ha) to chilled soups. Most of the gazpachos I’ve encountered have just made me feel like I’m eating a big bowl of salsa. Given that logic, when I spotted this cold avocado soup at Joy the Baker I should have assumed it would taste like eating a big bowl of pureed guacamole, but instead I thought, “Ooh, pretty!” and “Ah, corn and bacon!” Maybe it’s just that I really like guacamole, or maybe the warm topping made it seem less like sauce disguised as a meal to me, but I bookmarked it instantly and made it soon afterward, in the throes of a 100-plus-degree heat wave.

This soup is good, with a wonderful velvety texture. The dominant flavors are, of course, avocado and lime (which I was even more generous with), but the savory broth (the recipe called for vegetable, but I used homemade chicken stock because I like its flavor so much) and the dollop of dairy (the recipe suggested sour cream, crème fraiche, or milk, but I knew plain yogurt—specifically, Trader Joe’s nonfat European-style yogurt, which is thin but not watery and my go-to for stirring into soups and sauces—would be the perfect choice for me) save it from guacamole-dom. I took a taste after blending it up and liked it pretty well but wasn’t sure I could eat a whole bowl of it. But the topping—oh, the topping!

The original recipe called for “cooked bacon,” as though you would just happen to have some sitting around, and then had you sauté the vegetables in olive oil. LOGIC FAIL! The best part of bacon is the grease, specifically the heavenly, transformative things it does to whatever you happen to cook in it. So I fried up some bacon, removed it from the skillet, and then cooked the onion, corn, and jalapeno in it, which was absolutely the correct choice. My second gripe with the original recipe was that it called for parsley when, to me, cilantro is made for moments like this—big handfuls of it, too. I mean, with avocado, jalapeno, and corn, we’re clearly already rocking this soup southwestern-style, am I right? When the topping mixture was all softened and browned and generously seasoned, I took a taste and had to stop myself from eating the entire skilletful with a spoon while standing over the stove. Stirred into the soup, it elevated it from “Hmm” to “Hell yes!”, its smoky heat providing much-needed textural, temperature, and flavor contrasts to the cold green creaminess. Instead of feeling like I was eating a beverage or condiment in a bowl, I thoroughly enjoyed this as a refreshing, satisfying summer meal.

Sauteeing the topping in bacon fat and swapping in cilantro really made this dish extra awesome, but then I made a major misstep in packaging up the leftovers: Not realizing how much I was going to enjoy the interplay between the warm topping and the cold soup, I premixed all my topping and soup portions before putting them in the fridge (perhaps I was a bit distracted by the complicated serving instructions in the original recipe, which asked me to put the topping in the bowls and then add the soup around it; for me, that just ended up burying the topping). When I went to eat the leftovers, I realized this meant I either had to heat the whole thing up (Cooked avocado soup? No thanks) or eat it all cold. It turned out I didn’t enjoy the topping nearly as well cold—especially the soggy-chewy-greasy texture of the bacon—and it was clear I should have stored the two components separately, so I could microwave the topping and then add it to the chilled soup. If I’d done that, this recipe would have been downright perfect. Oh, well; live and learn. I’m almost hoping for another heat wave this month (not unlikely, given Southern California’s traditionally hot Septembers) so I have an excuse to eat this one more time before autumn sets in.

2 ripe avocados
1 cup vegetable or chicken broth
1–2 tablespoons lime juice
2 tablespoons plain yogurt (or sour cream, creme fraiche, or milk)
¾ teaspoon salt, plus extra to taste
1¼ to 1½ cups water
1 tablespoon olive oil
1 small yellow onion, diced
2 ears fresh corn, sliced from the cob
1 small jalapeno pepper, de-seeded and diced
4 slices diced bacon
1 handful cilantro, chopped
Freshly cracked pepper to taste

1. To make the soup, place avocado flesh in a blender along with broth, lime juice, yogurt (or sour cream, crème fraiche, or milk), and ¾ teaspoon salt. Blend until the avocados are creamy. Remove the center from your blender lid, and while blending, slowly add 1¼ cups water. Soup will be done when smooth, with your desired consistency—feel free to add another ½ cup water if you prefer a thinner soup. Taste and add salt and pepper as necessary. Place in a covered container in the fridge (I just left it in the blender pitcher) while you make the topping.

2. To make the topping, cook bacon in a skillet over medium heat until crisp. Remove bacon with a slotted spoon and set on a paper-towel-lined plate to drain. Add onion to the bacon fat in the skillet and cook until translucent and browned, about 5 minutes. Add corn and jalapeno and cook for 3 minutes more. Add bacon and cilantro. Cook until everything is warmed and just browned. Season with salt and pepper to taste.

3. Divide the cold soup into four bowls and top each with one-quarter of the warm topping mixture (unless you’re planning on keeping some of the soup as leftovers—see my note below). Garnish with additional cilantro, if desired.

Serves: 4
Time: 40 minutes
Leftover potential: Soup will last for about three days in an airtight container in the fridge. I recommend storing the topping mixture in a separate container, so you can reheat it before adding it to the cold soup.

BANANA PUDDING


After getting hooked on homemade pudding, I started looking for new pudding recipes. I’d already bookmarked the usual suspects, vanilla and chocolate—which make up the vast majority of available recipes—as well as my childhood faves, butterscotch and pistachio, but it was surprisingly hard to find other options. In trying to narrow my search, I was brainstorming my way through the Jell-O instant pudding varieties and remembered banana pudding. Literal banana-flavored pudding, not the Southern dessert made with vanilla pudding, sliced bananas, whipped cream, and Nilla Wafers. I do remember my (most definitely not Southern) mom making this occasionally when I was a kid, and although I liked the flavors together, I was never really a fan of all that lumpy stuff interrupting the nice, smooth texture of my pudding. I preferred the fake-banana flavor of the instant variety, so I thought it would be fun to try to replicate that with real banana. Unfortunately, 99 percent of the “banana pudding” recipes on the Internet are for the Southern-style version, and of the remaining 1% that are actually banana flavored, most seem to call for banana extract rather than an actual banana. After a dogged search, however, I finally found what I was looking for—at least, sort of—at Homesick Texan. It was still a version of the Southern dessert, but lo and behold, there was a pureed banana in the pudding itself!

I ended up improvising to an uncharacteristic degree with this one. I tinkered with the procedure to make it more similar to the other pudding recipes I’ve made (adding the egg midway through the cooking time rather than at the end), but my main changes were to the banana cooking method; since my oven was broken, I couldn’t roast the banana as the recipe asked me to. My original plan had been to use a ripe frozen banana instead (I always have some in reserve for banana pancakes), because when defrosted again they become almost totally liquefied. But then I happened to acquire some non-frozen ripe bananas from work that week, and I couldn’t resist gilding the lily. I’d had great success with adding rum to my vanilla pudding, so what about taking a cue from bananas Foster and putting rum in my banana pudding too? And if I was doing that, I should really go whole hog and sauté my banana in butter and brown sugar, right? I don’t even like bananas all that much, but I can’t resist a caramelized banana. I also, afraid there wouldn’t be enough banana flavor, used two small bananas instead of one large one.

For the most part, I think my plan worked pretty well, but I’d like to experiment a bit more in the future. I went easy on the brown sugar (just 1 tablespoon, I think) in sautéing the banana, fearing the finished pudding would be too sweet, but I didn’t end up getting much caramel flavor and almost wished for more sweetness at the end. The caramelizing also created some textural challenges; as the pureed banana mixture cooled while I heated the milk, the sugar resolidified and I had to whisk it like the dickens to break up the chunks after adding it to the pot, so either this isn’t the best method, I need to sauté the banana simultaneously while heating up the milk so it doesn’t get a chance to cool, or I need to learn to live with some lumps in my banana pudding. The latter may well be the case; I always think of bananas as being smooth and soft, but they have some fibrousness to them and never break down entirely in baked goods, so it’s probably unrealistic to expect them to do so here. I suspect the reason that I didn’t find many pudding recipes using real banana is that it’s nearly impossible to get a totally smooth end product resembling the creamy, pillowy artificially flavored Jell-O version. I even strained mine to be sure and still ended up with small grainy flecks. But if I can live with pistachio pieces in my pistachio pudding, why not banana pieces in my banana pudding? Or did I simply use a bit too much banana?

Texture issues aside, the flavor was quite good. I thought it tasted a smidge flat (it needed more brown sugar, a pinch of salt, or both), but A, who was absent for the initial tasting session and ate his portion after I went to bed, loved it so much that he wrote a note to me on the bathroom mirror singing its praises, so it’s possible my expectations were just too high. Even though it wasn’t my favorite of the puddings I’ve made so far, it was certainly worth making again. I’d like to try some variations to see if I can improve it, though—once with the frozen-and-defrosted banana to see if that makes it smoother, once (if my oven is ever repaired) with roasted banana as written, and once again with the caramelized banana but more brown sugar. The best thing about pudding is that it always seems to taste good even if it’s too thick or too thin or too lumpy, so I’m happy to devour any number of “failed” batches in the name of science. I’ll keep you posted!

1 large ripe banana or 2 small ripe bananas
1–2 tablespoons butter
2 tablespoons brown sugar (optional)
2 cups milk (1% worked just fine for me)
⅓ cup white sugar
3 tablespoons cornstarch
1 egg
1 teaspoon vanilla
1 teaspoon rum (optional)

1. Place the unpeeled banana(s) on a parchment-paper lined sheet and roast in the oven at 400 degrees for 15 minutes or until skin blackens; then peel banana and lightly mash with a fork. Alternatively, peel and slice the banana(s) and sauté in 1 tablespoon butter over medium heat with the 2 tablespoons brown sugar, then puree with a food processor, blender, or immersion blender until smooth.

2. Place the milk, white sugar, and cornstarch in a saucepan, mix well with a whisk, and cook over medium heat, stirring constantly, until just before it boils. Add the mashed banana and whisk until as smooth as possible.

3. Beat the egg in a separate dish. Very gradually add 1 cup of hot pudding, stirring constantly, and then add egg mixture back to the pot of pudding on the stove.

4. Bring pudding to a boil, stirring constantly, and boil 1 minute or until thickened.

5. Remove pudding from heat and mix in the vanilla, 1 tablespoon butter (I skipped this here since I’d already sautéed the banana in butter, but you could do both for a richer pudding), and rum (if using).

6. Press pudding through a fine-mesh strainer to remove any stringy banana pieces.

7. Divide pudding among four ramekins or airtight containers, cover surface of pudding with plastic wrap if you don’t like pudding skin, and chill.

Serves: 4
Time: 1 hour
Leftover potential: Will keep in the fridge for a few days.

Thursday, September 08, 2011

HERB GARDEN POTATO SALAD WITH SPINACH AND LEMON


I seem to be accumulating a lot of potato salad recipes for someone who hates potato salad—or at least claimed to until last year, when I realized it doesn’t necessarily have to be ice-cold and dripping with mayonnaise). Just when I think I’m all set with my two faves, along comes another good-looking recipe, like this one from The Kitchn, so alluring with its lemony greenness. I love potatoes with dill and parsley and shallots, I love lemon-olive oil dressings, and I love spinach, so it seemed like it couldn’t go wrong—and it didn’t, even though I tried my best to flub it by temporarily forgetting how many ounces are in two pounds and only putting in three-quarters of the amount of potatoes. Luckily, one of the main things I like about this recipe is how many greens are packed in here, yet they’re wilted by the heat of the potatoes so you still feel like you’re eating a potato dish, not a leafy salad with potatoes in it. Even A, not always a veggie fan, claimed to like my overly high ratio of spinach to potatoes and said he’d happily have it that way again.

Aside from that inadvertent change, I did make one important improvement to the recipe: adding Dijon mustard to the dressing. I think mustard and potatoes are BFFs, but even if you don’t care for the flavor of mustard that much, a dab of it in a salad dressing will work savory wonders without necessarily being identifiable as mustard. I always add it to my everyday lemon vinaigrette, and since the dressing here was basically the same thing, I thought it seemed a shame to leave it out. Mine was probably a pretty heaping spoonful, but I’ve added it to the recipe below as a more modest 1 teaspoon; use your judgment depending on your degree of mustard love. My one regret: Adding the 1 teaspoon of sugar that the original recipe called for. I was trying to play by the rules the first time around and trust that it added some important element, but I should have trusted my instincts—I enjoy my lemony tartness straight up, so I could taste the sweetness in the dressing and didn’t like it. I wouldn’t add the sugar in the future, and I’ve removed it from the recipe below.

Lemons and dill and new potatoes always remind me of spring, so that’s when I’d be most likely to crave this salad, but it was good in the summer too. Plus, since it can be served warm and the ingredients are things most people can get fresh year-round, it would be a lively way to brighten up your winter diet.

2 pounds extra-small Yukon Gold potatoes
1 large lemon, juiced and zested
⅓ cup olive oil
1 teaspoon Dijon mustard
5 ounces fresh baby spinach, well-washed
⅔ cup flat-leaf parsley leaves, loosely packed
⅔ cup fresh dill fronds, loosely packed
3 shallots, peeled and thinly sliced
Coarse salt and freshly ground black pepper

1. Heat a large pot of water to boiling and salt the water generously. Add the potatoes and cook for 15 to 18 minutes, or until they are quite tender and creamy. Drain, slice each potato in half, and place them in a large bowl.

2. In a measuring cup, whisk together the lemon juice, zest, mustard, and olive oil. Whisk until well-combined; it will be thick and opaque yellow. Pour over the hot potatoes and stir gently until the potatoes are coated with dressing.

3. Slice the spinach leaves into thin ribbons. Mince the parsley leaves and the dill fronds as well. Add the spinach, parsley, dill, and shallots to the potatoes, and toss gently. The spinach and herbs will wilt as they are combined with the hot potatoes. Taste and season with salt and pepper as needed. Serve warm, at room temperature, or chilled.

Serves: 4–6
Time: 45 minutes
Leftover potential: Good.

Tuesday, September 06, 2011

WATERMELON SALAD WITH FETA, MINT, AND LIME


Even though I firmly believe summer isn’t summer without watermelon, my appetite for it is limited. I love its cool, crisp, and well, watery properties, but its sweetness can be cloying. I’d had savory treatments of watermelon before—a restaurant near my office serves a complimentary appetizer of watermelon with balsamic vinegar, feta, and basil—but they’d never really spoken to me. This one, however, looked so pretty, and I am fully aware what wonderful things mint and lime can do for fruit, and my obsession with feta only grows, so I gave it a try and HOLY COW, PEOPLE.

Make this right away. Seriously. It does crazy things to your taste buds, transforming the relatively uncomplicated flavor of the watermelon into a salty-sweet-savory kaleidoscope. You can even leave off the cheese if that seems just too weird to you—it does add a wonderful saltiness, and the contrast of its creaminess with the liquidity of the watermelon is interesting, but I’m convinced that it’s really the lime, mint, and pinch of salt that I love the most here. The lime adds that tang I’m always missing from watermelon, the mint makes the watermelon even more refreshing than you ever dreamed possible, and the salt cuts the sweetness so much that it really brings out the melon flavor in the watermelon, something you can’t always detect when it’s accompanied by all that sugar. This is all theoretical, though, because I haven’t tried it without the feta yet; I’m addicted to it just the way it is. It’s become my default way of preparing watermelon, and I’m going to have trouble going back to the plain stuff after this.

I first made this when A and I were going to the Hollywood Bowl, and it was very tasty as a picnic food—I just assembled it a few hours ahead of time, leaving the feta, mint, lime, and salt on the very top of the container of watermelon until it was time to eat. I’ve also taken it to work for lunch that way, putting it together the night before. But over time, the salt draws so much juice out of the watermelon and the feta starts to break down in the acid, leaving you with a milky-watery mess, so it’s really best to eat this fresh, with all the ingredients still chilled from the fridge. Luckily, it’s so easy to make that I can throw together a single serving at the drop of a hat. Measurements aren’t really necessary here (just don’t drown the watermelon in the toppings; it should still be the main feature), but if I had to guess I’d say I use the juice from a quarter of a lime, a tablespoon of chopped mint, a tablespoon of feta, and a single pinch of fleur de sal per every cereal-bowl-sized serving of watermelon.

Watermelon, cubed
Feta cheese, crumbled
Fresh mint leaves, cut in ribbons
Freshly squeezed lime juice
Coarse finishing salt, such as fleur de sal

1. Place your watermelon on a plate or in a bowl.

2. Sprinkle watermelon with feta cheese, mint ribbons, lime juice, and a pinch of salt.

Serves: As many or few as you like
Time: 5 minutes
Leftover potential: Will be OK for a few hours in the refrigerator (leave the toppings on top of the watermelon and don’t stir to combine until you’re ready to eat), but it’s best freshly made.

Friday, September 02, 2011

VANILLA PUDDING

I wish I had fallen in love with a dessert that’s a little more photogenic…

It’s puddingmania over here right now. I’ve made four kinds of pudding in the past month (one of which will be posted shortly; the other I forgot to photograph and will be forced to make again—poor me!), one of them twice. I can’t get enough! All the recipes are similar in terms of ingredients and basic procedure (heat milk, add egg, heat again until thick), but it’s interesting to see how much the methods vary—more so than, say, your basic cookie or cake recipes. Some have you heat the milk with the cornstarch and sugar, others have you add them to the egg mixture. I sense that pudding is a lot more forgiving than I expected. Even if you mess up and it turns out lumpy, you can always just strain it. And if it’s too thin: it’s creme anglaise!

Of all the recipes I’ve tried so far, this one has been, rather surprisingly, my favorite. I say “surprisingly” because even though I love vanilla more with each passing year, I still tend to think of it as a plain favor on its own, something I would rarely choose over, say, pistachio or butterscotch. I don’t know if this recipe was just the best of the bunch (which wouldn’t be a shock, considering it’s from the Smitten Kitchen) or if I just really nailed the execution, but it came out wonderfully. Part of what I loved about it was that it is really custardy, by far the thickest pudding I’ve made so far (even though I used 1% instead of whole), so thick it pulls away slightly from the sides of the ramekin when you stick your spoon into it, and it turns out I love thick pudding. It also seems that I love pudding skin, which I’d never encountered before because I’d never had homemade pudding, except my mom’s (skinless) rice and tapioca puddings when I was a kid. It’s often maligned and I’d always thought it sounded gross—I mean, “skin”?—but in fact, the way I’m encountering it in my own puddings, it’s just a slightly thicker top to the pudding, not something slimy and chewy that you can peel off in a big sheet, as I had always envisioned it.

I am also learning that the full flavor of pudding doesn’t tend to come through when it’s still warm. The vanilla bean I was using was rather elderly, and once I’d finished making the pudding, I kept tasting it and it seemed sort of bland, so I added some vanilla extract (about a teaspoon, I think) just in case. Then I saw that Deb had mentioned that you could add a teaspoon of rum if you wanted, and I had a tiny bottle in the cupboard left over from some baking project, so I went for it. I wasn’t sure I could taste any difference in the hot pudding, but into the fridge it went. A few hours later I spooned a bite of chilled pudding into my mouth and—zowie! It probably would have been fine if I’d left it as written, but the extra vanilla and rum pushed it over the top into amazing. (You couldn’t identify the rum and rum per se—it just seemed to enhance the vanilla even more.) Not too sweet, slightly eggy, intensely creamy without being especially rich, and super-vanilla-flavored, this recipe is definitely a keeper.

2⅔ cups milk (the original recipe calls for whole milk, but I used 1% with no ill effects), divided
½ cup sugar
¼ cup cornstarch
¼ teaspoon salt
½ vanilla bean (or 2 teaspoons of vanilla extract) (or ½ vanilla bean plus 1 teaspoon extract, if you’re me)
1 large egg
1 teaspoon rum (optional)

1. Bring 2 cups of the milk just barely to a boil in a medium saucepan over medium heat.

2. While the milk is heating, if you are using a vanilla bean, scrape out the seeds into the bottom of a medium, heatproof bowl (I recommend adding the scraped-out pod to the pot of simmering milk for an extra vanilla boost). Add sugar, cornstarch, and salt, and whisk to combine. Gradually whisk in the remaining ⅔ cup milk, a little at a time so lumps do not form, then whisk in the egg.

3. Once the rest of the milk is boiling, remove the vanilla pod if you used it, then very gradually add the milk to the cornstarch mixture in the bowl, whisking the whole time.

4. Return the mixture to the saucepan, stirring constantly with a silicon spatula or wooden spoon. Once it comes to a full simmer, cook it for one minute longer. Stir in vanilla extract if you’re using it and the rum if desired. Divide pudding among 4 to 6 dishes (cover the surface of each pudding with plastic wrap if you don’t like pudding skin). Chill in refrigerator until fully set, about 2 hours.

Serves: 4–6
Time: 45 minutes
Leftover potential: Good; will last a few days in the fridge.

Friday, August 26, 2011

MUESLI


For several summers when I was in my early teens, I attended a two-week German-language immersion camp. The counselors spoke German to us all the time from the instant we arrived, and in addition to the language, we learned German songs, dances, games, and so forth. The food was German, too, and I remember it actually being pretty good, which is a glowing testimonial considering what a picky eater I was at the time. I liked the noodles and schnitzel and potatoes, and different varieties of bread were baked fresh on site daily, so if there was nothing else I liked I could always have plenty of tasty brot und butter. (It also helped that there was great chocolate—we could buy Ritter Sport and Toblerone, which at the time were hard to find in the U.S., at the little commissary every day.) I remember enjoying the breakfasts especially; there were these wonderful big, fluffy white rolls with butter and jam, and sometimes there was muesli.

I probably would have forgotten about muesli completely if it hadn’t been for the fact that my oven has been out of order for months, depriving me of my two favorite breakfast foods, granola and baked oatmeal. I tried making oatmeal in the microwave or on the stovetop for a while, but I just couldn’t muster up much enthusiasm for it, especially as the summer temperatures soared and the prospect of eating a piping hot breakfast held less and less appeal. In my desperation, I wondered, what if I just threw most of my usual granola ingredients—oats, coconut, nuts, fruit—in a bowl and poured milk over them? Well, duh: That’s muesli! I gave it a shot, and as soon as I tasted it, I was transported right back to those happy days at camp. More importantly, it was delicious: I love the taste of raw oats (I pop a handful in my mouth whenever I’m cooking or baking with them), and I’ve always been a little disappointed by the way that taste gets muted in cooked oatmeal. In muesli, the oats absorb enough milk to become tender, but they still retain their flavor and a pleasing chewiness (although unless you want to soak them in milk overnight, I recommend sticking to the smaller quick oats). I add oat bran and flaxseed for more fiber, nuts for protein, a hint of sweetness and spice, and fruit for moisture, vitamins, and color. Plus coconut, because I love coconut.

I’ve really been enjoying this as a summer breakfast—it’s hearty but not heavy, easier to eat than granola (sometimes all that crunching can be tiring first thing in the morning!), infinitely customizable, and very cool and refreshing, plus a great way to use up some of that juicy summer fruit (I always seem to buy a bit too much, and then it ripens all at once). You can put whatever you want in it, in whatever quantities you prefer, but the following is my rough template. I usually just mix it up in the morning before I eat it (on weekends or days I’m working at home), without worrying about precise measurements, and sometimes I throw together two or three servings at once while I’m at it, but I haven’t tried making a big batch yet. It would be really easy, though, if you don’t mind doing the math.

½ cup quick oats
1 tablespoon oat bran
1 tablespoon flaxseed meal
1 tablespoon unsweetened flaked coconut
2–3 tablespoons nuts (I usually use sliced almonds or chopped pecans)
1 teaspoon sesame seeds
1 teaspoon brown sugar
A few pinches of cinnamon and/or cardamom
½ cup fresh fruit (I usually use fresh blueberries, sliced strawberries, or chopped peaches or nectarines, but banana or apple might be good too, and I imagine you could use dried fruit such as raisins or apricots)
Milk to taste (or yogurt, if you prefer)

1. In a cereal bowl, combine all ingredients except fruit and milk. Stir well, then top with fruit.

2. Add enough milk to moisten the oats to your liking (they absorb some of the liquid, so be generous), stir, and eat.

Serves: 1
Time: 5 minutes
Leftover potential: If you double, triple, or otherwise multiply this recipe and want to save some for later, stop before adding the fruit and milk; place muesli in an airtight container and store at room temperature or in the refrigerator. Add the fruit and milk when ready to serve.

Tuesday, August 16, 2011

BUTTERSCOTCH PUDDING


Pudding is one of those things I rarely remember to think about, but on the rare occasion that I do, I also remember that I love it. So smooth, cool, and creamy! One of the only things I liked about my college cafeteria, besides the perpetual availability of cereal and ice cream, was that I could almost always get a little bowl of pudding with a dollop of whipped topping with (or, occasionally, as) my meal. So naturally, what do I do to satisfy my sweet tooth when it’s too hot to make or even buy ice cream (we have no air conditioning, and our freezer gets a bit indifferent about keeping things fully frozen when the outdoor temperature tops 90) and I can’t bake cookies, cake, pie, cobblers, or crisps because my oven is STILL BROKEN (not that I’m not bitter or anything)? Why, learn to make homemade pudding, of course!

Which, it turns out, is as easy as easier than pie. Sugar, milk, cornstarch, eggs, simmer, stir, a little butter and vanilla, chill, done. Sure, you have to temper things, but that’s just a fancy way of saying “pour, stir, pour.” I was worried my pudding wouldn’t set, but it turned out just fine—and besides, once I had a little taste, I realized it was so delicious I’d drink it through a straw if I had to. Given my intense love of all things caramel-like, this Cooking Light recipe for butterscotch (or, probably more accurately, brown sugar) pudding was a no-brainer for my first outing, and it’s going to be a hard one to top—but I’ve already hunted down further recipes for pistachio (my childhood fave), chocolate, vanilla, lemon, banana, and peanut butter, so expect many more pudding posts in the near future. Sweet but light, comforting but cold, it makes a surprisingly refreshing and grown-up (if slightly unphotogenic) summer dessert. The only change to the recipe I made was to nix the fat-free whipped topping, because ew. I like this pudding straight up, but if I wanted whipped cream I’d use the real stuff.

Postscript, September 2011: After trying a few more pudding recipes and becoming more confident in my pudding-making skills, I made this again and got a much thicker, more satisfying result, so I’ve made a few small changes and clarifications to the recipe below. I think I was too meek about cooking the pudding until it was thick enough the first time around, thinking that it was OK that it was fairly thin when I finished cooking because it would do most of its thickening when chilled, like instant pudding. Not so! It should really be close to normal pudding texture before you take it off the stove, so when Step 3 says “bring to a boil,” it means it; it may take more time than you expect, but there should be bubbles that can’t be stirred away before you start the 1-minute clock, and—assuming that, like me, you prefer a thicker pudding texture—you should definitely rely on your eyes rather than the timer to make the judgment about when it’s done. As long as you’re stirring constantly (good arm workout!) and nothing’s burning (keep the heat at medium; I’ve found that a silicon spatula is the best tool here, for making sure the pudding doesn’t stick to the bottom and corners of the pot), I don’t think you need to worry about overcooking, so let that sucker thicken. Oh, and I edited out the part about chilling the pudding in a bowl of ice; it’s a hassle, no other pudding recipe I’ve seen calls for it, and I skipped it the second time around with no ill effects. I suspect that perhaps it’s intended to reduce the formation of pudding skin, but it turns out I love pudding skin!

1 cup packed dark brown sugar
¼ cup cornstarch
½ teaspoon salt
3 cups 1% low-fat milk, divided
1 large egg
1 large egg yolk
1 tablespoon butter
1 teaspoon vanilla

1. Combine brown sugar, cornstarch, and salt in a saucepan. Gradually add 2 cups milk and stir with a whisk until blended. Cook mixture over medium heat to 180 degrees or until tiny bubbles form around the edge (do not boil), whisking occasionally.

2. Place egg and egg yolk in a large heatproof bowl and beat lightly with a whisk. Add 1 cup remaining 1 cup milk and stir with a whisk.

3. Very gradually add 1 cup of hot milk mixture to egg mixture, stirring constantly with a whisk. Add egg mixture to saucepan. Bring to a full boil over medium heat; cook 1 minute or until thick, stirring constantly (a silicon spatula works very well for this). Remove from heat; stir in butter and vanilla.

4. Spoon pudding into individual serving bowls; if you don’t like pudding skin, cover surface of pudding with plastic wrap. Chill.

Serves: 4–6
Time: 45 minutes
Leftover potential: Keeps in the fridge for at least a few days.

Wednesday, August 03, 2011

SUMMER LASAGNA


I don’t think I’ll make this recipe again, but I couldn’t resist sharing it because it’s so pretty, even with my sloppy construction and poorly lit photography. And maybe someone else will enjoy it more; after all, we didn’t hate it, just found it a bit bland. (It’s also hard to eat, even more slippery than normal lasagna—it deconstructs itself as soon as you put a fork into it.) But layering noodles with cheese and vegetables right on the plate for a refreshing no-bake lasagna (yes, my oven is still broken) is such a clever idea that I’m sure someone with more improvisational skills could adapt it into something amazing. I did make a few additions in an effort to punch up the flavor, and I’m glad I did, because otherwise it would have been totally boring.

The original recipe is from Martha Stewart, but I spotted a link to an adaptation of it in a roundup of summery lasagna recipes at The Kitchn. The adapted version made a few changes to Martha’s recipe, most notably increasing the quantity of the cheeses and basil, which I of course was on board with. Also included in the roundup was this recipe from Rachael Ray, which wasn’t as useful to me because it doesn’t involve noodles (I was looking to get rid of a half-boxful that had been haunting my cupboard for ages), but it did captivate me with its addition of lemon to the ricotta, making it similar to this tasty sandwich recipe in my archives. Further inspired by that sandwich, I decided to add my basil to the ricotta filling as well, rather than just sprinkling it around the finished lasagna. (I also did away with the 2 teaspoons of olive oil in the ricotta—it seemed unnecessary.) And while cooking, I decided to throw some red pepper flakes into the tomatoes to add a little spice.

I was a bit perplexed by how to build the actual lasagna. Martha calls for the noodles to be cut in half, which I did, but that makes them more like long rectangles than the squares shown in the photos, and I ended up trimming the ends off them so they would fit on my plates and not make gigantic servings (they still ended up being generous portions). I noticed that the adapted version has the noodles cut into thirds, which makes more sense, but it still calls for the same total number as Martha does, without explaining what to do with the extras. (If you cut your noodles into thirds, you’d really only need to cook six of them instead of eight, yielding 18 noodle pieces of which you’d use 16, four per serving.) And then since cherry tomatoes are involved, my layers didn’t lay flat, but got all lumpy. The photos at the other sites are a lot prettier than my finished product, but they look like they only contain a fraction of the total filling—a few zucchini slices and tomatoes scattered on each layer. I didn’t want to throw food away, so I ended up with askew, teeteringly high piles. I don’t like recipes that have you cook a bunch of food and not use all of it.

This is an elegant presentation for a summer pasta, but unfortunately it’s more interesting to look at than to eat. Once you bite in and the layers slide every which way (you may want to serve this in shallow bowls rather than on plates), it quickly becomes just tepid noodles, tomatoes, and zucchini in a creamy (but at least lemony, thanks to Rachael Ray) sauce—not unpleasant, but nothing too special. Next time I have noodles to use up, I’ll try stovetop lasagna or lasagna rollups instead.

The chaos!

1 cup ricotta
¼ cup grated Parmesan
Zest of one lemon
2 tablespoons freshly squeezed lemon juice
Coarse salt and freshly ground black pepper to taste
8 lasagna noodles, broken in half crosswise
3 tablespoons olive oil, divided
1 minced garlic clove
¼ teaspoon red pepper flakes
2 pints cherry tomatoes, halved
2 medium zucchini (about 1 pound total), halved and thinly sliced into half-moons
½ cup torn basil leaves

1. In a medium bowl, combine ricotta, Parmesan, lemon zest and juice, basil, and salt and pepper to taste. Set aside.

2. Cook lasagna noodles according to package directions and drain.

3. Meanwhile, heat 2 tablespoons oil in a skillet over medium heat. Add garlic, red pepper flakes, and tomatoes. Cook until slightly broken down, about 3 minutes. Transfer to a bowl.

3. Add the remaining 1 tablespoon oil to the same skillet and when it is heated, add zucchini. Season with salt and pepper and cook about 5 minutes or until tender.

4. Scatter a few tomatoes over four plates. Top with one noodle, a spoonful of ricotta mixture, zucchini, and more tomatoes. Repeat layering twice, then finish with one more noodle and the remaining tomatoes. Serve, garnishing with more basil if desired.

Serves: 4
Time: 30 minutes
Leftover potential: Good.