Showing posts with label Avocados. Show all posts

Thursday, February 12, 2015

KALE COBB SALAD


Meet our new favorite salad. I feel a little silly being like, “Hey guys, look what I just discovered!” when Cobb salad has been around since the 1930s, but the addition of kale makes it hip, right?

Having grown up with a horror of so many ingredients all mixed together, especially cold meat and eggs, I never really gained much familiarity with the classic salads of yore, and I certainly never saw a Cobb look remotely appealing until I paged to this recipe in Dinner: The Playbook (yes, again; and here is the original post at Dinner: A Love Story). It was so pretty, and I realized, Wait! I like avocado and bacon and tomatoes and cheese and eggs and chicken! I also love kale, and swapping it in for lettuce here isn’t just blind trend-following—it gives you a definitive green presence that stands up to the weight of all those hefty toppings and, better still, lasts for days without wilting so you can stash the leftovers all ready to go. We’ve already eaten this twice in one month, and it’s destined to become a year-round staple. I love the rainbow of wholesome ingredients and fact that it makes a perfectly easy, protein-packed work lunch that’s hearty without being heavy; A loves that it’s a satisfying meal with a variety of flavors and textures, especially bacon and blue cheese to help temper his kale skepticism.

I made a few slight modifications—omitted sugar from the vinaigrette, massaged the kale with half the dressing right away and let it marinate a bit (key, in my view, to a successful kale salad), and increased some of the toppings to make an even more substantial main dish—one egg and one slice of bacon per serving, and more tomatoes to amp up the color. And I went a bit easy on the cheese, because blue isn’t my favorite, although it definitely adds an important flavor contrast here. The original recipe says you can use feta instead, and the second time around I tried that and preferred it, with just a light dusting of blue for a hint of funk.

A came in just now to prod me to go to bed on time, but granted me a reprieve as soon as he saw what I was working on, saying, “The world needs to know about Cobb salad.” So there you have it! It may not be breaking news, but just in case you weren’t aware, Cobb salad—this one, at least—is delicious.


1 heaping teaspoon Dijon mustard
¼ cup red wine vinegar
A squeeze of lemon juice
Salt and pepper to taste
1/3 cup olive oil
1 large bunch Tuscan kale, stemmed and thinly sliced
2-4 hard-boiled eggs, peeled and chopped
1 to 1½ cups poached, grilled, or roasted chicken breast, shredded or cubed
3-4 slices bacon, cooked and crumbled
2-4 tablespoons thinly sliced scallions or minced chives
½ to 1 cup cherry or grape tomatoes, halved (or quartered if large)
1 avocado, diced
¼ to ½ cup crumbled blue or feta cheese
  1. In a small bowl, mix the mustard, vinegar, and lemon juice, then season generously with salt and pepper to taste. Gradually whisk in the olive oil until emulsified.
  2. Place the shredded kale in a large bowl and drizzle with about half of the vinaigrette. Mix thoroughly with your hands until the leaves are evenly coated, and let sit for at least 15 minutes while you assemble the remaining ingredients.
  3. Portion out the dressed kale equally into four salad bowls. Top each portion with a quarter of the eggs, chicken, bacon, scallions, tomato, avocado, and cheese, then drizzle with a quarter of the remaining dressing and toss gently. (If you prefer, you can just mix all the ingredients together in a very large serving bowl and go from there. Or you can place each component in a separate bowl and let everyone assemble their own, salad-bar style, especially if you have picky eaters on hand.)
Serves: 4
Time: 30 minutes (1 hour if you need to boil the eggs, cook the bacon and poach the chicken)
Leftover potential: Awesome. 

Wednesday, September 10, 2014

GREEN QUINOA SALAD


My ardor for quinoa has dimmed somewhat (blame overexposure, the fact that A has discovered/decided he doesn’t like it, and the newfound allure of farro), but I felt it spark anew when I saw this salad at The Kitchn. The original recipe calls it a Green Goddess dressing, but since it omits the traditional anchovies (fine by me) and replaces mayonnaise with creamy avocado, I’m just calling it “green.” Zesty with herbs, red pepper, vinegar, and lemon, it reminds me of chimichurri instead, even more so because I didn’t have the full quantity of basil and had to swap in some cilantro—a substitution that ended up being so tasty I made it official below.

If you find quinoa bland, this vibrant dressing is just the fix. All the other quinoa salads I’ve tried have light vinaigrettes, so a heavy dousing of thick, assertive sauce seemed strange at first, but it tastes so right. The dressing is totally the star here, but the other elements work surprisingly well together too; I’ve paired radishes and arugula before, but wouldn’t necessarily have thought to add edamame and walnuts to the mix. The colors are pretty, the flavors are fresh, and the mix of crunchy and creamy textures is addictive. I thought this might be the dish to redeem quinoa for A, but alas, he still didn’t dig it. Oh, well—that means more for me of what might be my new favorite salad. With three sources of protein (quinoa, edamame, and nuts), it makes a satisfying lunch all week long.

Dressing:
2 scallions, minced (white and light green parts only)
1 large ripe avocado, peeled and diced
3 tablespoons fresh lemon juice
1-2 tablespoons apple cider vinegar
2 tablespoons water
¼ cup extra-virgin olive oil
½ cup fresh basil, chopped
½ cup fresh cilantro, chopped
1/3 cup fresh parsley, chopped
½ teaspoon crushed red pepper flakes
Kosher salt to taste
Salad:
1 cup dry quinoa
3 cups arugula
1 cup shelled cooked edamame
½ cup chopped walnuts, toasted
4 large radishes, thinly sliced
Salt and pepper to taste
  1. Prepare the dressing by combining all of the ingredients in a food processor and blending until smooth. Add a little more water or oil to thin if necessary. Set aside.
  2. Rinse the quinoa in a strainer under cool running water, then combine it in a saucepan with 2 cups of water. Bring to a boil. Cover and reduce heat to low. Cook until quinoa has absorbed the liquid and can easily be fluffed with a fork, about 12 to 15 minutes. Let cool slightly.
  3. While the quinoa is still a little warm, toss it with about half of the salad dressing, then add the arugula so the leaves wilt down a bit. Stir in the edamame, walnuts, and radishes, then slowly drizzle in the dressing.
Serves: 4
Time: 30 minutes
Leftover potential: Good.

Saturday, July 13, 2013

KALE, STRAWBERRY, AND AVOCADO SALAD


I’m still desperately trying to play catchup here, but at least I’ve reached a recipe that seems more seasonally appropriate for today (i.e., isn’t soup). My goal is to have kale salads for all seasons, and here’s my spring edition—Southern California spring, at least, but more like summer everywhere else…so, see, I’m not late with this at all! I wouldn’t necessarily have thought to combine bitter leafy greens with sweet berries, creamy avocado, and crunchy poppy seeds, but the blend really works. Bright lemon vinaigrette is perfect as always (I can’t recall, but I’m guessing I left out the honey, because I like my dressings acidic), almonds add more texture and some protein, and feta brings its usual salty cheesy goodness. Regrettably, my salad didn’t turn out as picture-perfect as the original version over at Two Peas and Their Pod—especially if your strawberries and avocado are very ripe, they’ll begin to break down somewhat as soon as you start mixing everything—but its pinks, reds, whites, and greens were still pretty, and I loved its fresh, grassy flavors. Oh kale, what can’t you do?

1 bunch Tuscan kale (about 4-5 cups), stems removed, leaves chopped
1 cup sliced strawberries
1 avocado, peeled and chopped
⅓ cup sliced almonds
¼ cup feta cheese
2 tablespoons olive oil
2 tablespoons fresh lemon juice
1 teaspoon honey
½ teaspoon poppy seeds
Coarse salt and freshly ground black pepper to taste

1. Put the kale in a large bowl.

2. In a small bowl or jar, combine the olive oil, lemon juice, honey, poppy seeds, salt, and pepper. Shake or whisk until mixed well.

3. Add most of the dressing to the kale and mix it together with your hands, massaging gently until the kale is well coated. If you have time, let the dressed kale sit for 15-30 minutes.

4. Add the strawberries, avocado, almonds, and feta cheese. Toss gently. Add the rest of the dressing as needed and toss gently to coat. Season with additional salt and pepper as needed.

Serves: 4
Time: 20 minutes
Leftover potential: With the berries and avocado, it doesn’t hold up as sturdily as other kale salads I’ve tried, but it’s fine for a few days.

Friday, August 31, 2012

ZUCCHINI RIBBON SALAD WITH CORN AND AVOCADO


Here would be a perfect place to employ the oft-overused (I include myself in this accusation) foodie phrase “summer in a bowl.” Summer squash, corn, avocado, cilantro, and lime all in one place is about as summery as you can get, at least without a tomato in sight. The recipe is from Two Peas and Their Pod, and while it didn’t rock my socks off quite as much as I’d hoped based on the gorgeous photos, there’s nothing not to like here. The well-matched, fresh, simple ingredients are elevated by the elegant presentation—ribbons are purty, and the white-yellow-green palette shot through with threads of purple is something I could gaze on all day long…assuming I didn’t get hungry at any point. It tastes just like the sum of its parts, but with parts like these, that’s not so bad. I especially liked the generous proportion of avocado.

I made no changes, except to use feta instead of queso fresco, because I already had it on hand. See my notes below regarding the leftovers; they’ll keep better if you leave the avocado out until you’re ready to eat.

2 tablespoons olive oil
2 tablespoons freshly squeezed lime juice
Salt and pepper to taste
2 medium zucchini
2 medium yellow squash
2 ears cooked sweet corn
¼ cup chopped fresh cilantro
½ red onion, sliced
2 medium ripe avocados, peeled, pitted, and sliced
½ cup queso fresco or feta cheese

1. In a large bowl, whisk the olive oil and lime juice together. Season with salt and pepper to taste.

2. Trim the ends of the zucchini and yellow squash. With a vegetable peeler, shave lengthwise into long, wide, thin strips. When you get to the center of the squash, turn the squash over and slice from the other side until you get to the center again.

3. Put the zucchini and yellow squash ribbons in a large bowl. Cut the sweet corn kernels off the cob, cutting close to the cob. Discard cobs. Add sweet corn, cilantro, red onion, and avocado slices to the squash ribbons. Pour olive oil and lime dressing over salad and toss until coated.

4. Crumble queso fresco over the top of the salad and season with salt and pepper, to taste.

Serves: 4
Time: 20 minutes
Leftover potential: Surprisingly good for a day or two, but if you plan on having leftovers, I recommend not adding the avocado in Step 3. If you plan on eating two servings now and two servings later, slice the first avocado and serve it atop the servings you intend to eat now, waiting to slice up the second avocado until you’re ready to eat the leftovers. I did the same with the cheese, adding it only to the servings only right before I ate them, but that’s less crucial.

Monday, June 11, 2012

ENFRIJOLADAS


I used to hate corn tortillas. I can only attribute this to having grown up in the Midwest, because ever since I moved to Southern California, I’ve gradually grown to love them, which I assume is I because I’ve finally been exposed to fresh, handmade, tender tortillas instead of the dry, mealy ones of my memories. (I don’t mean to malign the Midwest; Minnesota actually has a large Mexican population and you can get excellent tortillas there now, but if they existed in the 1980s and 1990s, I didn’t encounter them or was too picky to try them.) I still don’t really bother with average mass-produced corn tortillas, but every now and then I make a pilgrimage to my favorite Mexican grocery for a warm stack of their housemade ones. The only problem is that the smallest package of these still contains dozens of tortillas (I’ve never counted, but I’d say at least 48), and with no preservatives in them, they only stay moist, soft, and taco-worthy for a few days. Granted, this heap of tortillas sets me back less than $2, but I hate to see them go to waste. The less-fresh ones are great for making quesadillas or tostadas or baking into chips to dip in salsa, and of course they’re delicious in soup, but even after all that I can still find myself with leftovers, so I’ve been on the lookout for other ideas.

When I spotted a recipe for enfrijoladas—basically, enchiladas made with a bean sauce instead of tomato sauce—at Tasty Kitchen, it seemed like the perfect solution. But at second glance, I was a bit put off by the fact that the sauce was made out of canned refried beans, thinned with broth. (Nothing especially wrong with canned refried beans, mind you, but I’m a recent convert to bean-loving, and in my bean-hating days, refried beans grossed me out the most.) Wouldn’t it make more sense to puree freshly cooked dry beans, or even canned beans, in their liquid? I hit the Internet to find out, and after a lot of searching I found what I was looking for at Pati’s Mexican Table: a series of recipes for frijolas de olla (cooked beans), pureed beans, frijoles colados (refried pureed beans), and finally enfrijoladas. Pati’s enfrijoladas were simpler and more authentic, with no cheese filling, no baking, and no toppings beyond queso fresco, avocado, and crema—lovely, I’m sure, but I liked the idea of filling and baking them and making some sort of salsa-like toppings, so I combined Pati’s many recipes for the bean mixture with the Tasty Kitchen method, then improvised my own topping out of various fresh southwesternish vegetables.

I feel a bit sheepish posting this here because I don’t think I’ve perfected it yet, but if I don’t get it written down I’m afraid I’ll forget it entirely. And my enfrijoladas were very good, even though I think my bean mixture was still a bit too thick overall and I probably used a bit too much of it (after the first few tortillas tore I thinned it further, but the end result was still on the clumpy, casserole-ish side, with the enfrijoladas completely breaking down when I tried to get them out of the pan). Luckily, they were so delicious that I didn’t really care what they looked like, and the colorful topping helped to mask my aesthetic sins. This may seem like a lot of work to go through for what is basically an inside-out bean and cheese enchilada, but none of the steps were especially hard and I think the end result was worth it.

You could basically put whatever you want inside these; plain cheese was sufficient for me, but to ease A’s suspicions about such a bean-heavy dish, I threw in a little cooked chicken from my stash in the freezer, and it did add some texture. You could also put whatever you want on top, but I must say I was very pleased with my version.

P.S. I really recommend refrying your beans in bacon fat. It adds a wonderful smoky flavor that makes all the difference, in my opinion.

1 pound dry pinto or black beans
1 large yellow or white onion, peeled and halved
1 tablespoon kosher or sea salt, plus more to taste
2–3 tablespoons canola oil or bacon fat
12–16 corn tortillas (you may want to have extras on hand in case some of them tear)
2 to 3 cups grated pepper Jack cheese
1 to 2 cups cooked cubed or shredded chicken (optional)
1 pint cherry tomatoes, halved
Cooked kernels from 1 ear of corn
2–4 green onions, sliced
Chopped cilantro to taste
Several radishes, sliced (optional)
1 ripe avocado, peeled and diced
Juice of 1 large lime

1. Rinse the beans in cold water and drain. Place them in a large, heavy pot and cover with about 10 cups of water, or enough water to come up to at least 3 inches above the top of the beans. Add half of the onion (just the entire piece, no need to cut it up). Bring to a boil over high heat. Reduce heat to medium-low and let simmer, partially covered, for about 1½ hours, or cover pot entirely and transfer to a preheated 250-degree oven for 75 to 90 minutes. When the beans are tender, add 1 tablespoon salt. Let them continue simmering for about another 15 minutes, or until the beans are so soft that they come apart if you hold one between your fingers. If the beans are not yet soft and the pot is drying out, add more water. When the beans are cooked, remove the onion with a slotted spoon and discard.

2. Drain the beans, reserving the liquid. Place the beans and 2 cups of the cooking liquid in a blender or food processor and puree until smooth.

3. Heat a large sauté pan over medium heat. Add the oil or bacon fat and heat until hot but not smoking, about 1 to 2 minutes. Dice the other half of the onion, add it to the pan, and sauté for 3 to 4 minutes, until it is softened and translucent, and has started to slightly brown along the edges. Add the pureed beans a cupful at a time over the sautéed onion, and let the mixture season for 3 to 4 minutes.

4. Reduce heat to low. Gradually add more bean cooking liquid (you can also use chicken or vegetable broth) to thin the bean mixture to a soupy/saucelike consistency. For me, this was at least 2 cups, and I probably could have used more, but your mileage may vary—just experiment until you find the right consistency. If the sauce is too thick, the tortillas will tear when you dunk them in and try to lift them out again; if that happens, just add more liquid and try again with a new tortilla. (The torn bean-soaked tortillas make a good snack for the cook.) Season sauce with salt to taste. I also stirred in a little bit of salsa for additional flavor; I might do more of that next time.

5. Preheat the oven to 350 degrees.

6. Heat your tortillas in the microwave until soft and pliable (or heat them briefly on a hot skillet on the stove). One by one, dip them into the bean mixture so that the tortilla is coated on both sides. Lay the tortilla in a 13-by-9-inch glass baking dish. Sprinkle a couple of tablespoons of grated cheese on one half of the tortilla and top with a little chicken, if desired. Fold the tortilla in half to cover the filling. Repeat with remaining tortillas until dish is full. Pour some of the remaining bean sauce over the tortillas in the baking dish (just do this to your taste; you don’t want to drown them, so you might not use it all—I probably could have used a little less). Sprinkle with remaining grated cheese, to taste.

7. Bake for about 10 or 15 minutes, or until the cheese has melted.

8. Meanwhile, mix together tomatoes, corn, green onions, cilantro, radishes (if desired), and avocado in a medium bowl. Add the lime juice and salt to taste, and toss well.

9. Serve the enfrijoladas topped with the tomato mixture.

Serves: 4–8
Time: 3 hours
Leftover potential: Good, but store topping separately.

Monday, September 12, 2011

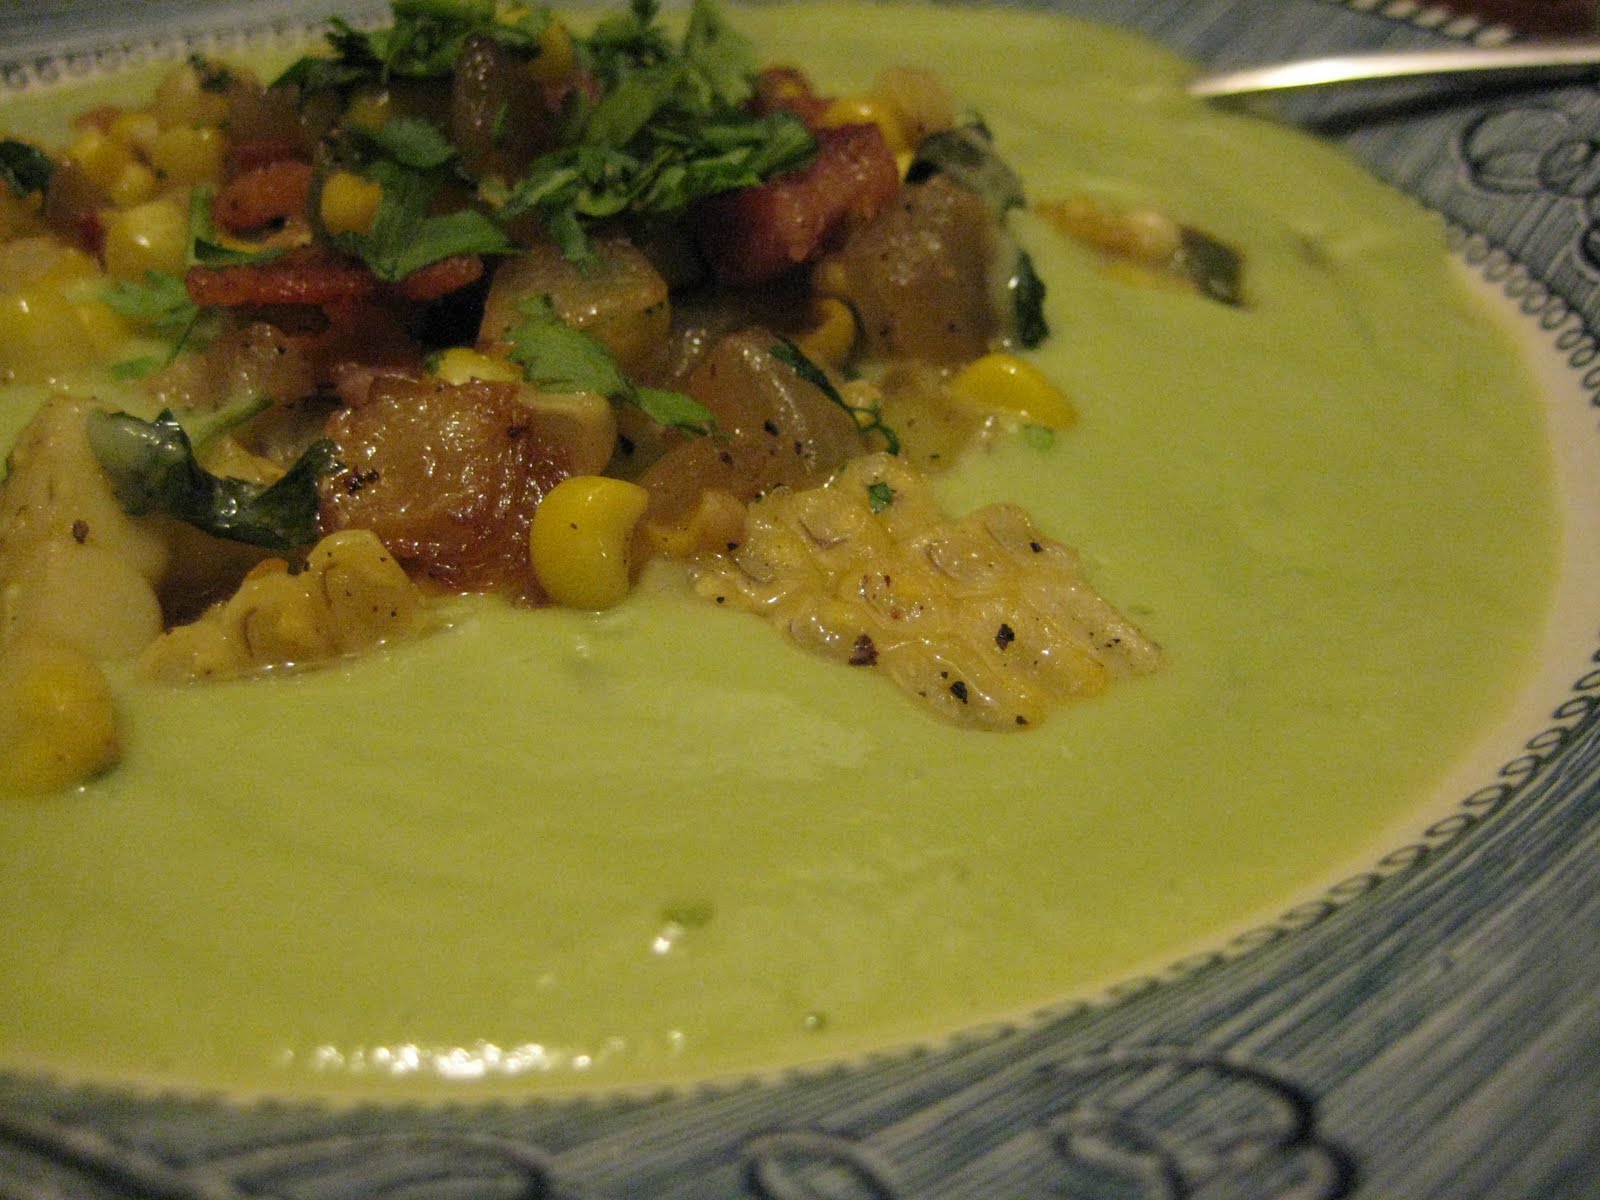
CHILLED AVOCADO SOUP WITH CORN AND BACON


In general, ice cream and popsicles aside, I don’t like cold food. Even in the hottest weather, I prefer my salads at room temperature. And the less said about cold pizza, the better. (Ugh, I can’t get over the congealed melted cheese.) Obviously, then, I have never really warmed (ha) to chilled soups. Most of the gazpachos I’ve encountered have just made me feel like I’m eating a big bowl of salsa. Given that logic, when I spotted this cold avocado soup at Joy the Baker I should have assumed it would taste like eating a big bowl of pureed guacamole, but instead I thought, “Ooh, pretty!” and “Ah, corn and bacon!” Maybe it’s just that I really like guacamole, or maybe the warm topping made it seem less like sauce disguised as a meal to me, but I bookmarked it instantly and made it soon afterward, in the throes of a 100-plus-degree heat wave.

This soup is good, with a wonderful velvety texture. The dominant flavors are, of course, avocado and lime (which I was even more generous with), but the savory broth (the recipe called for vegetable, but I used homemade chicken stock because I like its flavor so much) and the dollop of dairy (the recipe suggested sour cream, crème fraiche, or milk, but I knew plain yogurt—specifically, Trader Joe’s nonfat European-style yogurt, which is thin but not watery and my go-to for stirring into soups and sauces—would be the perfect choice for me) save it from guacamole-dom. I took a taste after blending it up and liked it pretty well but wasn’t sure I could eat a whole bowl of it. But the topping—oh, the topping!

The original recipe called for “cooked bacon,” as though you would just happen to have some sitting around, and then had you sauté the vegetables in olive oil. LOGIC FAIL! The best part of bacon is the grease, specifically the heavenly, transformative things it does to whatever you happen to cook in it. So I fried up some bacon, removed it from the skillet, and then cooked the onion, corn, and jalapeno in it, which was absolutely the correct choice. My second gripe with the original recipe was that it called for parsley when, to me, cilantro is made for moments like this—big handfuls of it, too. I mean, with avocado, jalapeno, and corn, we’re clearly already rocking this soup southwestern-style, am I right? When the topping mixture was all softened and browned and generously seasoned, I took a taste and had to stop myself from eating the entire skilletful with a spoon while standing over the stove. Stirred into the soup, it elevated it from “Hmm” to “Hell yes!”, its smoky heat providing much-needed textural, temperature, and flavor contrasts to the cold green creaminess. Instead of feeling like I was eating a beverage or condiment in a bowl, I thoroughly enjoyed this as a refreshing, satisfying summer meal.

Sauteeing the topping in bacon fat and swapping in cilantro really made this dish extra awesome, but then I made a major misstep in packaging up the leftovers: Not realizing how much I was going to enjoy the interplay between the warm topping and the cold soup, I premixed all my topping and soup portions before putting them in the fridge (perhaps I was a bit distracted by the complicated serving instructions in the original recipe, which asked me to put the topping in the bowls and then add the soup around it; for me, that just ended up burying the topping). When I went to eat the leftovers, I realized this meant I either had to heat the whole thing up (Cooked avocado soup? No thanks) or eat it all cold. It turned out I didn’t enjoy the topping nearly as well cold—especially the soggy-chewy-greasy texture of the bacon—and it was clear I should have stored the two components separately, so I could microwave the topping and then add it to the chilled soup. If I’d done that, this recipe would have been downright perfect. Oh, well; live and learn. I’m almost hoping for another heat wave this month (not unlikely, given Southern California’s traditionally hot Septembers) so I have an excuse to eat this one more time before autumn sets in.

2 ripe avocados
1 cup vegetable or chicken broth
1–2 tablespoons lime juice
2 tablespoons plain yogurt (or sour cream, creme fraiche, or milk)
¾ teaspoon salt, plus extra to taste
1¼ to 1½ cups water
1 tablespoon olive oil
1 small yellow onion, diced
2 ears fresh corn, sliced from the cob
1 small jalapeno pepper, de-seeded and diced
4 slices diced bacon
1 handful cilantro, chopped
Freshly cracked pepper to taste

1. To make the soup, place avocado flesh in a blender along with broth, lime juice, yogurt (or sour cream, crème fraiche, or milk), and ¾ teaspoon salt. Blend until the avocados are creamy. Remove the center from your blender lid, and while blending, slowly add 1¼ cups water. Soup will be done when smooth, with your desired consistency—feel free to add another ½ cup water if you prefer a thinner soup. Taste and add salt and pepper as necessary. Place in a covered container in the fridge (I just left it in the blender pitcher) while you make the topping.

2. To make the topping, cook bacon in a skillet over medium heat until crisp. Remove bacon with a slotted spoon and set on a paper-towel-lined plate to drain. Add onion to the bacon fat in the skillet and cook until translucent and browned, about 5 minutes. Add corn and jalapeno and cook for 3 minutes more. Add bacon and cilantro. Cook until everything is warmed and just browned. Season with salt and pepper to taste.

3. Divide the cold soup into four bowls and top each with one-quarter of the warm topping mixture (unless you’re planning on keeping some of the soup as leftovers—see my note below). Garnish with additional cilantro, if desired.

Serves: 4
Time: 40 minutes
Leftover potential: Soup will last for about three days in an airtight container in the fridge. I recommend storing the topping mixture in a separate container, so you can reheat it before adding it to the cold soup.

Monday, July 25, 2011

SUMMER CORN CAKES WITH TOMATO AND AVOCADO SALSA


Few things say “summer” to me more clearly than the combination of corn and tomatoes, unless perhaps it’s the incredible medley of avocado, cilantro, and lime, so even though I already have a very good corn cake recipe in my archives, I bookmarked this one (originally by Sara Foster) at Ezra Pound Cake the instant I saw the photo. Sure, I could just throw some salsa on top of my usual corn cakes and call it a day, but these corn cakes looked totally different than mine—thick like crab cakes, with lots more leavening and the added flavors of cornmeal, buttermilk, basil, and red onion. Could there be room in my life for two different corn cake recipes? But of course!

Despite our large appetite for all things fritter-like (we routinely eat them as entrees, especially in the summer), these corn cakes looked so hearty in the picture that I halved the recipe, which claimed to serve six to eight people. This resulted in the rather awkward requirement of 1½ ears of corn, but I used two smallish ears and it was just fine (I imagine one large ear would also be OK). I decided to stick with the full recipe for the salsa, mostly because I didn’t want half an avocado floating around in my fridge, but also because I figured extra salsa never goes amiss. This was a wise decision; the corn cakes are sturdy and stand up well to toppings, so feel free to pile on the salsa to your heart’s content. In fact, because the corn cakes have the drier texture of cornbread rather than the pancake-like texture of my usual recipe, the salsa provides an important contrast. The salsa has a fair amount of liquid in it, most of which I’d left behind in a bowl, spooning on the chunkier parts with a slotted spoon because I was afraid of making the corn cakes soggy, but their crispy surfaces turned out to be largely impermeable (at least in the short time it took to go from plate to mouth), so I needn’t have been so shy—the juiciness would have been quite welcome.

Following the recipe’s instructions to use heaping tablespoons of batter, I got slightly smaller cakes than I’d expected; they puffed up tall but didn’t spread much, turning out like cute sliders where Ezra Pound Cake’s photo had made them look like burgers. At this appetizer-like size, the recipe yielded eight cakes, which made for a perfect four per serving: generous enough to be satisfying, but still a light summery meal (we had something else on the side that I can’t quite recall—grilled chicken thighs, maybe?). I would definitely make these again.

For the salsa:
1 large tomato, cored and chopped
1 scallion, trimmed and minced
1 small jalapeno pepper, cored, seeded, and diced
1 tablespoon chopped fresh basil
1 tablespoon chopped fresh cilantro
1 garlic clove, minced
Juice of ½ lime
1½ teaspoons extra-virgin olive oil
1½ teaspoons white wine vinegar
Sea salt and freshly ground pepper to taste
1 ripe avocado, peeled, pitted, and diced

For the corn cakes:
1 large ear or 2 small ears corn, shucked
½ cup all-purpose flour
¼ cup cornmeal
2 tablespoons diced red onion
2 tablespoons thinly sliced fresh basil
½ teaspoon baking powder
¼ teaspoon baking soda
Sea salt and freshly ground black pepper to taste
1 large egg, lightly beaten
1 tablespoon well-shaken buttermilk
1 tablespoon unsalted butter, melted
2 tablespoons olive oil

1. Place all of the salsa ingredients except the avocado in a bowl, and stir to mix. Refrigerate in an airtight container until ready to serve, for up to 2 days. Just before serving, add the avocado and mix gently.

2. Cut the corn from the cobs into a large bowl, and scrape the stripped cobs with the back of the knife (or a spoon) to release the juices into the bowl.

3. Place 1 cup of the corn kernels into a food processor and pulse several times, until the corn is slightly pureed but still chunky. Scrape into the bowl with the remaining corn kernels.

4. Add flour, cornmeal, onion, basil, baking powder, baking soda, salt, and pepper to the corn. Stir to mix.

5. Add the egg, buttermilk, and butter, and stir just to combine. (Do not overmix.)

6. Place a large skillet over medium heat. Add 2 tablespoons olive oil, and heat until sizzling hot.

7. One heaping tablespoon at a time, scoop the batter into the skillet. Cooking in batches of 4 to avoid overcrowding, fry the cakes for about 2 minutes per side, until golden brown. (I got 8 small corn cakes.)

8. Remove corn cakes from pan, set them briefly on a paper towel to blot away any extra oil, and set on a cooling rack (or on a parchment-lined baking sheet in a warm oven if you want to keep them hot) until ready to eat. Serve warm, topped with a heap of salsa.

Serves: 2 as a main dish, 4 as a side
Time: 45 minutes
Leftover potential: For the corn cakes, unknown. Extra salsa will keep in the fridge for a few days and can be eaten with tortilla chips, used on tacos, or mixed with black beans for an easy salad.

Friday, March 18, 2011

QUINOA AND BLACK BEAN SALAD


Grains like quinoa are such a great way to down a big bowl of vegetably goodness without feeling like you’re making a meal entirely out of leaves. (Yes, I still have a slight aversion to main-dish green salads. I REQUIRE CARBS, PEOPLE.) This recipe, which I spied at Tasty Kitchen, is essentially a quinoa-based version of the Southwestern salad I first enjoyed (despite its leafiness) late last summer: cilantro-lime dressing, black beans, corn, peppers, green onions…yum. To make it even more like that salad, I had to add avocado, because I am a spoiled Californian who can get them at the farmers’ market. I also added some feta, because I had some sitting in the fridge that needed to be used, and also because feta has been a delicious addition to every other quinoa salad I’ve made so far (I imagine cotija would also work well, perhaps better). I also think cherry tomatoes might not be a bad extra, either. Oh, and although the recipe called for fresh corn, I used frozen, because even spoiled Californians can’t get good corn in March, which is as it should be. The frozen tasted just fine.

The original recipe calls for red quinoa, which makes the dish extra-pretty, but Trader Joe’s was inexplicably out of it this week, so the beige quinoa had to do (as far as I can discern, they taste exactly the same anyway). I ditched the recipe’s annoyingly convoluted directions for preparing the quinoa, which involved cheesecloth and boiling plus steaming, and just used the back-of-box directions as I usually do. I’m sure the more complicated method results in some barely perceptible improvement in texture, but I tried that once for this corn-mint quinoa recipe and didn’t find it worth the hassle. In addition, I reduced the quinoa amount from 1½ cups to 1 cup, just because every other recipe I’ve made uses 1 cup and it always seems to result in plenty of quinoa. In retrospect, this was the right call; there seemed to be just the correct balance between the quinoa and the other ingredients as it was, and any more quinoa would risk being too much. We still got five servings of salad out of it; the first night, we had small-medium portions with chicken quesadillas on the side (mostly because I feared that A wouldn’t like the salad, being a bean hater; rather surprisingly, however, he praised it), but the three more generous leftover servings made satisfying vegetarian main dishes in their own right. Zippy, colorful, and packed with vitamins and protein, this is definitely a keeper.

Dressing:
5 tablespoons fresh lime juice
1 teaspoon salt
1 clove garlic, minced
¼ cup finely chopped fresh cilantro
1 teaspoon ground cumin
⅓ cup olive oil
½ teaspoon freshly ground black pepper, to taste

Salad:
1 cup red quinoa (normal quinoa works just fine, too)
½ teaspoon salt, plus extra to taste
1 15-ounce can black beans, rinsed and drained
1 cup corn kernels, fresh (cut from about 2 large cooked ears) or frozen (defrosted)
1 cup finely chopped bell pepper
1 whole jalapeño pepper, seeded and minced
¼ cup finely chopped fresh cilantro
¼ cup finely chopped green onion
1 ripe avocado, diced (optional)
4 ounces feta or cotija cheese, diced or crumbled (optional)

1. Rinse the quinoa well under cold water, then add to a medium saucepan with 2 cups of water and ½ teaspoon salt. Bring to a boil, then turn down the heat to medium-low, cover, and cook until the water is absorbed and quinoa is fluffy and chewy, about 15–20 minutes.

2. Empty cooked quinoa into a large bowl and allow it to cool almost to room temperature, stirring occasionally. (This will help the vinaigrette coat everything without the quinoa absorbing too much of it.)

3. While quinoa is cooling, make the dressing: In a small bowl, whisk together lime juice, 1 teaspoon salt, minced garlic, ¼ cup chopped cilantro, and cumin and add oil in a stream, whisking. Add black pepper, stir, and set aside.

4. When the quinoa has cooled, add the beans, corn, peppers, cilantro, green onions, and avocado and/or cheese if desired, and toss gently with the dressing.

Serves: 4–6
Time: 45 minutes
Leftover potential: Good. (If using avocado, prevent it from browning by tossing it in a little lime juice before adding it to the salad.)

Thursday, March 03, 2011

CHICKEN TORTILLA SOUP


It appears I’m on a soup kick this year; this is my fourth new soup recipe in two months. Not only did this recipe at The Pioneer Woman Cooks look colorful and delicious and generally souptastic, but it also gave me an excuse to buy fresh, handmade corn tortillas. Yes, folks, nearly seven years after moving to Los Angeles, I’ve finally found a source for good tortillas. Really, I’m embarrassed that it took me so long to discover the awesome Mexican grocery just a few miles up the road, where you can buy a stack of several dozen perfectly tender, addictively flavorful, ridiculously simple (“ingredients: corn, water”) tortillas for just 99 cents. I’m even more embarrassed that it took me nearly as long to like corn tortillas, because I’d mostly only had the dry, mealy storebought ones. Falling in love with the good ones has been a total revelation.

This is a fairly basic tomatoey chicken and bean soup made remarkable by three things:
  1. Stirring in cornmeal, which I’d never done before, gives a faint nutty, savory flavor and subtly creamy texture.
  2. Those tortillas are the superstars here, added the soup without baking or frying—a rarity among tortilla soup recipes I found online, and dubiously received by some of the commenters, but to me, it makes a lot of sense. It seems more authentic somehow—I can see this recipe originally being created, like chilaquiles, as a thrifty way to use up slightly stale tortillas. It’s such a win-win for common sense: The cheap tortillas bulk up the soup and make the expensive meat stretch further, and the soup rehydrates potentially dried-out old tortillas and makes them toothsome again. But even if you’re using fresh tortillas as I was, it’s still a great idea: The tortillas lend their corny flavor to the soup, the soup’s flavor soaks into the tortillas, and, particularly after a day or more has elapsed, they have the irresistible soft-chewy texture of noodles. Even if you’re skittish about the idea of soggy tortillas, promise me you’ll give it a try. You can always garnish with corn chips if you want the crunchy topping too.
  3. The garnishes really amp things up. As with chili, the sky’s the limit and the combinations are nearly endless. I think avocado, cilantro, and lime are a must, and onions (I used green instead of PW’s red) and cheese are strongly recommended, but you could add salsa/pico de gallo and sour cream as well. I only added avocado to about half the leftover servings, because I had a lot of them and I wasn’t sure how avocado would hold up over the long term (especially if I ended up freezing it). Then later in the week, after making fish tacos (I had a lot of tortillas to use up, after all), made the miraculous discovery that the leftover avocado cream sauce (that’s pureed avocado, lime, cilantro, and yogurt) was excellent when drizzled atop the avocado-less soup portions. When stirred in thoroughly, it froze just fine. In fact, it was so good that next time I’d consider making avocado cream specifically for the purpose of adding it to my tortilla soup.
In short, we really liked this soup. However, I’d do a few things differently next time. Overall, the soup base was blander than I’d expected. Granted, I wasn’t able to cook it quite as long as the recipe directed, and the flavor did improve the next day. But I think there are a few other factors. Using half broth and half water definitely made it taste watered-down; next time, I’ll make a half-recipe (this made a ton) and use all broth. And even gussied up with the spice rub, I don’t think the boneless, skinless chicken breasts did the soup any favors. I don’t really like white meat that much, but even chicken breast off the bone has exponentially more flavor. Usually, I use leftover roasted chicken or chicken I’ve boiled for stock to stir into soups, and I should have followed that impulse here, but I wanted to obey the recipe the first time through. Next time, I’ll do off-the-bone chicken instead (if you don’t usually have a stash of it in your freezer as I do, a storebought rotisserie chicken would do the trick) and just stir all the spice rub into the soup in Step 3. I also think one could squeeze in more veggies: a bit more bell pepper, maybe some fresh or frozen corn kernels, and possibly a diced jalapeno to add a bit more spice? I’ll try all these changes out next time and report back to you. But even if you make the recipe as written in the meantime, I think you’ll be pleased.

2 whole boneless, skinless chicken breasts
2 tablespoons olive oil, divided
1½ teaspoons cumin
1 teaspoon chili powder
½ teaspoon garlic powder
½ teaspoon salt, plus additional salt to taste
1 cup diced onion
½ cup (or more) diced bell pepper
3 cloves garlic, minced
1 14-ounce can diced tomatoes with green chilies (such as Rotel, or Trader Joe’s fire-roasted tomatoes with green chilies; just use a can of diced tomatoes plus a can of green chilies if you can’t find this)
4 cups low-sodium chicken broth
3 tablespoons tomato paste
4 cups water
2 15-ounce cans black beans, drained
3 tablespoons cornmeal
5 corn tortillas, cut into uniform strips
1–2 ripe avocados, diced
Juice of 1 lime
Sliced green onions to taste
Chopped fresh cilantro to taste
Grated pepper Jack, Monterey Jack, or cheddar cheese to taste

1. Preheat oven to 375 degrees. Mix cumin, chili pepper, garlic powder, and salt in a small bowl. Drizzle 1 tablespoon olive oil on chicken breasts, then sprinkle a small amount of spice mix on both sides. Set aside the rest of the spice mix.

2. Place chicken breasts on a baking sheet. Bake for 20 to 25 minutes, or until chicken is just done. Use two forks to shred chicken. Set aside.

3. Heat 1 tablespoon olive oil in a pot over medium high heat. Add diced onion, bell pepper, and minced garlic. Stir and begin cooking, then add the rest of the spice mix. Stir to combine, then add shredded chicken and stir.

4. Pour in diced tomatoes and chilies, chicken stock, tomato paste, water, and black beans. Bring to a boil, then reduce heat to a simmer. Simmer for 45 minutes, uncovered.

5. Mix cornmeal with a small amount of water (I used a couple of tablespoons). Pour into the soup, then simmer for an additional 30 minutes. Check seasonings, adding more if needed—add more chili powder if it needs more spice (I added some chipotle chili powder at this point, which was an excellent decision), and be sure not to undersalt. Turn off heat and allow to sit for 15 to 20 minutes before serving. Five minutes before serving, gently stir in tortilla strips.

6. Ladle soup into bowls, then top with desired garnishes such as diced avocado, lime juice (to keep the avocado fresher, I recommend tossing it with the lime juice and then adding the mixture to the soup), green onions, cilantro, and grated cheese.

Serves: 8
Time: 2½ hours
Leftover potential: Great; leftovers will keep for at least a week in the fridge, improving with time, and can be frozen indefinitely.

Monday, November 01, 2010

BEER-MARINATED CHICKEN TACOS


Hmm. Instead of “Recipes I Was Too Lame or Indecisive to Post the First Time Around,” how about we place this in the more-adventuresome-sounding imaginary category “Lost Recipes From the Distant Past Unearthed!” I first made this recipe (from the book Weber’s Real Grilling, via Serious Eats) more than a year ago, but I was on the fence about it. It wasn’t earth-shatteringly exciting (seasoned grilled chicken on a corn tortilla with guacamole: couldn’t I have thought of that?), and the flavor had a weird, unpleasant undertone I couldn’t place. In retrospect, I think my sesame oil had gone rancid. It’s not an ingredient I use often (gotta make more wontons and dumpling soup, I guess). So I didn’t take any photos and I didn’t add the recipe to my repertoire, but I still kept it in my “try again” file, and when I recently bought a six-pack of Negra Modelo so I could pour a bottle into a pot of chili, I figured I might as well put another bottle toward trying these again—with a new batch of sesame oil. And the result was quite tasty! Even on the decidedly-not-a-real-grill George Foreman, the exterior of the chicken got crisp and caramelized while the interior stayed moist and flavorful. I still don’t find this recipe especially revelatory, but it’s a quick and easy summer (or summery) meal, and living in a household that loves tacos and guacamole and beer, I’d be foolish not to make it again.

1 cup dark Mexican beer, such as Negra Modelo
2 tablespoons dark sesame oil
1 tablespoon finely chopped garlic
1 teaspoon dried oregano
1 teaspoon kosher salt
½ teaspoon freshly ground black pepper
¼ teaspoon ground cayenne pepper
6 boneless, skinless chicken thighs
2 cups of your favorite guacamole
8–12 small (taco/fajita size) corn tortillas

1. Mix the first seven ingredients (through cayenne pepper) together in a large Ziplock bag or large glass or plastic bowl with a lid. Add the chicken thighs, stirring to coat. Seal the container, removing as much air as possible, and place in the refrigerator to marinate for 2–24 hours (I recommend doing it at least overnight).

2. Grill chicken until fully cooked and browned on both sides. Remove from the grill and allow to rest for 5 minutes, then cut into thin strips.

3. While the chicken is resting, warm tortillas on the grill (or in a dry skillet on the stove) until pliable, about 30 seconds to 1 minute per side. To assemble, spread a heaping spoonful of guacamole along the middle of each tortilla, then pile with chicken slices.

Serves: 4
Time: 30 minutes, plus 2–24 hours marinating time
Leftover potential: OK (store chicken, guacamole, and tortillas separately until ready to eat).

Tuesday, August 03, 2010

SOUTHWESTERN SALAD WITH CILANTRO-LIME VINAIGRETTE


I’ve discussed this before, but I have a weird aversion to green salad recipes. Unless it’s really complex or has an exotic feature (like meat or fruit, or both), I tend to look away, thinking, “Big whoop! Different vegetables on top of lettuce. I could’ve thought of that!” The trouble is, I never do think of it, and just end up eating plain spring mix and dressing 90% of the time. So I’m trying to be more open-minded. I spotted this utterly delicious-looking cilantro-lime dressing at Whipped and immediately bookmarked it (if two flavor combos had to compete for my summer adoration, it would be a cage match between lemon-basil and cilantro-lime), but only later did I think to click through to the original recipe and its accompanying salad at For the Love of Cooking. It looked so fresh and colorful and full of things I love (avocado! corn! black beans!) that it immediately broke through my salad-recipe resistance. With a quesadilla on the side, it made for a delicious and satisfying Summer Salad Night.

Obviously, measurements are approximate (I probably ended up using more corn and black beans, just because I had them), and you can customize however you like to fit your tastes. I didn’t tinker much, except that since we were having quesadillas, I left out the cheese the first time around. But A was a bit underwhelmed by the salad, and at his suggestion, I threw in some extra shredded pepper Jack the next day when we ate the leftovers for lunch (I stored the tomato/onion/pepper/bean/corn mixture, the dressing, the lettuce, and the half-avocado all separately). It added an important creamy/savory/spicy component, so I’ll definitely add it again next time (although I imagine crumbled cotija would also be quite tasty). Although I also skipped the tortilla strips—I had some tortilla chips I thought I’d use, but the pepitas seemed to fulfill the salty/crunchy role well enough— if I had some extra corn tortillas next time, I’d probably cut and bake them and throw them in there. I could also see this being good with pieces of cooked chicken added, if you feel you need more protein to round out the meal. As for the dressing, I might try leaving out the vinegar next time; I was pretty (overly?) enthusiastic with the lime, so that acidity would probably be enough. But it was still utterly tasty, and easy enough to make with my immersion blender that I’d happily try it over just corn, black beans, tomatoes, or even my habitual plain salad greens.

Cilantro-lime vinaigrette:
½ cup chopped cilantro
¼ cup canola oil
1–2 tablespoons fresh lime juice
1 tablespoon apple cider vinegar or red wine vinegar
Salt and pepper to taste
1 clove garlic, minced
½ teaspoon dried oregano

Salad:
1 head Romaine lettuce, chopped
¾ cup cherry or grape tomatoes, halved if large
2 green onions, sliced
2 small red, yellow, or orange bell peppers, diced
½ cup black beans
½ cup fresh (cooked and cut from cob) or frozen (thawed) sweet corn
1 tablespoons raw or toasted pumpkin seeds (pepitas)
1 ripe avocado, diced
¼ cup crumbled cotija or shredded Monterey Jack cheese
1 handful chopped corn chips or baked or fried corn or flour tortilla strips

1. Combine all the dressing ingredients in a blender or food processor (or put them in a small bowl and use an immersion blender). Blend well and then let the flavors mingle for at least 30 minutes before using.

2. In a large salad bowl, combine all the salad ingredients, add the dressing, and toss well.

Serves: 4
Time: 35 minutes
Leftover potential: Low, unless you store the lettuce separately from the dressing and other ingredients.

Monday, July 19, 2010

FISH TACOS


I wanted fish tacos. And lo, I did make them. The End.

Except I’m not sure I know why I wanted fish tacos, considering I’ve eaten them maybe three times before in the course of my life. I’m guessing I just saw them on a food blog somewhere and they suddenly seemed like the most perfect, light, fresh, summery, Southern-California thing to stuff my face with. I’m especially susceptible to the romance of food photography in the summer, the sparkly lemonades, the effortless salads, the insouciant sandwiches, the kicky kebabs, the chic grilled steaks, all prettily arranged on sun-drenched picnic tables looking like they don’t care (bonus points if you know that movie reference), seeming to promise me entrance to some higher plane of casually elegant being where I will nonchalantly produce cool, delicious treats from my kitchen in mere moments without ever breaking a sweat.

Whatever the inspiration, it took me a long time to find a recipe that matched the Ideal Fish Tacos in my head. I wanted the fish to be breaded (I always think of the classic fish taco as being batter-fried, but a lot of online recipes just have you grill or sautée) , but not deep-fried (both for health reasons and because I’m a wuss when it comes to hot oil). Exactly like the panko-coated pan-fried halibut from my beloved fish and chips recipe, actually—in fact, I belatedly realized, I could actually just use that recipe, maybe leaving out the parsley and swapping lime zest for the lemon zest. Perfect! Except that neither Trader Joe’s nor Whole Foods had any halibut last week. I could have used cod, tilapia, or another whitefish, but then I spotted the frozen, pre-battered halibut (basically just fancy fish sticks) at Trader Joe’s and my love for halibut, combined with my laziness, won out. The fish looked to be decent, the ingredients relatively simple and wholesome, and it could be baked in the oven in about 15 minutes. It’s sort of funny that I ended up doing this, because during my intensive recipe search I’d stumbled upon, and rolled my eyes at, this Real Simple fish taco recipe that’s basically the same thing (albeit with Gorton’s fish tenders, which I suspect are several steps down from what I used). Luckily, the end result was really tasty, crisp without being greasy, even though the fish beneath the batter was a wee bit dry. In the future I’ll try breading my own (and forgoing the halibut if I must), but high-quality pre-battered stuff would be acceptable again if I were in a particular hurry.

I also, for some reason, had a really specific vision when it came to the condiments. When I think of classic fish tacos I think of cabbage and a white sauce (usually mayonnaise-based), neither of which I really like very much on their own, but I’ve got to admit they do go well with fish. The fish taco recipes I found online came with a host of varying condiment suggestions, from pico de gallo to pickled onions to mango salsa to guacamole, but my impulse was not to stray too far from tradition—and, for some reason, to avoid normal salsa, because somehow the combination of fish and tomatoes doesn't appeal. I decided to concentrate on the flavors that tantalized me most in the recipes I was skimming, all three of which seemed to marry well with both the fish concept and the taco concept: lime, cilantro, and avocado. I always use broccoli slaw (from Trader Joe’s) instead of cabbage with the fish and chips, so I decided to do the same thing here and found this simple, lime-and-cilantro-laced recipe for a fish-taco-friendly version. Ironically, Trader Joe’s didn’t end up having broccoli slaw that day, so I ended up using shredded cabbage after all—and it was still quite tasty. Then, taking a cue from this excellent recipe from Whipped, I pureed yogurt (the original used sour cream, but I prefer yogurt for most things) with avocado and more cilantro and lime for a fresh, zippy sauce that is also, I might add, addictive on tortilla chips, chili, or just, you know, your fingers.

Considering I cobbled it together from three different sources—and then ended up having to scrap my original plans and improvise thanks to the vagaries of ingredient availability—I’m really pleased with how this meal turned out. I’m not normally an inventive type, and neither A nor I was even certain how much we even liked fish tacos, but I had a dream…OK, that sounds a little grandiose. How about: I had a craving for a fresh and fun summer meal, and I satisfied it exactly. And just for a minute, eating my bright, pleasingly green-and-golden fish tacos and drinking a cold beer, I felt like one of those glossy food-magazine people. Except that we were eating indoors, sitting on the floor in front of the TV, fending cats away from the table, and I was sweating.

One final note: I used a 10-ounce package of fish and halved the slaw recipe and it served two (a generous three tacos apiece), with leftover avocado cream. You could easily scale up the fish amount and make the whole slaw recipe and serve three or four. I don’t think it would be worthwhile to end up with leftovers, though—except for the avocado cream, I can’t see this being good the next day.

Cilantro-lime slaw:
4 cups broccoli slaw or shredded cabbage
⅓ cup thinly sliced green onions
¼ cup chopped fresh cilantro
2 tablespoons fresh lime juice
1 tablespoon olive oil
¼ teaspoon salt

Avocado cream:
1 ripe avocado, peeled, seeded, and chopped
½ cup sour cream or plain yogurt
¼ cup fresh cilantro
Juice of ½ large lime
Salt to taste (a few good pinches)

Pan-fried fish:
1 pound 1½-inch-thick halibut fillets (or cod, tilapia, or another whitefish)
¾ cup panko
1 teaspoon coarse kosher salt
1 teaspoon finely grated lime zest
¼ teaspoon cayenne pepper
2 large egg whites
2 tablespoons dark ale
2 tablespoons olive oil
OR
10 ounces to 1 pound good-quality breaded frozen fish fillets

6–8 corn tortillas

1. To make the slaw, toss together the broccoli or cabbage, the green onions, and the cilantro in a large bowl. Mix in lime juice, oil, and salt and toss well to coat.

2. To make the avocado cream, place the avocado, sour cream or yogurt, cilantro, lime juice, and salt in a food processor or blender and process until smooth.

3. To make fish, cut halibut into sticks and sprinkle with salt and pepper. Heat oil in a large nonstick skillet over medium-high heat. While oil is heating, combine panko, salt, lime zest, and cayenne in a shallow bowl; in a separate shallow bowl, whisk egg whites and ale. When oil is hot, dip fish sticks in ale mixture, turn to coat, and shake off excess; then place fish in panko mixture and turn to coat all sides. Add fish sticks to skillet and cook about 2 minutes on each side, until all sides are golden and fish is opaque in center. Transfer fish to paper towels, sprinkle with salt and pepper, and serve immediately. OR, if using frozen fish fillets, skip this whole step and prepare according to package directions.

4. Heat a skillet over medium heat and warm tortillas on each side for a minute or so, until soft and pliable. Place tortillas on plates and top with a piece or two of fish and generous amounts of slaw and avocado cream.

Serves: 2–4
Time: 1 hour
Leftover potential: Not good, except the avocado cream will last for several days in the fridge and makes a great dip for chips or veggies.

Friday, June 18, 2010

QUINOA SOUP WITH AVOCADO AND CORN


Now this is a quinoa and corn recipe I definitely like! (As opposed to my previous attempt at one, which was just OK.) This was the first time I’d used quinoa in soup, and even though it’s really more of a stew, or even an extra-brothy version of a regular quinoa pilaf (especially in the leftovers, the quinoa absorbs a lot of the liquid), it’s getting me inspired about other ways to use my new favorite grain.

The recipe is from Lorna Sass’ Whole Grains for Busy People (which I’m tempted to check out the next time I’m at the library), via the Seattle Times, via Cheap Healthy Good. It’s extremely easy and quick, making it one of those rare summer-weeknight soups, and has a nice flavor reminiscent of tortilla soup. The avocado and lime are what really do it for me; in particular, something about the creamy texture of the avocado with the toothsome quinoa, the crisp corn, and the savory broth pleased me immensely. I was also impressed that the avocado retained its shape and greenness even after several days in the refrigerator followed by reheating in the microwave. I’ve got to admit that A wasn’t as enchanted, but he also doesn’t really like avocado much unless it’s in guacamole. But it’s a testimony to how much I liked this soup that I’m not too bothered by his lukewarm reaction: this is one of those recipes I’ll keep on making anyway, because he’ll tolerate it well enough at dinner and then leave all the leftovers for me.

Since I’m a lime fan, I altered the recipe slightly so that the lime juice is added to the soup at the end, instead of just using lime wedges as a garnish. I figured this would help prevent the avocado from browning in the leftovers, and it also tasted darn good. I also used lots of salsa and cilantro, and more than 1 cup of corn because I had two big ears of the fresh stuff. I might use a bit more broth next time, just to make it more soup-like. Otherwise, perfect!

4 cups chicken or vegetable broth
1 cup quinoa
1 cup fresh or frozen corn kernels
⅓ cup chunky salsa, or to taste (I used more)
1 large ripe but firm avocado, diced
Salt to taste
¼ cup chopped fresh cilantro, or to taste (I used more)
Juice of 1 lime, plus extra lime wedges for serving if desired

1. In a large pot or Dutch oven, bring broth to a boil over high heat. Add quinoa, reduce heat to medium-high, and cook (still boiling) 15 minutes.

2. Add corn and salsa. Stir. When the soup comes back up to a simmer, turn off the heat and remove the pot from the burner. Add avocado and lime juice and stir gently. Add cilantro, plus salt and pepper to taste. Stir again.

Serves: 4
Time: 30 minutes
Leftover potential: Good

Tuesday, April 27, 2010

AVOCADO, STRAWBERRY, ORANGE, AND ARUGULA SALAD


I’m a latecomer to avocados; I didn’t even start liking guacamole until my college years, when I tasted the good stuff in Mexico. But moving to California, where avocados are so very cheap and good and plentiful (so much so that you might actually know some people who have avocado trees in their backyards and bestow big bagfuls upon you), made me feel contractually obligated to use them, and now I am enamored with them. It helps that our farmers’ market has a cheerful, capable vendor A and I refer to as The Avocado Lady, who has the infallible magical power of selecting precisely the right avocado for you based on size, type, intended use, and when you want to eat it, so that all I have to do is stroll up and say “I’d like something that will be ripe tomorrow night” and I’m presented with a perfect avocado every time.

I don’t have that many avocado recipes yet, though, so I was excited to see this one from Gourmet at The Bitten Word, chock full of ingredients I like and bursting with beautiful bright colors. Since goat cheese tastes like dirt to me (I keep trying, I swear!) I almost skipped the cheese entirely, but I subbed in feta at the last minute and was glad I did; it kept the sweet-savory balance intact. I also ended up using a couple of mandarin oranges instead of a navel orange, because when I sliced open my navel orange it was all tragically dry and stringy (I think that’s the first-ever bad orange I’ve encountered in the six years I lived here), so I squeezed out enough juice for the dressing and discarded the flesh. I actually liked the mandarin orange segments a lot; they were a lot less labor-intensive and held together neatly for tossing and eating. Surprisingly, though, I didn’t really like the dressing here, even though it’s just a lime-orange version of my go-to lemon vinaigrette. Maybe the juice from the rogue orange tainted the whole thing, but I kept tasting the dressing over and over again as I whisked it, and it seemed to vacillate between anemic at best and off-tasting at worst. It didn’t ruin the salad for me because I loved all the other ingredients so much, but it certainly lacked the pizzazz needed to elevate this from “big bowl of cut-up foods I enjoy” to more than the sum of its parts. Perhaps having orange in both the dressing and the salad was overkill, and my taste buds were hoping for a more contrasting flavor? I wonder how the balsamic vinaigrette from the rather-similar-now-that-I-think-about-it arugula and strawberry salad would work with this recipe. I know people routinely eat avocado halves with balsamic vinegar poured in the pit cavity, so it wouldn’t be a crazy flavor combo, right? Or possibly, since I thought this salad also needed a crunchy, earthier element like nuts, I should just merge the two recipes and be done with it. I’ll experiment and let you know how that goes. But regardless, I’ll make this again. It’s a tasty way to get your fruits and veggies in one bowl and will make a refreshing light dinner on a hot summer day.

1 navel orange
1 cup strawberries, sliced or quartered
1 avocado, halved, pitted, peeled and cut into ½-inch pieces
2 teaspoons fresh lime juice, divided

1 tablespoon extra-virgin olive oil
3 cups baby arugula (2 ounces)
2ounces mild goat or feta cheese, crumbled
Salt and pepper to taste

1. Cut peel, including all white pith, from oranges. Working over a small bowl, cut segments free from membranes. Squeeze membranes for more juice so that you have 1½ teaspoons of orange juice in the bowl. In a larger bowl, gently toss together the orange segments, strawberries, avocados, and ½ teaspoon lime juice.

2. To the small bowl of orange juice, add oil, remaining 1½ teaspoons lime juice, and salt and pepper to taste.

3. Toss arugula with dressing, top with avocado-strawberry mixture, and sprinkle with cheese.

Serves: 2–3
Time: 15 minutes
Leftover potential: Poor, unless ingredients are stored separately (but even then, avocado will get brown)

Tuesday, June 09, 2009

GUACAMOLE MY WAY


Our favorite guacamole comes from a vendor at our farmers’ market, but lately it’s been getting too expensive to justify buying. Over $6 for a small container is pretty exorbitant, especially in a city where avocados literally grow on trees (my friend Editor A has one in her backyard). So, last time we had steak tacos for dinner, I decided to make my own guac, using a recipe from my files I hadn’t tried in years. A few of the details gave me pause (lemon juice instead of lime juice? tomatoes? cumin?), but I forged ahead and discovered that apparently my tastes have changed, because the resulting guacamole was...not very good. I mean, we ate it and it didn’t taste bad or anything, but it didn’t hold a candle to the pricy farmers’-market guacamole I’d had fantasies of effortlessly surpassing with my homemade version. FAIL.

So when I was presented with a mess of beautiful avocados from the CSA last week, I was a little worried about doing right by them. I promptly scrapped the old recipe and searched for a better one, but after scrolling through the comments of numerous blog posts and Epicurious entries, I realized that everyone’s guacamole ideal is different—garlic or no garlic (or garlic powder), onions or no onions, cilantro or no cilantro, tomatoes or no tomatoes, lemon or lime or orange juice, peppers or Tabasco sauce or cayenne or no spice at all, not to mention all the other crazy things people confess to adding, including sour cream, cream cheese, and Miracle Whip! In the end, I decided simplest was best. I chose the ingredients I considered to be indispensible—avocado, lots of lime juice, a little garlic (some people find raw garlic too overpowering, but I like it while I’m eating it; admittedly, however, when my mouth tastes like garlic hours later even after I’ve brushed my teeth, I have some regrets), cilantro, and plenty of salt—and concocted my own version. And cripes, it was one of the most delicious guacamoles I have ever eaten, rivaled only by the ur-guacamole I ate on my first trip to Mexico that got me liking guacamole in the first place. We ate the entire bowl for dinner, with just some corn chips for dipping and some corn fritters on the side. And I’m crossing my fingers for more avocados in the CSA box this week, because I can’t wait to make this again.

2 medium, ripe avocados
1 medium clove garlic
Coarse kosher salt to taste
Juice of 1 lime
1 handful minced fresh cilantro (maybe 2 heaping tablespoons?)

1. Peel, seed, and dice the avocados and place them in a medium glass bowl (preferably one that has a lid), but don’t mash them yet.

2. Mince the clove of garlic and sprinkle the garlic with a pinch of coarse salt. Let it sit for a minute or two, then mash it well with a fork until it makes a paste. Scatter the paste over the avocados in the bowl.

3. Add lime juice, cilantro, and coarse salt to taste to the bowl. (At Andy’s behest, I added a few drops of Tabasco sauce—most people use green Tabasco for guacamole, but I only had the red—but I’m not sure it really added anything, and I didn’t miss the spiciness.) Toss everything well, then mash with a fork to desired consistency. Taste for seasonings, adjust as necessary, and mix well.

4. Cover surface of guacamole with plastic wrap to prevent browning (some people, including me, perhaps superstitiously, also put one of the avocado pits in there), cover the bowl with a lid, and refrigerate for at least a few hours so the flavors can blend. I like to take it back out of the fridge about 15–20 minutes before eating, though, so it’s not ice-cold.

Serves: 2 or more
Time: 15 minutes
Leftover potential: Unknown

Friday, January 19, 2007

BLACK BEAN TOSTADAS


Tuesday was about the third time I’ve made these, but I’ve resisted accepting the recipe into my repertoire because (a) It’s somewhat similar to other recipes I make regularly (in that it involves tortillas, cheese, and black beans), and (b) It’s one of those recipes so simple that it’s nearly intuitive, leading me to think, “I could have come up with this! Why do I need a recipe?” But of course, I didn’t come up with this; Cooking Light did. And it’s easy and speedy and delicious—like little personal taco pizzas, basically, with pureed, seasoned, lime-spiked black beans for the sauce.

I think Cooking Light suggested using storebought rotisserie chicken as a convenience, but the reason I find this recipe so genius is that it’s the perfect way to use the extra meat I sometimes end up with after roasting a chicken or making chicken-noodle soup, or even from other recipes with complimentary flavorings, like Israeli Spice Chicken. As with pizza, you can modify the toppings however you like; the original recipe calls for adding shredded lettuce and sour cream after cooking, but we don't use them, preferring instead cilantro and a drizzle of salsa. For extra zest, we also use pepper Jack instead of plain Jack. Although I think the seasonings are just about right in this recipe, it's OK to mess around with a lot of the quantities--the original recipe had very precise measurements, because that's how Cooking Light operates, but I'll admit I don't bother with measuring out exactly 3 tablespoons of cheese or 1/4 cup chicken for each tostada; I just use however much looks like a good amount to cover the tortilla.

The finished tostadas make OK leftovers, but the tortillas don't stay crisp. Sometimes I don’t want more leftovers when my fridge is already packed with them, but it's awkward to halve the recipe because then you end up with a half-can of leftover black beans. Luckily, this recipe is so versatile and easy to assemble that if I don't want 4 tostadas immediately, it's easy to prep all of the components but then only assemble 2 tostadas, storing the extra chicken, tortillas, cheese, and black bean mixture in the fridge all ready for later, perhaps a nice quick lunch on the weekend. (The avocado mixture won't last more than a day or two without turning brown and getting mushy, but you can just use storebought salsa instead if you like.)

Now that I look back at the recipe, I see that it's actually called "Soft Black Bean Tostadas." That's weird to me--a soft tostada? Why call it that when the crisp tortilla crust can be so nice? The original recipe has you broiling the tostadas, but back when my broiler was nonfunctional, I got into the habit of baking them at 450 instead, and this makes the difference--because the heat comes from below when you bake, the tortilla gets crisper while the toppings stay moister. I think this method is preferable, even though it might take a few more minutes. But if you want the "soft," super-quick version, feel free to broil instead.

1 medium avocado, peeled and chopped
1 tomato, seeded and chopped (I've sometimes used about 3/4 cup halved cherry tomatoes instead)
¼ cup thinly sliced green onion
2 teaspoons fresh lime juice
¼ teaspoon salt
2 tablespoons water
2 tablespoons fresh lime juice
½ teaspoon ground cumin
⅛ teaspoon salt
⅛ teaspoon ground red pepper
1 (15-ounce) can black beans, rinsed and drained
4 (8-inch) flour tortillas
1 cup shredded cooked skinless, boneless chicken breast
¾ cup (3 ounces) shredded Monterey Jack cheese (I use pepper Jack)
Salsa and/or cilantro, if desired

1. Preheat the oven to 450 degrees.

2. Combine the first five ingredients (avocado through ¼ teaspoon salt) in a small bowl. Toss gently and set aside.

3. Combine the next six ingredients (water through black beans) in a blender; process until smooth.

4. Place the tortillas on baking sheet(s) and spread ¼ of the black bean mixture evenly over each tortilla. Top each evenly with ¼ cup chicken and 3 tablespoons cheese. Bake until cheese melts and tortilla edges begin to brown.

5. Top each tortilla with ¼ of the avocado mixture (and salsa and/or cilantro, if desired). Cut each tortilla into 4 wedges and serve.

Serves: 4
Time: 25 minutes

Friday, June 24, 2005

PASTA WITH TOMATO, AVOCADO, AND OREGANO


Pasta and avocado? Doesn't that sound kind of weird? Trust me, it's delicious--a nice, easy, no-cook sauce for summer, with a lot of spicy-garlicky bite but then the citrusy freshness of lemon and the soft, creamy green blandness of avocado to cool it down. A doesn't love avocado, so I don't make this too often anymore (even though I try to tell him it's almost got the same ingredients as guacamole, somehow this doesn't inspire confidence in him when I add "...but on pasta!"). But I could feel summer a-comin' in and I wanted avocado, and because I Am The Cook I made it and he ate it. He claimed to like it, too. I loved it.

4 medium ripe tomatoes (about 1 and 1/2 pounds)
2 medium cloves garlic, minced
2 tablespoons minced fresh oregano leaves
1/4 cup olive oil
1 teaspoon salt
1/2 teaspoon hot red pepper flakes
1 pound penne pasta
1 medium avocado (about 1/2 pound)
2 tablespoons fresh lemon juice

1. Core the tomatoes into 1/2-inch cubes. Add these to a large bowl along with the garlic, oregano, oil, salt, and red pepper flakes, and toss everything together. Set this aside for about 20 minutes to allow the flavors to blend.

2. While the sauce marinates, bring a large pot of salted water to a boil and cook the pasta.

3. While the pasta is cooking, peel the avocado and remove the pit, cut the flesh into 1/4-inch cubes, and toss them in a small bowl with the lemon juice and a little salt to taste.

4. When the pasta is al dente, drain it and toss it with the tomato sauce (this can be done in the bowl, if it's large enough, or in the pasta pot). Serve out the portions to serving dishes, then divide the avocado/lemon juice mixture evenly among the servings, arranging it festively atop the pasta.

Serves: 6
Time: 30-40 minutes